From what I've seen recently, the A800 is fine in 4R stereo. Just don't try your luck and hold it in clip!
I'm not sure there's much doubt that with 3x the cone area and 2x the power you won't outperform the BK 🙂
FYI: A800 = 2*240Wrms@4R.
I'm not sure there's much doubt that with 3x the cone area and 2x the power you won't outperform the BK 🙂
FYI: A800 = 2*240Wrms@4R.
Last edited:
From what I've seen recently, the A800 is fine in 4R stereo. Just don't try your luck and hold it in clip!
I'm not sure there's much do
Ta dude. I've no intention of going anywhere near clip, let alone sitting around in it😀
FYI: A800 = 2*240Wrms@4R.
Thanks for that. I knew that the marketing/lies/exaggerations/peak/whatever of 2x400w @ 4Ω, but RMS - that's a handy figure to know. Nice one.
Haven't started the actual making yet, I'm still at the thinking about various ideas stage. I will post some pics along the way though.
I'll pop up a pic of the drivers and my available material after work🙂
I'll pop up a pic of the drivers and my available material after work🙂
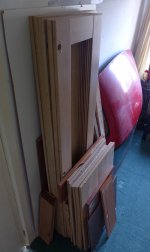
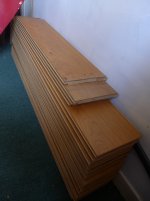
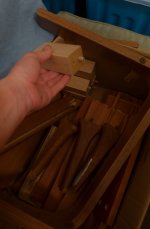
Some pics of what I'm working with here... I got my work cut out for me eh. I'll manage to scrounge some good stuff out of it though, but it'll be a right faff getting all those engineered floor pieces to line up and glue/screw on from the inside. Lucky I got a 15" hole to get the drill through eh😀
There's also a lovely 3m 25x70mm piece of very decent wood for battens and bracing etc.
Anyways, pics below:
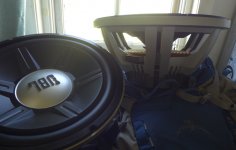
1: Drivers
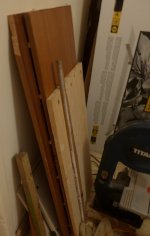
2: The upstairs stash of wood (lots of batten material behind it)
3: The precious stuff protected. Name that roof and win, errrm, some automotive respect.
4: The precious stuff exposed. Loads of it. Enough to make two 55x55cm boxes according to my mother. Was a total hell to squeeze in an S2000 boot.
5: The measly downstairs stash. Some solid wood in there though.
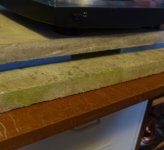
6: A big sheet of 12mm MDF I bought when I thought I was making something else and hadn't been paid in a while. Should've got 16-20 eh. Ahh well, It'll have uses.
8: Got 8 of these sturdy enough with the right screws feet from somewhere.
9: A small part of me wants to use these (cut down a bit) for feet on one though. Tacky as hell.
10: The sturdiest bit of wood of them all I have a couple of them too (one is still on my GF's cupboard... Inch thick and did a great job of sitting under my record player and paving slabs to stop it skipping when i jump around near it.
There's also a lovely 3m 25x70mm piece of very decent wood for battens and bracing etc.
Anyways, pics below:
1: Drivers
2: The upstairs stash of wood (lots of batten material behind it)
3: The precious stuff protected. Name that roof and win, errrm, some automotive respect.
4: The precious stuff exposed. Loads of it. Enough to make two 55x55cm boxes according to my mother. Was a total hell to squeeze in an S2000 boot.
5: The measly downstairs stash. Some solid wood in there though.
6: A big sheet of 12mm MDF I bought when I thought I was making something else and hadn't been paid in a while. Should've got 16-20 eh. Ahh well, It'll have uses.
8: Got 8 of these sturdy enough with the right screws feet from somewhere.
9: A small part of me wants to use these (cut down a bit) for feet on one though. Tacky as hell.
10: The sturdiest bit of wood of them all I have a couple of them too (one is still on my GF's cupboard... Inch thick and did a great job of sitting under my record player and paving slabs to stop it skipping when i jump around near it.
Attachments
-
 P1130785.JPG188.7 KB · Views: 278
 -
 P1130790.JPG435 KB · Views: 185
 -
 P1130792.JPG229.9 KB · Views: 186
 -
 P1130789.JPG382.1 KB · Views: 186
 -
 P1130786.JPG238.2 KB · Views: 81
 -
 P1130805.JPG377.1 KB · Views: 81
 -
 P1130801.JPG372.2 KB · Views: 73
 -
 P1130797.JPG156.5 KB · Views: 75
 -
 P1130795.JPG411.7 KB · Views: 188
in the second to last picture your holding a wooden leg/foot. be careful using that, as it may not hold the weight, the timber may give way around the threaded stud area.
good luck
good luck
in the second to last picture your holding a wooden leg/foot. be careful using that, as it may not hold the weight, the timber may give way around the threaded stud area.
good luck
Yeah they're the feet from super 70's-80's chest of drawers I disassembled / smashed to bits. It's very unlikely I won't just use the rather conveniently perfect 8 other feet, but a little part of me thinks it would be hilarious to have a great big 15" sub box sitting on those, cut down bit. Sort of like The Rock in his wrestling pants, flexing hard, wearing a pair of brown 80's stilettos.
But don't worry, I'll use the much nicer looking 8x ready made perfect legs in the pic before (third to last).
^😀
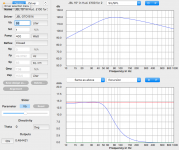
Fair bit of progress on this, in fits and starts. I'm aiming for the internal box to be about 53l as the driver hits xmax at around 51l, and by the time I'm done bracing the thing I (total guess) expect the volume to drop to about 50-51l ish. To be fair, I'm not that bothered as anything from 45-51 gets perfectly useable results when coupled with my miniDSP. And lets be honest, When am I ever going to be pushing the full 400w through the thing? Especially with a 2x4 miniDSP that only outputs 1v to the RCA's at the rear... To get the driver over xmax with only 200w going to it, I'd need a 100l box, with very little flattening of the frequency response curve.
Included is a pic of the 53l box as designed in SpeakerCalc, the only mac software I could find for this stuff, and not bad for beginner use. I expect hornsrep or one of the multitude of windows based programs would outperform it by MILES, but this little £8 app, with a developer who responded to an email RE: one of my speaker designs instantly crashing the software, while a replica of said design was fine telling me where to find the relevant file, how to fix it if I wanted to try myself, and to please send him a copy of the file so he can work out the bug and update the app... Well, that's just fine with me as a first time subwoofer builder. Highly recommended for basic speaker box calculations (and there's more in there I don't yet understand) on a mac. Many thanks to Jonathan Millen for designing this and taking my crash report so seriously. A good chap, a goo app. Hey, I'm a poet and had no idea!
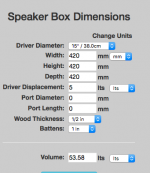
So far, I'm aiming at 420mm (lol 420 blaze it - not really, those days are LONG behind me) cubed designs. I mean, they're already not cubed internally as I'm reinforcing the inside of the top plate and bottom baffle with a slice of 12mm MDF, so it's now already down to a smidge under 50l. I might borrow my boss's hole saw set to swiss cheese that top plate reinforcement to get the volume back up a little... After all, it's still got 16mm of engineered flooring to go on top and I will be bracing these bad-boys PLENTY.
Also included is a pic of speaker box volume calculator showing my workings.
Sorry, i've not taken any pictures of the making of it, i'll be sure to grab some next time i'm working on it. I'm taking a lot of video to edit into a light-hearted video of the realities of first time uk sub building on a budget, and where I'm finding the value!
Bearing in mind these are down firing subs..
Completed so far:
2x Baffle plates, 1"
2x 12mm baffle plate reinforcements
2x top plate reinforcements
1x set of 16mm reclaimed side panels
Still to do:
1x set of 16mm reclaimed side panels
2x top plate
9001x reinforcements for inside the box
Glue & screw all that together
Cut the engineered flooring at 45 degrees for pretty corner joins (not looking forward to that - top joins, not so scary, long side joins, no idea how i'm gonna go that)
mount sub, cut hole for speaker terminal box, wire it up, and then get into all the miniDSP and REW stuff.
That's the meat of the post. If you don't want to read me rambling on for a thick paragraph about how much I want a table saw, feel free to stop reading here 😀
Oh lord do I want a table saw... You watch these Americans and their sub/speaker building youtube videos just ripping through MDF slabs, setting 45 degree angles for perfect corner matchups, and here I am, in my driveway, using my mothers borrowed 20+ year old circular saw and a cheap jigsaw, sawing in the dark, wood clamped to an old coffee table with a woodworkers vice, using wood reclaimed from nasty old cabinets etc etc etc. So far I've not a perfectly straight line on the thing... Wait, that's a bit of a lie, I did work out that if I clamp a long plastic ruler I have exactly 115mm from the desired cut, I can use it as a fence of sorts. Even that cut (on the 1" really tough baffle wood) needed trimming though as this method requires I cut with quite a lot of stick-out - my small clamps, from knife making not woodwork proper, can't reach around wood/ruler/table- and without a decent support on the other end of the piece being cut, well, I haven't quite mastered that technique yet.
So far, this is all practice for when I have to make critical straight cuts.
Any UK chaps on here with a recommendation for a cheap (£100-£200) table saw do let me know!!!!
Even if ordered now it wouldn't get here till it's time for the engineered outer to go on... But that'd be a godsend. I can probably cut a passable (with wood filler) 45° in a mitre box I have on loan... Great news for the top of the box... But a 45° cut all the way down the EDGE of one of these flooring panels? No chance!
Anyways, I don't think this will be my last speaker build project.
Thanks for reading, and thanks for all the help so far!
As much as I wasn't sure about these as my driver of choice, I'm really coming around to the construction of the things, they're HEFTY, and those cast aluminium *whatever-they're-called* things look pretty dam sexy!These nice looking JBL's deserve plexiglass enclosures!
Fair bit of progress on this, in fits and starts. I'm aiming for the internal box to be about 53l as the driver hits xmax at around 51l, and by the time I'm done bracing the thing I (total guess) expect the volume to drop to about 50-51l ish. To be fair, I'm not that bothered as anything from 45-51 gets perfectly useable results when coupled with my miniDSP. And lets be honest, When am I ever going to be pushing the full 400w through the thing? Especially with a 2x4 miniDSP that only outputs 1v to the RCA's at the rear... To get the driver over xmax with only 200w going to it, I'd need a 100l box, with very little flattening of the frequency response curve.
Included is a pic of the 53l box as designed in SpeakerCalc, the only mac software I could find for this stuff, and not bad for beginner use. I expect hornsrep or one of the multitude of windows based programs would outperform it by MILES, but this little £8 app, with a developer who responded to an email RE: one of my speaker designs instantly crashing the software, while a replica of said design was fine telling me where to find the relevant file, how to fix it if I wanted to try myself, and to please send him a copy of the file so he can work out the bug and update the app... Well, that's just fine with me as a first time subwoofer builder. Highly recommended for basic speaker box calculations (and there's more in there I don't yet understand) on a mac. Many thanks to Jonathan Millen for designing this and taking my crash report so seriously. A good chap, a goo app. Hey, I'm a poet and had no idea!
So far, I'm aiming at 420mm (lol 420 blaze it - not really, those days are LONG behind me) cubed designs. I mean, they're already not cubed internally as I'm reinforcing the inside of the top plate and bottom baffle with a slice of 12mm MDF, so it's now already down to a smidge under 50l. I might borrow my boss's hole saw set to swiss cheese that top plate reinforcement to get the volume back up a little... After all, it's still got 16mm of engineered flooring to go on top and I will be bracing these bad-boys PLENTY.
Also included is a pic of speaker box volume calculator showing my workings.
Sorry, i've not taken any pictures of the making of it, i'll be sure to grab some next time i'm working on it. I'm taking a lot of video to edit into a light-hearted video of the realities of first time uk sub building on a budget, and where I'm finding the value!
Bearing in mind these are down firing subs..
Completed so far:
2x Baffle plates, 1"
2x 12mm baffle plate reinforcements
2x top plate reinforcements
1x set of 16mm reclaimed side panels
Still to do:
1x set of 16mm reclaimed side panels
2x top plate
9001x reinforcements for inside the box
Glue & screw all that together
Cut the engineered flooring at 45 degrees for pretty corner joins (not looking forward to that - top joins, not so scary, long side joins, no idea how i'm gonna go that)
mount sub, cut hole for speaker terminal box, wire it up, and then get into all the miniDSP and REW stuff.
That's the meat of the post. If you don't want to read me rambling on for a thick paragraph about how much I want a table saw, feel free to stop reading here 😀
Oh lord do I want a table saw... You watch these Americans and their sub/speaker building youtube videos just ripping through MDF slabs, setting 45 degree angles for perfect corner matchups, and here I am, in my driveway, using my mothers borrowed 20+ year old circular saw and a cheap jigsaw, sawing in the dark, wood clamped to an old coffee table with a woodworkers vice, using wood reclaimed from nasty old cabinets etc etc etc. So far I've not a perfectly straight line on the thing... Wait, that's a bit of a lie, I did work out that if I clamp a long plastic ruler I have exactly 115mm from the desired cut, I can use it as a fence of sorts. Even that cut (on the 1" really tough baffle wood) needed trimming though as this method requires I cut with quite a lot of stick-out - my small clamps, from knife making not woodwork proper, can't reach around wood/ruler/table- and without a decent support on the other end of the piece being cut, well, I haven't quite mastered that technique yet.
So far, this is all practice for when I have to make critical straight cuts.
Any UK chaps on here with a recommendation for a cheap (£100-£200) table saw do let me know!!!!
Even if ordered now it wouldn't get here till it's time for the engineered outer to go on... But that'd be a godsend. I can probably cut a passable (with wood filler) 45° in a mitre box I have on loan... Great news for the top of the box... But a 45° cut all the way down the EDGE of one of these flooring panels? No chance!
Anyways, I don't think this will be my last speaker build project.
Thanks for reading, and thanks for all the help so far!
Attachments
Last edited:
Router with a roller bit might be the ticket for you.
My woodworking isn't fantastic, but a flush trim bit followed by a roundover makes things look pretty "pro".
Chris
My woodworking isn't fantastic, but a flush trim bit followed by a roundover makes things look pretty "pro".
Chris
A quick anecdote, based on the whole "and here I am, in my driveway... sawing in the dark..." bit of that post:
Last Saturday I was in full on ADHD project focus mode - dark? DARK CAN'T STOP ME! It's only 21:00...
I set up my little battery powered light, pop on a flat cap and a head torch, and get to work with the circular saw...
Great progress, and at about 22:30 I decide it's time to stop using that foghorn of a saw for the neighbours sake, and pack away. I'm unusually tired too, better not make any stupid mistakes etc, dangerous using power tools when so tired.
I get up to my room (the GF is usually sleeping in her back room retreat, what with her corona risk level etc)... Flip open my computer, and look at the time....
02:45.
Turns out, as I smashed my smartphone a week or so back, and have been using my old dumbphone* for a while, I'd never set the time on it. My 22:30 was the rest of the worlds 02:30.
I apologised to my neighbour the next morning via text... I'm lucky to have such a chill neighbour. Honestly, I get away with audio murder, and she gets away with having lord knows how many screaming kids still living at home😀
She said she thought there was a tractor working a couple fields over... Then she thought it sounded like someone sawing... Considered texting me to see if there was some funny business going on out in the fields or whatever... Then fell asleep.
We had a laugh and conversation moved on to her buying a new Tesla model 3😀
God daaaaaaam I'm lucky to have such a chill neighbour!
*Dumbphones are actually AMAZING for two things, weight and size that has me patting my pocket regularly to make sure it's still there, and that battery life... Oh that battery life. But when you absolutely have to know what a basic speaker level high-pass filter circuit looks like and you're half way through rolling a field, NOPE.
(also texting on that thing makes my thumbs ache)
Last edited:
Router with a roller bit might be the ticket for you.
My woodworking isn't fantastic, but a flush trim bit followed by a roundover makes things look pretty "pro".
Chris
Yep... Also very high on my wish list.
A router with selection of bits for:
Cutting perfect round holes for driver mounting...
Stepped edges for flush mounting drivers...
And of course the flush trim followed by roller "beautiful roundover" bit you mention (I don't know the proper names but I'll figure them out when I buy one!)
All pretty dam high on my list too.
Wouldn't be applicable for this project now that I've already cut all the big round holes with a jigsaw, but yep, I hope to be owning one of those someday soon-ish too.
Bought a table saw. Not the cheapest, but a couple steps up in price.
Got it from screwfix, apparently it's coming "direct from their suppliers"... Lets hope their suppliers aren't all at home on corona holiday... Or at the very least I really hope it turns up while I'm still building these subs!
Got it from screwfix, apparently it's coming "direct from their suppliers"... Lets hope their suppliers aren't all at home on corona holiday... Or at the very least I really hope it turns up while I'm still building these subs!
A question about bracing in these subs. Ideally i'd love to leave one of the side panels off while I glue/screw it all together have incredible access to the inside to make all sorts of precision fit bracing here there and everywhere, then glue/screw the panel back on. My worry is probably fairly obvious - What If I misalign something, squeeze a brace in a little tight, and one way or the other, the open side panel either too wide or slim.
So many questons, this speaker buildin siht is deep, but a lot of fun.
If anyone has any recommendations of a chaep delivered router, I'd very much love to hera your thoughts:
So many questons, this speaker buildin siht is deep, but a lot of fun.
If anyone has any recommendations of a chaep delivered router, I'd very much love to hera your thoughts:
Ps.. @Studley
While I was genuinely unsure about these drivers vs spending a lot more (a LOT) to get exactly what I wanted for perfection, the more I look at them, model them, handle them etc. The more I like them. What I said about "glad you met me half way at £90 as that's all the cash we had in the house" was true, albeit a joke too, I didn't want you getting the impression I was bullsihtting you in any way about my decision to by them. I'm very glad I did now, and you were indeed rifght - £100 the pair would have beeen more a fair price. i just wish I could hae heard you martin logan / what's-his-name setup🙂
I maybe back for one of the remaining pair for another bedroom setup, provided I can find the right plate amp.
Thanks dude.
sorry james i havent been keeping an eye on this thread.
you need not have got the table saw, you could use a straight edge and a new circular saw blade to get cuts that are good enough. you should have messaged me and i'd have given you step by step instructions.
you need not have got the table saw, you could use a straight edge and a new circular saw blade to get cuts that are good enough. you should have messaged me and i'd have given you step by step instructions.
sorry james i havent been keeping an eye on this thread.
you need not have got the table saw, you could use a straight edge and a new circular saw blade to get cuts that are good enough. you should have messaged me and i'd have given you step by step instructions.
Ah yes, I've done that that a couple times... My plastic ruler, upside down, clamped 115mm from the desired cut. Problem for me is that my selection of clamps is all on the very small side, meaning I have to have a fair bit of stick-out of the piece i'm cutting, as I'm using a woodworkers vice to clamp to a wobbly old coffee table and my clamps won't reach that thick. On uneven ground, supporting the stuck-out end becomes critical - this is where my selection of knackered old furniture never seems to be enough to have something remotely the right height😀
Plus at some point I'm going to have to make lengthways (500mm ish) 45° cuts on those pieces of engineered flooring, and there's no way my bodegy-**** setup was going to manage that to my satisfaction.
I appreciate the help, but in this case a table saw kills a few birds with one stone for me here. Reliable 45° cuts length ways down the engineered flooring, a solid base to work on, no faffing about with clamps, long overhangs, and supports. Most importantly it will hopefully remove a fair bit of the "concentration factor" which means a mellower Jjams making fewer stress induced mistakes.
Once again, any and ALL help and/or advice is much appreciated, so don't stop coming up with good ideas
Wow, so I fell asleep half way through posting pics of where I'm up to... I'm absolutely exhausted lately.
Unfortunately "token expired" before I got the chance to copy/paste/post it, so gone. No great loss though. Here it is again. Temper your expectations... It's no work of art... Yet.
Pics:
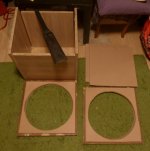
1: Wood cut and ready for the inner box so far:
- 2x1" baffle chunks for the down firing woofers and feet.
- 2x12mm baffle chunk backers
- 2x top piece backers... Which I may go nuts on with a hole saw, old-school race car style. I'm going to be bracing the top and sides like crazy, and the reduction of 12mm they introduce reduces my internal volume by a surprising amount, IIRC.
- 4x16mm side panels to form the "box" of one speaker. Remember, these will be covered (glued and screwed) with engineered flooring of another 16mm, for a total of 32mm laminated/glued/screwed box walls.
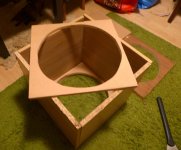
2: A very structurally unsound mock-up of the side plates and baffle/backing in place. I will probably use some battens (right word, spelling?) at least partially (as wood allows) or triangular corner bracing on this stuff. It's in decent shape, fairly heavy, but I don't trust it like I trust the 1 inch baffle plate or the brand new 12mm MDF.
The Finished articles will be sanded then given a good coat of boiled linseed oil. They should, if I can learn carpentry fast enough, look quite beautiful.
One thing I'm struggling with is when to make and fasten in the bracing/battens/triangles. I'll need access to the inside, with a drill... which panen do I leave off while doing that? More to the point, I think I'm going to have to glue/screw the final fake solid oak wood flooring before I put all the bracing in, leaving me with a risk of tweaking something out of alignment. My gut says it has to be the baffle/backing plate... as I'll also need to secure the feet to that (access to where they go is already compromised) and if I make it right, and I hope I do, I can glue/screw that on last to a multi-layered selection of corner bracing - there's no space in the centre of the baffle for that.
Any thoughts on the matter, let me know. I really hope my table saw arrives before I have to start doing all this stuff, as precision straight and 45° cuts will be essential (ok maybe a smidge of diy wood filler here and there).
Unfortunately "token expired" before I got the chance to copy/paste/post it, so gone. No great loss though. Here it is again. Temper your expectations... It's no work of art... Yet.
Pics:
1: Wood cut and ready for the inner box so far:
- 2x1" baffle chunks for the down firing woofers and feet.
- 2x12mm baffle chunk backers
- 2x top piece backers... Which I may go nuts on with a hole saw, old-school race car style. I'm going to be bracing the top and sides like crazy, and the reduction of 12mm they introduce reduces my internal volume by a surprising amount, IIRC.
- 4x16mm side panels to form the "box" of one speaker. Remember, these will be covered (glued and screwed) with engineered flooring of another 16mm, for a total of 32mm laminated/glued/screwed box walls.
2: A very structurally unsound mock-up of the side plates and baffle/backing in place. I will probably use some battens (right word, spelling?) at least partially (as wood allows) or triangular corner bracing on this stuff. It's in decent shape, fairly heavy, but I don't trust it like I trust the 1 inch baffle plate or the brand new 12mm MDF.
The Finished articles will be sanded then given a good coat of boiled linseed oil. They should, if I can learn carpentry fast enough, look quite beautiful.
One thing I'm struggling with is when to make and fasten in the bracing/battens/triangles. I'll need access to the inside, with a drill... which panen do I leave off while doing that? More to the point, I think I'm going to have to glue/screw the final fake solid oak wood flooring before I put all the bracing in, leaving me with a risk of tweaking something out of alignment. My gut says it has to be the baffle/backing plate... as I'll also need to secure the feet to that (access to where they go is already compromised) and if I make it right, and I hope I do, I can glue/screw that on last to a multi-layered selection of corner bracing - there's no space in the centre of the baffle for that.
Any thoughts on the matter, let me know. I really hope my table saw arrives before I have to start doing all this stuff, as precision straight and 45° cuts will be essential (ok maybe a smidge of diy wood filler here and there).
Attachments
Last edited:
Ps.. @Studley
While I was genuinely unsure about these drivers vs spending a lot more (a LOT) to get exactly what I wanted for perfection, the more I look at them, model them, handle them etc. The more I like them. What I said about "glad you met me half way at £90 as that's all the cash we had in the house" was true, albeit a joke too, I didn't want you getting the impression I was bullsihtting you in any way about my decision to by them. I'm very glad I did now, and you were indeed rifght - £100 the pair would have beeen more a fair price. i just wish I could hae heard you martin logan / what's-his-name setup🙂
I maybe back for one of the remaining pair for another bedroom setup, provided I can find the right plate amp.
Thanks dude.
That’s OK you can give me £110 to balance the books when you buy the other pair 😉. I’m actually toying with the idea of using the other pair myself to make a sub in push-push configuration.
- Home
- Loudspeakers
- Subwoofers
- UK subwoofer building - Where's the value at?