You have some speakers that are a step up in quality from the majority of studio monitors. Seriously.
Now, you're saying that vocals don't quite come through as you think they should. That could be down to a whole load of factors - anything from the way the music was mixed/mastered, through to the speakers themselves, and also your own expectations and biases.
I really do think it's time to start measuring things and see where you're at. We're trying to figure out what you're after, with only vague descriptions from you. That's not an insult. "Vocals not sitting right" is nowhere near as precise as "I have a 2.5dB dip from 1-2.5kHz".
I don't like quoting my own posts, but I do think this bears repeating. For very much less than the cost of one of your drivers, you could be measuring them.
I'd start with REW, which is free. You'll need a way of connecting a laptop (or desktop, if you can be bothered to drag it out) to the HiFi system, and you'll need a measurement mic.
A Behringer ECM8000 is cheap, and usually good enough to get you started. Combine that with a UMC202HD soundcard. Add an XLR cable, and you're set.
I must admit that if I was to choose a set of HiFi speakers for an acoustically reflective room, I would have seriously considered compression drivers with horns, or at the very least a waveguide for the tweeter. By focusing the sound on a narrower area, you gain efficiency (or give the HF driver an easier life) and avoid throwing excess sound at the side walls.
If you're near Sheffield, give me a shout. I have the measurement gear around. We'll have to work something out WRT the virus.
Chris
Hello again Chris,
I've finally received the equipment that you recommended and have spent a few hours getting set up, but I've given up and have absolutely no clue whatsoever how to set it up or make it work. In summary, I have the UMC202HD, the ECM8000 microphone and REW software. I'm really struggling to connect my laptop to the hifi, having bought a USB to USB (to connect into the USB connection in my Cyrus Streamline 2), I can't get anything to play through that port and I have since noted the Cyrus instructions specifically state in bold that a computer is not to be connected through there.
Subsequently, I have an RCA cable from my laptop headphone jack to a direct input into the DAC XP preamp. This works, as I can play YouTube through it.
And thats it, I have no idea whatsoever what to do from here and cannot understand the instruction on the REW software. The first thing it is asking me is to do is a calibration against an 'SPL meter' whatever one of those are. It keeps telling me that the levels are too low. I also can't output any sound (i.e YouTube to the hifi) when I have the UMC202HD connected to my laptop, as the laptop is trying to output sound to that rather than through the headphone jack/hifi.
I also have no idea whether I should be playing music through the speakers and measuring the sound form there, or using some REW generating sound, whether I am doing both speakers or individual ones, where to place the microphone etc etc. I've no idea what to measure, what an SPL meter range is and how to calibrate it, how to get the input levels to 75dBL or anything else that the software is telling me to do.
Is there any guide in plain English that I could refer to?!!! I can't even identify what the 'UMC202HD' actually is. I've no idea what it does and the manufacturer doesn't seen able to describe what it actually is or does other than an 'interface'. I'm sticking to designing bridges in future!!!!!!!!!!!!!!!!!!!!!!!!!!!!!!!!!!!!!!!
All help welcome.
Rant over.
Thank you.
Alex
Does your operating system recognize your new usb sound card as such?
Is this a windows machine?
Is this a windows machine?
I've managed to play around with a lot of settings and get something to work. I'm not sure if it is correct or not, but I have some graphs at least.
I'm also not sure what I should be measuring and where, so I've made a few different measurements.
Does any of this make sense or is it more helpful if I overlay them?
I'm also not sure what I should be measuring and where, so I've made a few different measurements.
Does any of this make sense or is it more helpful if I overlay them?
Attachments
-
 Main listeneing position 6m distance.jpg84.5 KB · Views: 226
 -
 Second listening position 8m distance.jpg83.2 KB · Views: 201
 -
 Left speaker 1.2m both speakers on.jpg94.1 KB · Views: 197
 -
 Right speaker 0.4m both speakers on.jpg97.9 KB · Views: 194
 -
 Left speaker only 1.2m distance.jpg97.4 KB · Views: 194
 -
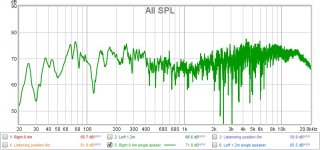 Right speaker only 0.4m distance.jpg86.6 KB · Views: 61
Apologies that I missed your post asking for help.
To answer some questions for you:
- The UMC202HD is a box that allows some audio input and output to your laptop, connected by USB. That particular unit allows 2x microphones to be connected (condenser microphones, like the ECM8000, will need phantom power - there's a +48v switch on the back), and has a couple of audio outputs including 1/4" jack stereo (headphone socket on the front) and 2x balanced 1/4" jacks (line out on the back).
- The UMC202HD allows you to adjust the input and output gains to get the signal levels where you want them. With a typical measurement mic, having the mic input at around 12 o'clock will be somewhere about right.
- Do not press the "direct monitor" button. Ever. What that does is route the microphone inputs to the outputs, which is useful for recording, but very very bad if you're trying to do measurements.
- Calibrating to an SPL meter just means the decibel numbers on the graphs are accurate. It's not necessary for most of what you're doing. What we care about here is whether your midrange is 5dB down on the treble, not whether it's reported at 65dB or 105dB.
- Apply smoothing to your graphs. 1/24 octave will clean things up. I usually go to 1/12th or 1/6th-octave.
When it comes to measurements, I find it useful to have the following:
- Nearfield LF response. ie, mic within an inch of the cone - remember you'll need to reduce the mic gain on the UMC202HD to avoid overload. Tells you what the anechoic LF response looks like. Useful for making sure the cabinet is tuned as it should be.
- Mid-field full-range response, on acoustic axis, and a couple of steps off-axis horizontally. Gives an idea of how the drivers are integrating, without too much of the room. In your case, use a distance of about 0.5-1m. Larger speakers will need larger distances, while smaller speakers can be closer.
- Far-field full-range response, at listening position. Tells you how the room & speakers are interacting together.
Generally, I'll EQ the far-field LF response and use the mid-field response to optimise crossovers.
Looking at your measurements, I'd say there's work to be done for sure. Try the mic positions I've suggested, apply a bit of smoothing, and see where you are.
Chris
PS - The apparent dip in the midrange (1kHz-ish) might give us an idea of why the vocals aren't right, but there's a lot of mash in those graphs, so difficult to say for sure.
Last edited:
Thanks for your reply Chris. The direct monitor was 'on' so I will do a new set of measurements with it off and your recommendations. A few questions please:
1. The only way that I've managed to connect my laptop to the Cyrus preamp is through my headphone jack into an RCA connection on the Cyrus - is this good enough?
2. For the nearfield LF response, which cone an I measuring it against - just one of the woofers or both and do I turn off the other speaker completely and the HF on the speaker that I'm measuring?
3. Mid field - when you say off axis, do you mean off the the side i.e. not directly in front of the speaker?
Thanks
No problem. If the "direct monitor" button is to present a problem, it'll be in the form of acoustic feedback, which is unpleasant for us and potentially damaging for the speakers. I've heard of someone walking in front of a PA system with a wireless mic and taking out all the compression drivers with a loud "SNAP".
In response to your questions:
1 - You should be able to go from the UMC202HD's headphone socket (you'll need a big-to-small jack adapter). That'll bypass any crap that might be sitting on the laptop's headphone socket. There's not always something there, but I've seen laptops with 12dB/oct highpass filters at 150Hz on the headphone out before. No bypass.
2 - Doesn't matter, just pick a cone. Try both if you feel like it. I can't remember if your speakers are ported, but try the mic at the port as well.
3 - Yep, off to one side a little. Try 20 and 40 degrees off to the side (compared to directly on-axis), only passing signal to the speaker under test.
Chris
Thanks, I'll get an adapter tomorrow. Just to make sure, cause I'm thick:
1. The mic is plugged into the UMC input
2. The UMC is plugged into my laptop via USB
3. I should connect the UMC headphone jack directly to my Cyrus
4. There should be nothing connected to the two 'output ' jacks on the back of the UMC
If that is correct, do I need to change the REW preferences input and output devices to the UMC?
Chris,
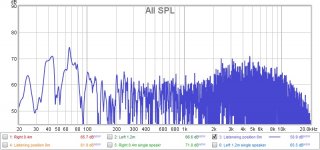
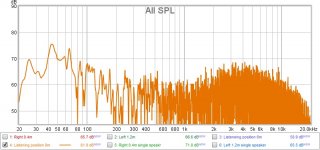
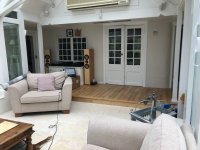
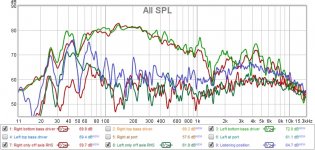
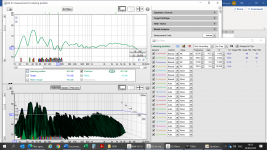
Right, I think that I got everything set up correctly and changed the input and output to the UMC. Please see the measurement results below. I hope that it isn't too messy with them all being on one graph? I've also taken a photo from my listening position, showing just how impossible my room actually is! There's nothing that I can do about this so will have to make the best with what I have. I can move the right speaker over to the right more, closer to the door. I've no idea why it is displaying up side down as it is the correct orientation on my laptop.
I also took a measurement at each port as you said. This is at the back at the end of the 'transmission line'.
Do I need to change the graphs to make them more readable?
Thanks
Alex
Attachments
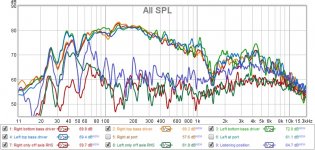
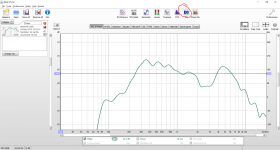
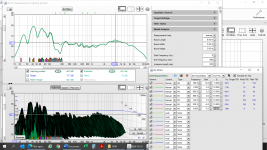
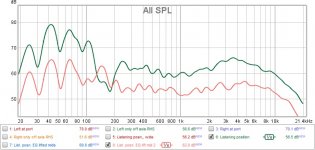
Your measurements look pretty reliable. Well done.
Separating out the measurements a little would be useful, though. It looks like the bottom red and green curves are the left & right speakers off-axis, and the nearby violet line is at the listening position. Is that correct?
If so, it looks pretty obvious why the vocals don't sound great - the 200Hz-1kHz range is recessed, followed by a bump centred on 4kHz. The LF response looks pretty choppy, too.
If you've got music on your laptop, install Equaliser APO and use REW to (manually) come up with some EQ settings and see how that goes. If you like the flatter result, then it's worth modifying the crossovers to get a similar response.
Chris
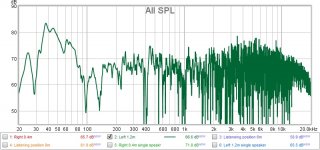
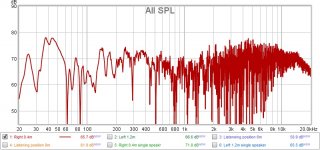
Chris,
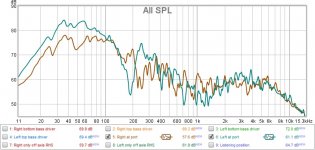
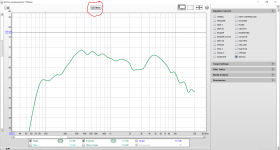
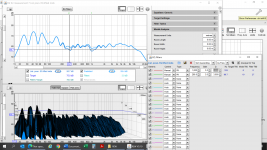
That is correct. I've made them a bit simpler as follows:
Simplified graph - Top red and green are at the bass driver, purple listening position and bottom red and green are off axis
At driver and listening position - listening position in purple. Ignoring the fact that the purple is more like a roller coaster than the at driver measurements, the line is more horizontal than the at driver measurements, which surprised me.
At driver and off axis - the top two are at driver.
I'll have a go with Equaliser APO.
Alex
Attachments
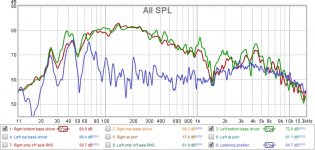
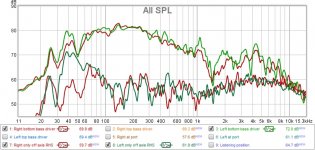
Well, when you close-mic a driver, you get a decent idea of what that one particular driver is doing. The response shape is as I'd expect:
- At the bottom end, the port helps
- In the 100-300Hz range, baffle step generally reduces the level.
- Towards the top of the band, another driver comes into play, so the response ought to roll off.
Anyway, that's largely irrelevant. What matters is how the speakers sound in-room, and the mid- and distant-mic'd measurements matter more there.
If you apply smoothing to get rid of more of the fuzz (try 1/12th or 1/6th octave), you'll have an idea of the EQ shape needed. See if you can get it done in two bands for a start - broad strokes.
Once you've got EQ set where REW says the output will be nice and flat, have a listen. Chances are it'll sound like an AM radio initially, if you're used to all that bass and lower-treble.
Give it 10-15 minutes of good listening to allow your ears to adjust to the new sound, and then break out the reference tracks which you know well.
I have an idea of what you'll think about the result, but I don't want to suggest anything that might influence your perception. Give it a try, see what you think.
IMO, you're on a good path. You've got a set of excellent drivers and a measurement mic. Good results are in reach.
Chris
Ok, I've done as you said. Its hard to make a good comparison as the sound quality of a track played through Tidal on my Cyrus Streamline is far far superior to the same track played through Tidal on my laptop, as you would expect.
However, the vocals are definitely clearer, or more in the foreground, with the equalizer adjustments, but it sounds a bit 'monotone' or AM as you described it. Not sure how else to describe it, a bit boring and linear perhaps?
It feels like the frequencies that you've identified above need lifting, but only slightly to stop the sound becoming boring - does any of this make any sense!!?
To be honest, using the Behringer USB interface, I wouldn't expect a whole lot of difference in quality between that and the Cyrus.
Can you share your EQ settings, and a screenshot of the REW EQ simulator?
What you're saying makes sense. Give it a while for your ears to adjust, and see what you think after that.
Chris
Can you share your EQ settings, and a screenshot of the REW EQ simulator?
What you're saying makes sense. Give it a while for your ears to adjust, and see what you think after that.
Chris
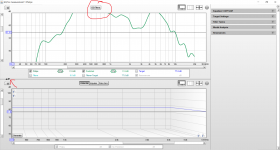
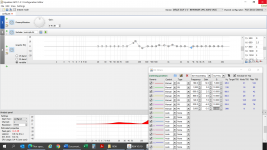
Ah. I think I've not been using the software correctly as I didn't know about REW EQ simulator but have just found it. Having a look at it, I've no idea how to use it so I'll have to have a play around with it.
What I did previously was look at the SPL graph at the listening position, then manually adjust the graphic equalizer in Equalizer APO to lift the frequencies approx. by the amount they dipped in the SPL graph, if that makes sense, mainly 100-200Hz and 800-1800Hz.
Anyway I've scrapped that and started looking at the REW room sim - is the attached graph the one which I'm interested in?
I really appreciate your patience with me by the way!
Anyway I've scrapped that and started looking at the REW room sim - is the attached graph the one which I'm interested in?
I really appreciate your patience with me by the way!
Attachments
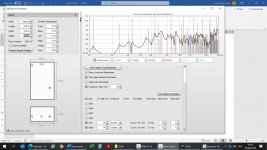
The images attached should help. This was just the frequency curve of an old bluetooth speaker I had lying around, which clearly needs some work.
Don't bother with the auto-EQ or anything like that. It usually throws 10+ filters at something that can be "close enough" with two.
If I had to guess at yours, I'd say a wide cut at 80Hz and 4kHz would do the job. Remember, if you use EQ to boost things, you'll need to drop the overall level to avoid digital clipping.
Chris
Attachments
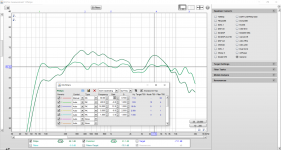
Right, I've finally made some good progress.
Initially, I tired to lowers the lows and highs around the values that you suggested, but I couldn't get a decent curve without creating many more filters.
Instead I tried to lift the mids. All I can say is wow, what a transformation. Although only a series of small changes, the overall effect has been to really lift the vocals and in general make the music much more three dimensional, it's like switching between mono and stereo!
Is it worth me doing any more iterations or are there diminishing returns? I'm conscious that whatever adjustments I make I need to do the same with my crossover equipment at some point!
The attachments are:
Equ lower 80 & 4000 1a & b = lowering lows and highs at values you suggested
Equ lifted mids iteration 1a & b = lifting mids iteration 1
Equ lifted mids iteration 2a & b = lifting mids iteration 2
Equ lifted mids iteration 2c = recording the values of the equalizer (so I dont forget them)
Equalizer = iteration 2 measured at listening position (in pink, original measurement in green)
Attachments
-
 Equ lifted mids iteration 1b.png561.5 KB · Views: 49
 -
 Equ lifted mids iteration 2c (shows values).png369.6 KB · Views: 56
 -
 Equ lifted mids iteration 2b.png444 KB · Views: 52
 -
 Equ lifted mids iteration 2a.png541.8 KB · Views: 59
 -
 Equ lifted mids iteration 1a.png349.2 KB · Views: 53
 -
 Equalized.jpg87.3 KB · Views: 61
 -
 Equ lower 80 & 4000 1a.png616.3 KB · Views: 64
 -
 Equ lower 80 & 4000 1b.png418.2 KB · Views: 58
- Home
- Loudspeakers
- Multi-Way
- Thor speaker – lots of help needed please!