Phwoaar!!!!
they might be rather big.....
Oh Dave! Don't forget to put felt on the front of them like Wilson Audio!!! LOVE 'EM
Stroop
they might be rather big.....
Oh Dave! Don't forget to put felt on the front of them like Wilson Audio!!! LOVE 'EM
Stroop
Would the Visaton BG 20 be suitable in the Metronome?
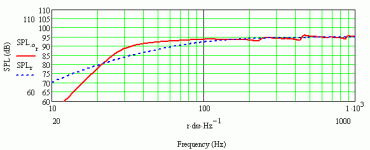
Technical Data:
Rated power 40 W
Maximum power 70 W
Nominal impedance Z 8 Ohm
Frequency response fu–18000 Hz
(fu: Lower cut-off frequency depending on cabinet) .
Mean sound pressure level 92 dB (1 W/1 m)
Maximum cone displacement 8 mm
Resonance frequency fs 38 Hz
Magnetic induction 1,2 T
Magnetic flux 380 µWb
Height of front pole-plate 4 mm
Voice coil diameter 25 mm
Height of winding 8 mm
Cutout diameter 184 mm
Net weight 1,3 kg
D.C. resistance Rdc 6,2 Ohm
Mechanical Q factor Qms 3,47
Electrical Q factor Qes 0,51
Total Q factor Qts 0,44
Equivalent volume Vas 110 l
Effective piston area Sd 214 cm²
Dynamically moved mass Mms 10 g
Force factor Bxl 6,1 T m
Inductance of the voice coil L 0,8 mH
Heat resistance −25 ... 70 °C
Thanks!
amk
I'll try -time is the problem. I've got a fair few things on the go at present, not least of them being the lectures I have to write, and my PhD thesis so I'm playing catch-up with audio at the moment. FWIW, it'll need a fairly big box.
THANKS Scottmoose!
Scottmoose said:This do you?
Line 60in
Zdriver 30in
So = 4in x 5.5in (WxD)
Sl = 14in x 12in (WxD)
Vent = 3in diameter, 2in long. Usual damping proceedure applies.
Hello...
I was looking for the dimensions of a FE207E-Metronome and didn't find it.
Is it possible that noone tried it with that great Fostex? Unbelieveable!!!
I was looking for the dimensions of a FE207E-Metronome and didn't find it.
Is it possible that noone tried it with that great Fostex? Unbelieveable!!!
You're welcome. Let us know how they pan out.
FE207E Metronome? We did one of those months ago. Have you seen the Metronome pages? http://www.frugal-horn.com/metronome.html
and if you go to the tables section: http://www.frugal-horn.com/metronome-table.html you'll find all the information necessary to build a pair, complete with CAD diagram.
FE207E Metronome? We did one of those months ago. Have you seen the Metronome pages? http://www.frugal-horn.com/metronome.html
and if you go to the tables section: http://www.frugal-horn.com/metronome-table.html you'll find all the information necessary to build a pair, complete with CAD diagram.
Whow...seams like the FE207E works great in the Metroneome...cool!!!
Did you ever listen to them?
Did you ever listen to them?
I'm not sure if any have been built with the 207 yet. But as you can see from the site, a pair with the Hemp FR8 have (same box) which work extremely well, so the 207 should be a breeze.
I'm guessing your BIB favorite the 165FF is a candidate too - and given its 3 inch depth maybe a bipole.
It'd certainly work, and lots of Nearfield Abby & Super Abby owners are happy with it. But you'd have to go easy with the volume knob. Having said that, with two of them per channel, you've doublee the travel, which is helpful.
Scott, I know you have other time committments, but looking at the Tables for the 126E versus the bipole version, its a case of doubling the top and bottom areas, and a bigger port, say 4 x 3?
Interesting
How do you think these would go with a pair of FE208EZ's
I am still looking at different options, but like the look of these drivers. And they are the better option as far as postage goes. As I can get them from Australia.
Do you think these would sound as good as the design Fostex have for them? I do NOT want a sub.
They seem less complicated to build, although I'm still a bit lost as to cutting the angles out for all the joins. How would you work that out?
Putting a super tweeter on these would also complicate things as well I suppose
Re: Interesting
Hi Endzone
The FE208EZs would work I think.
Dave might be able to advise further. Scott is a bit busy at the mo with his PHd thesis.
Enclosures for these would be about 60 inches tall and about 14 inches wide at the base by about 12 inches deep. Similar to the Hemp Acoustics 8 incher on the Metronome pages. That cabinet may well work as it is after a bit of port tuning.
Metronome cabinets are very easy to build. You don't need to cut any angles.
All I did was butt join the sides together after I had cut the shapes out on a table saw.
What you end up with then are the sides perfect but the top and bottom need to be sawn through to provide a flat platform for the top plate and a flat base so they will stand squarely on all fours. You need to make the lengths of the sides, back and front about an inch overall longer than the drawing dimensions to allow for the trimming needed at the top and bottom.
You will definitely not need a sub with a driver and cabinet that size. A sub is only really necessary with the tiny FE108EZ driver I use in my originals. However it may need a super tweeter as the old FE108EZ tended to roll off after 12KHz. I think the latest drivers go up a lot further so it depends what you go for.
Hope that helps.
Steve
enzedone said:How do you think these would go with a pair of FE208EZ's
I am still looking at different options, but like the look of these drivers. And they are the better option as far as postage goes. As I can get them from Australia.
Do you think these would sound as good as the design Fostex have for them? I do NOT want a sub.
They seem less complicated to build, although I'm still a bit lost as to cutting the angles out for all the joins. How would you work that out?
Putting a super tweeter on these would also complicate things as well I suppose
Hi Endzone
The FE208EZs would work I think.
Dave might be able to advise further. Scott is a bit busy at the mo with his PHd thesis.
Enclosures for these would be about 60 inches tall and about 14 inches wide at the base by about 12 inches deep. Similar to the Hemp Acoustics 8 incher on the Metronome pages. That cabinet may well work as it is after a bit of port tuning.
Metronome cabinets are very easy to build. You don't need to cut any angles.
All I did was butt join the sides together after I had cut the shapes out on a table saw.
What you end up with then are the sides perfect but the top and bottom need to be sawn through to provide a flat platform for the top plate and a flat base so they will stand squarely on all fours. You need to make the lengths of the sides, back and front about an inch overall longer than the drawing dimensions to allow for the trimming needed at the top and bottom.
You will definitely not need a sub with a driver and cabinet that size. A sub is only really necessary with the tiny FE108EZ driver I use in my originals. However it may need a super tweeter as the old FE108EZ tended to roll off after 12KHz. I think the latest drivers go up a lot further so it depends what you go for.
Hope that helps.
Steve
Re: Re: Interesting
Everyone will have differrent ways of working around the limitations of their shop (and talent, or in my case the relative lack thereof). I didn't have a sliding taper jig to cut the sides on the table saw, so I made the long cuts with a circular saw and a straightedge. They came out close enough to get good glue joints, but there were some inaccuracies to deal with.
I cut a small piece with mitered edges to make an internal top. Gluing that in as I assembled the sides helped me keep things square. I made sure the top and sides were slightly proud of the top piece, then flattened the top with 50 grit in my power sander. The visible top is a thin piece of poplar, for cosmetics only, it's not structural. I cut it slightly oversized, and sanded it flush after gluing (finer grit for that!).
I cut the bottom (again with mitered edges) and fit it afterwords, so that I could get it to sit exactly where I wanted it. Too hard to figure the exact dimensions before the cabinet was built.
I also used the sander to flatten out the feet after assembly. Then I cut some small blocks to glue into the corners below the bottom, and drilled them to accept carpet piercing spikes. Those tall boxes would be pretty tippy on my carpeted floor without them, and they take care of leveling out any imperfections in the feet.
Bill
Steve Cresswell said:
Hi Endzone
...
Metronome cabinets are very easy to build. You don't need to cut any angles.
All I did was butt join the sides together after I had cut the shapes out on a table saw.
What you end up with then are the sides perfect but the top and bottom need to be sawn through to provide a flat platform for the top plate and a flat base so they will stand squarely on all fours. You need to make the lengths of the sides, back and front about an inch overall longer than the drawing dimensions to allow for the trimming needed at the top and bottom.
Steve
Everyone will have differrent ways of working around the limitations of their shop (and talent, or in my case the relative lack thereof). I didn't have a sliding taper jig to cut the sides on the table saw, so I made the long cuts with a circular saw and a straightedge. They came out close enough to get good glue joints, but there were some inaccuracies to deal with.
I cut a small piece with mitered edges to make an internal top. Gluing that in as I assembled the sides helped me keep things square. I made sure the top and sides were slightly proud of the top piece, then flattened the top with 50 grit in my power sander. The visible top is a thin piece of poplar, for cosmetics only, it's not structural. I cut it slightly oversized, and sanded it flush after gluing (finer grit for that!).
I cut the bottom (again with mitered edges) and fit it afterwords, so that I could get it to sit exactly where I wanted it. Too hard to figure the exact dimensions before the cabinet was built.
I also used the sander to flatten out the feet after assembly. Then I cut some small blocks to glue into the corners below the bottom, and drilled them to accept carpet piercing spikes. Those tall boxes would be pretty tippy on my carpeted floor without them, and they take care of leveling out any imperfections in the feet.
Bill
cheers
That is what I was also after; an easy way of putting this together.
I am very limited as far as tools go, so I'm after a process that will still produce a reasonable result from simple solutions.
That is what I was also after; an easy way of putting this together.
I am very limited as far as tools go, so I'm after a process that will still produce a reasonable result from simple solutions.
I've been asked this question many times recently so for those that don't know what a sliding taper jig is..here is a pic.
I've drawn it upside down to show the guide.
The guide runs in the slot on the table saw. The work piece is stuck to the jig with blue-tac or double sided tape, with the required cut aligned to the edge of the jig.
The edge of the jig is right up to the blade.
Regards
Ed
I've drawn it upside down to show the guide.
The guide runs in the slot on the table saw. The work piece is stuck to the jig with blue-tac or double sided tape, with the required cut aligned to the edge of the jig.
The edge of the jig is right up to the blade.
Regards
Ed
Attachments

TB Metronome
I wanted a Metronome in the house just to be able to live with the shape for awhile... our official Metronome project is way down in the queue, so a recent post reminded me that cardboard was an easy to use material for whipping up "working mockups". Here is a picture of one of the almost finished unobtainum 3" TB cardboard Metronomes... Fonken in the background for scale (these metronomes are a bout 1m high)
dave
Attachments

- Home
- Loudspeakers
- Full Range
- The Metronome