Perfect. Now I know where to go if I wreck something.😀
Just curious? What do you do with all those Mk2's and MJX-12A's?
I use a couple for myself as well as collecting, others I use for parts and service.
We're opening parts depots.
good idea... MK2A what's inside? pcb?
Well, I’m 50 pages in trying to learn along the way. Just adopted an SP10 MKII of my own. Comes with a birch plinth and Grace g560l tonearm, power supply and possibly more have been re-capped (previous owner not totally sure, had a tech do it and says he bought a kit,) so I’ll probably be opening it up soon to take a look for myself. Maybe I’ll find out as I make my way through the second half of this thread, but I’m wondering if anyone has anodized the base or platter? Anywho, back to reading!


Welcome to the club, these are terrific turntables.
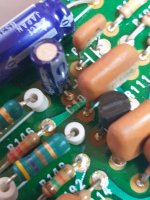
On the caps, open the power supply and check the caps on the lower PCB, these are almost always bloated. If these have been replaced you are most of the way there.
On the caps, open the power supply and check the caps on the lower PCB, these are almost always bloated. If these have been replaced you are most of the way there.
Two platters and two motors.good idea... MK2A what's inside? pcb?

@FuzzyNightmares
That looks like a great setup! Yes, open up the PSU and take some photos of the caps, it’s pretty easy to see if they are original or not.
Is it on speed? (Just look at the strobe) If so, grab a headshell and cartridge and spin some records. 🙂
Anodizing? I don’t think anybody has. I absolutely would not do the platter.
Thank you! Will definitely get in there tomorrow and take a look around, will take pictures as well.Welcome to the club, these are terrific turntables.
On the caps, open the power supply and check the caps on the lower PCB, these are almost always bloated. If these have been replaced you are most of the way there.
Sounds good. Have a stock Denon 103 and a headshell ready to go once I confirm it’s on speed and no caps are ready to kick the bucket. And nothing says I can’t give the visible part of the platter a nice spit shine though, right?!@FuzzyNightmares
That looks like a great setup! Yes, open up the PSU and take some photos of the caps, it’s pretty easy to see if they are original or not.
Is it on speed? (Just look at the strobe) If so, grab a headshell and cartridge and spin some records. 🙂
Anodizing? I don’t think anybody has. I absolutely would not do the platter.
Looking back at your plinth has me thinking about weighing down my birch until some day in the future when I’d be ready to consider Panzerholz. So much information and inspiration in here, thank you for birthing it!
It's a good idea to check the PCBs even if they have been recapped. I am currently refurbishing a SP-10 MkII that had been recapped and the drive transistors replaced. C106 had been installed back-to-front, sending the FG signal to ground, and one of the 2SD389 transistors had been substituted with an MJE3055. Some of the shoulder washers holding the drive transistors were not properly seated. The thrust pad needs changing but otherwise the turntable is in pretty good condition.
Attachments


Thank you! Will definitely get in there tomorrow and take a look around, will take pictures as well.
Sounds good. Have a stock Denon 103 and a headshell ready to go once I confirm it’s on speed and no caps are ready to kick the bucket. And nothing says I can’t give the visible part of the platter a nice spit shine though, right?!
Looking back at your plinth has me thinking about weighing down my birch until some day in the future when I’d be ready to consider Panzerholz. So much information and inspiration in here, thank you for birthing it!
The only caps in the electronic unit that have a hard time are the C2,4 and 6. The rest are mostly power supply smoothing caps.
I use Mag Wheel polish to shine the edge of the platter. Makes it easy if you have a lathe but can be done by hand, just a little more work.
IME, having had resin/bentonite and Permalli (Panzerholtz) plinths the Permalli was far superior. I took measurements of both plinths. Stylus on a stationary LP and tapped the plinth monitoring the output of the cartridge. The Permalli plinth had far better impulse response. Meaning that any plinth disturbance like acoustic feedback will better attenuated.
It's a good idea to check the PCBs even if they have been recapped. I am currently refurbishing a SP-10 MkII that had been recapped and the drive transistors replaced. C106 had been installed back-to-front, sending the FG signal to ground, and one of the 2SD389 transistors had been substituted with an MJE3055. Some of the shoulder washers holding the drive transistors were not properly seated. The thrust pad needs changing but otherwise the turntable is in pretty good condition.
This is a common issue I see with SP10's serviced by DIY. I repaired an SP10 recently where the large cap in the power supply was replaced with one with screw terminals. The tech soldered the wires into the terminals compromising the capacitor the SP10 worked for a few months before the cap gave out and caused all maner of platter rotation issues.
Maybe I’ll find out as I make my way through the second half of this thread, but I’m wondering if anyone has anodized the base or platter?
Hi,the base cannot be anodized as it is not aluminum but zamac and the zamac can be finished with a brushing but it is not possible anodized; for this reason the turntable was originally protected with varnish.
Perhaps the plate can be anodized but it is better not to do it, instead polishing it is possible and in my opinion much more beautiful.
This is a common issue I see with SP10's serviced by DIY. I repaired an SP10 recently where the large cap in the power supply was replaced with one with screw terminals. The tech soldered the wires into the terminals compromising the capacitor the SP10 worked for a few months before the cap gave out and caused all maner of platter rotation issues.
In the recaps I usually never change it, it's the only one that falls within always the specifications; moreover it is so big that you can find capacitors with a diameter of 35mm. it is not easy unless you want to exaggerate by purchasing a high 200 or 400V (rather useless) withstanding voltage in order to take advantage of the same fixing band.
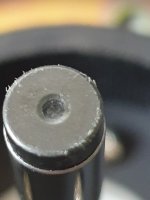
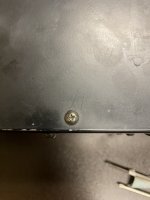
This is the silliest of questions, but unfortunately it’s the second time I’ve run across this issue with vintage electrics in recent history. When reassembled they used a thread lock, and my experience with these small machine screws is they are soft as butter and strip way too easily. Any suggestions? I don’t want to start experimenting with anything and risk damaging things.
Attachments
Thank you for that information, and you are correct that looks fantasticHi,the base cannot be anodized as it is not aluminum but zamac and the zamac can be finished with a brushing but it is not possible anodized; for this reason the turntable was originally protected with varnish.
Perhaps the plate can be anodized but it is better not to do it, instead polishing it is possible and in my opinion much more beautiful.
View attachment 1131035
View attachment 1131036
This is the silliest of questions, but unfortunately it’s the second time I’ve run across this issue with vintage electrics in recent history. When reassembled they used a thread lock, and my experience with these small machine screws is they are soft as butter and strip way too easily. Any suggestions? I don’t want to start experimenting with anything and risk damaging things.
You sure? That's a really odd thing to do.
Those are very soft. Recommend a properly sized JIS compatible driver like a Vessel +1: https://www.amazon.com/Vessel-Megadora-1x75-Screwdriver-900-1-75/dp/B000TGAMC6
The first one came out with that tell tale ‘snap’ of a screw with old thread lock, did not back out easily. That or there was some moisture buildup where it was stored and maybe some residue set in, but I’m at one for three on successful removal right now and starting to strip a bit so I stopped.You sure? That's a really odd thing to do.
Those are very soft. Recommend a properly sized JIS compatible driver like a Vessel +1: https://www.amazon.com/Vessel-Megadora-1x75-Screwdriver-900-1-75/dp/B000TGAMC6
That sounds like a fuzzy nightmare. 😀The first one came out with that tell tale ‘snap’ of a screw with old thread lock, did not back out easily. That or there was some moisture buildup where it was stored and maybe some residue set in, but I’m at one for three on successful removal right now and starting to strip a bit so I stopped.
The first one came out with that tell tale ‘snap’ of a screw with old thread lock, did not back out easily. That or there was some moisture buildup where it was stored and maybe some residue set in, but I’m at one for three on successful removal right now and starting to strip a bit so I stopped.
The 'snap' is from thread stiction. I find all the fasteners on the PSU cover do that and I've never seen any indication of thread lock.
- Home
- Source & Line
- Analogue Source
- The Incredible Technics SP-10 Thread