Folks:
I'm having an unexpected issue biasing the F6 Diamond amp on my work bench. The left channel has biased just fine, to 0.506 VDC. The right channel, on the other hand, biases up to about 0.400 VDC and then drops to zero and starts biasing up again to 0.400 VDC, over and over. I don't know how to interpret this and have no idea how to proceed. Your counsel is appreciated.
Regards,
Scott
Attachments
I am having a difficult time seeing how this construction is working at all.
First remove that module from the middle of the backplate. Eliminate it completely.
It is possible to use a single bridge rectifier, but I am not sure you have wired this correctly. Try using two bridge rectifiers - one for the positive input to the CRC board, and the other for the negative input.
First remove that module from the middle of the backplate. Eliminate it completely.
It is possible to use a single bridge rectifier, but I am not sure you have wired this correctly. Try using two bridge rectifiers - one for the positive input to the CRC board, and the other for the negative input.
...And one for the ground lift board... which you're probably looking at. 🙂 Follow the wiring from the DC input of the filter boards to the left for the bridges.It is possible to use a single bridge rectifier, but I am not sure you have wired this correctly. Try using two bridge rectifiers - one for the positive input to the CRC board, and the other for the negative input.
Reads like a cap charging/discharging. What are the rails doing?

Scott - What you may consider is powering the board with the symptoms from the other side of the PSU and vice versa one channel at a time. Since you're using spades, maybe just build up quick extra section of wires to lengthen the V+, V-, and GND from the PSU to the board(s) on the opposite side.
For a few minutes work, that could narrow down where to look by a decent margin. If the issue "follows the amp board", you look one way... if it follows the 'side' of the PSU (seems less likely to me... but who knows?), you look another.
For a few minutes work, that could narrow down where to look by a decent margin. If the issue "follows the amp board", you look one way... if it follows the 'side' of the PSU (seems less likely to me... but who knows?), you look another.
While your at it, connect IEC Earth GND directly to chassis, remove purple trafo shield wire from GLB board and connect to the same bolt as Earth ground.
Folks:
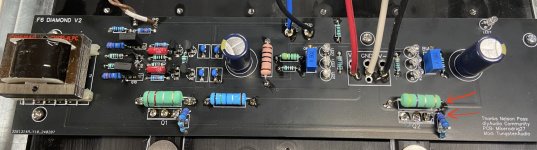
The module on the back panel is a speaker protection board (Prasi released it recently; it's based on the Store's version but updated to use solid state relays). The bridge rectifier towards the lower middle of the first photo is a ground loop breaker. There are two bridge rectifiers trucked close to the toroid, under the power supply. The small transformer simply powers the speaker protection board.
The toroid is an Antek AS-4218. The power supply board is producing +/- 23.37 VDC. When I initially biased the amp, both channels read about 0.503 VDC across R2. I dialed the offset down below 1.2 mV on each channel. I installed the amp in my main system and both channels worked, but the right channel was noticeably quieter than the left channel. I then returned the amp to my work bench and checked the bias, which was when I saw the cycling bias reading across R2 on the right channel.
@ItsAllInMyHead -- a great suggestion, which I'll try out shortly.
I apologize for not providing enough detail (and suitable photos) in my last post. The problem persists and your advice is appreciated.
Regards,
Scott
Attachments
@SRMcGee
This isn’t a problem with the input stage/Austin buffer. It may be an intermittent connection/poor soldering somewhere.
I would concentrate on the DC setpoints of the output stage for the offending channel, which also means the DC bias circuitry which involves pins 5,6,7,8 of the transformer as well (see schematic below, the pin numbers might be different for Cinemag vs Jensen). You should be able to verify continuity of this entire circuit.

I am assuming that you substituted one blue LED for the green LTL-4231N diode since you are using the IXTQ75N10P N channel Mosfets which is fine.
Can you measure the voltage across the outer pins of each of the Mosfets? Is C1, C2 oriented properly? Are all the diodes lit, all the time? What are the voltages at the wiper end of the pots, i.e. where R9 and R10 connect?
Best,
Anand.
This isn’t a problem with the input stage/Austin buffer. It may be an intermittent connection/poor soldering somewhere.
I would concentrate on the DC setpoints of the output stage for the offending channel, which also means the DC bias circuitry which involves pins 5,6,7,8 of the transformer as well (see schematic below, the pin numbers might be different for Cinemag vs Jensen). You should be able to verify continuity of this entire circuit.
I am assuming that you substituted one blue LED for the green LTL-4231N diode since you are using the IXTQ75N10P N channel Mosfets which is fine.
Can you measure the voltage across the outer pins of each of the Mosfets? Is C1, C2 oriented properly? Are all the diodes lit, all the time? What are the voltages at the wiper end of the pots, i.e. where R9 and R10 connect?
Best,
Anand.
Anand & Co.:
I've resoldered every accessible connection on both sides of the right channel pcb and the problem persists. I'm using IRFP240 MOSFETs, not IXTQ75N10P, because I have a huge stock of matched units, but I still installed one blue LED (along with 2 green) in both banks. All six of those LEDs light (as does the seventh on the pcb). C1 and C2 are properly oriented. The input is shorted.
I'm getting 4.3 VDC measuring across Q1 and 4.28 VDC across the outer pins of Q2.
I'm getting 5.64 VDC measuring from the proper end of R9 to Input Ground, and 18.32 VDC measuring from the proper end of R10 to Input Ground.
From the anode on LED1 to the cathode on LED3 there is 7.85 VDC; the same across LED4 to LED6.
So what does this mean?
Thanks in advance for the support!
Regards,
Scott
Attachments
@SRMcGee
My surmise at this point is that you have enough forward bias voltage to “turn on” your Mosfets since your Vgs for Q1 and Q2 are about 4.3VDC. Double check with the other channel just to be sure. See if there is a major difference between the two channels.
If you leave your multimeter across the outer pins of the offending channel’s Q1 and Q2 (you need 2 multimeters for this), does the voltage remain steady or does it change?
That leaves the question on which one of your Q1,Q2 mosfets is misbehaving.
Best,
Anand.
Anand & Co.:
There is no major difference between the voltage across the MOSFETs on the two channels -- the right channel reads roughly 4.3 VDC across the outer pins on both devices and the left channel reads closer to 4.4 VDC. I would note that the bias on the right channel undoubtedly needs adjusting at this point.
The voltage across both MOSFETs on the right channel steadily increase to about 4.3 VDC in about 20 seconds after power is turned on. Same with the left channel.
This may be relevant: I tried measuring VDC across R2 and R12 instead of across the outer pins on Q2 at the spots indicated on the photo below because I had easier access to the resistors. While the voltage across Q2 remained steady, the voltage at the resistor leads bounced all over the place.
I have more matched pairs (and quads) of the IRFP240 MOSFETs. I'd be happy replacing both if you thought one or both were the issue.
Your thoughts?
Thank you,
Scott
Go ahead and try replacing both, and also measure the Vgs voltages of Q1 and Q2 by only placing the multimeter leads on the outer pins of the mosfets. Please leave enough "lead" on the Mosfets themselves so you can use clip leads from your multimeter so you don't accidentally slip and create a short. See if replacing the Mosfets solves your problem. Double check and make sure there is good electrical isolation along with thermal conduction particularly with the back of the MOSFET which is connected to the Drain pin.
Using the proper end of the resistors for measuring Vgs is probably fine, however, this is faster as you don't have to keep double checking the traces on the pcb which are extremely difficult on black pcb's or when you don't have the trace layout printed in front of you. Hope that makes sense.
Best,
Anand.
I’m not trying to derail anything, just trying to learn. How would you know the bias pot is not an issue?
If you keep the meter leads attached to the outer pins of a Mosfet (see pic below), say Q1, and then adjust the pot at the same time, the voltage should change. I’m going to then assume that the resistors, the secondaries of the transformer and the pot are all working as they should and are connected as represented on the schematic. Especially if the pots are brand new and don’t look physically damaged. To be honest I’ve never dealt with a faulty pot especially one recently purchased from Mouser or Digikey. I would imagine if a trimmer pot was constantly changing, you would see the set screw itself physically moving!

Best,
Anand.
Best,
Anand.
Last edited:
@Mulburg
Since you asked the question I have been reading up on failure modes on potentiometers. Thanks for asking the question 🤓 .
.
I think the reason I have never dealt with it is that I test every potentiometer prior to connecting it to the circuit. I always have my DMM leads connect to the outer leads of the pot first, to verify what the total travel resistance is. Why? Because if it is labeled as a 5k pot, it should measure close to 5K ohms (I have had mislabeled resistors from Mouser/Digikey so beware!). Next I connect one lead to the wiper and leave the other lead as is, and rotate the screw. The resistance should change slowly and smoothly, if it is super abrupt or a changing resistance, I might worry about poor contact and then a faulty pot.
At that point, I would place a small DC voltage across the potentiometer (say from a battery or dc regulated supply). Then connect an oscilloscope from the negative lead to the center lead or the wiper. While slowly turning the potentiometer you should see a smooth trace on the oscilloscope as you turn the pot. If the pot has issues you will most likely see the trace jump and look jagged as you turn the pot. At the point, it’s just cheaper to replace the pot.
That being said, these investigations are done BEFORE soldering has occurred. The hope is that no damage has occurred AFTER soldering due to overheating of the pot. So your point is a good one☝️. I do think that these pots are quite durable 💪however, particularly genuine brands such as Bourns.
Best,
Anand.
Since you asked the question I have been reading up on failure modes on potentiometers. Thanks for asking the question 🤓
.I think the reason I have never dealt with it is that I test every potentiometer prior to connecting it to the circuit. I always have my DMM leads connect to the outer leads of the pot first, to verify what the total travel resistance is. Why? Because if it is labeled as a 5k pot, it should measure close to 5K ohms (I have had mislabeled resistors from Mouser/Digikey so beware!). Next I connect one lead to the wiper and leave the other lead as is, and rotate the screw. The resistance should change slowly and smoothly, if it is super abrupt or a changing resistance, I might worry about poor contact and then a faulty pot.
At that point, I would place a small DC voltage across the potentiometer (say from a battery or dc regulated supply). Then connect an oscilloscope from the negative lead to the center lead or the wiper. While slowly turning the potentiometer you should see a smooth trace on the oscilloscope as you turn the pot. If the pot has issues you will most likely see the trace jump and look jagged as you turn the pot. At the point, it’s just cheaper to replace the pot.
That being said, these investigations are done BEFORE soldering has occurred. The hope is that no damage has occurred AFTER soldering due to overheating of the pot. So your point is a good one☝️. I do think that these pots are quite durable 💪however, particularly genuine brands such as Bourns.
Best,
Anand.
Last edited:
Anand (& Co.):
MOSFETs swapped out for a fresh matched pair and the amp is singing beautifully! Thank you for the help -- I'm no diagnostician and, Blanche DuBois-like, have to rely on the kindness of others. Your support and guidance were crucial. If we both find ourselves at BA2024, please let me buy you a beer.
Regards,
Scott
No worries buddy! Please repay your kindness in a few weeks with your F6 subjective review!
Best,
Anand.
Best,
Anand.
- Home
- Amplifiers
- Pass Labs
- The F6 Revisited