I've decided to skip on putting a dedicated subwoofer in my boot because I want/need the boot space and instead I've taken out the factory 6x9 rear parcel shelf speakers from my VCV10 V6 Camry Vienta Grande and have measured them up to make sure that they are actually 6x9's and not 5x7's and they are 6x9's. I've also cleaned up the existing factory metal brackets and removed the rivets which hold the metal brackets to the speaker baskets.
(2) Rockville RVL69W 6x9" 600w Cast Aluminum Car Subwoofers Sub Woofers | eBay
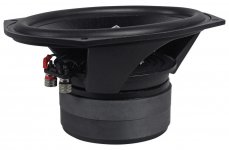
These are the speakers which I'm going to be putting into the car instead of a dedicated subwoofer. Rockville RVL69W speakers.
150 watts RMS each, should make me happy. I will power them with a Pioneer GM-A5702 (150w RMS x2) mounted in the boot (somewhere, not sure where just yet). As a pair of stereo channels, so technically I will have stereo bass and midbass support from the rear.
That way my existing Pioneer GM-A3702 amplifier can power the two front speakers in the door at 60 watts RMS per channel, and if I can get myself a crossover for midrange I can add the SL713 drivers into the mix along with some tweeters on the dash for high frequency support.
I might end up relocating both of them into the boot however as I'm not too happy with the amplifier being underneath the passengers seat because if we ever have a flood and I have to drive through it the amp will get wrecked.
(2) Rockville RVL69W 6x9" 600w Cast Aluminum Car Subwoofers Sub Woofers | eBay
These are the speakers which I'm going to be putting into the car instead of a dedicated subwoofer. Rockville RVL69W speakers.
150 watts RMS each, should make me happy. I will power them with a Pioneer GM-A5702 (150w RMS x2) mounted in the boot (somewhere, not sure where just yet). As a pair of stereo channels, so technically I will have stereo bass and midbass support from the rear.
That way my existing Pioneer GM-A3702 amplifier can power the two front speakers in the door at 60 watts RMS per channel, and if I can get myself a crossover for midrange I can add the SL713 drivers into the mix along with some tweeters on the dash for high frequency support.
I might end up relocating both of them into the boot however as I'm not too happy with the amplifier being underneath the passengers seat because if we ever have a flood and I have to drive through it the amp will get wrecked.
Attachments
Last edited:
In one of my older Toyota’s, I found a zone on the sides of the boot that are near the C pillars, above the wheel wells. I used a piece of plywood with threaded inserts to make a convenient mounting bracket for my amp. It didn’t affect the storage capacity and was safely tucked away.
Yeah I already thought about doing that myself but I just went down and checked after you mentioned it and I think that the strut towers are too small to have me bolt some mdf to them.
Plus if I did go down that path the amps would be too wide for placing on the strut towers, one side of the amp would be overlapping the strut towers, and it would have to be mounted vertically which means the inputs and outputs of the amps will be blocked by both the base and top of the boot.
I'm thinking instead of placing a large piece of mdf across the cutaway between the boot and the rear seats which would need be about 37 inches long and 14 inches tall.
On my old Contour (Mondeo), I put the CD changer on a piece of plywood on the roof of the trunk. Although it did protrude, I found it rarely a problem since the trunk was deeper than the opening was wide. In other words, if you could get it into the open trunk hatch, it would sit below the changer.
Thanks for the suggestions from everyone.
I could mount one amplifier underneath the mdf board where the cd stacker used to be and one on top.... I'll think about it.
I could mount one amplifier underneath the mdf board where the cd stacker used to be and one on top.... I'll think about it.
Last edited:
I've ordered a new thermostat directly from Toyota. It cost me $35 but I do get a gasket that comes with it.
Last edited:
And peace of mind knowing it will more than likely perform flawlessly...
Had some aftermarket thermostats that were horrible, running cold, another one surging hot, then too cold, back and forth continuously.
But heck, they were only $5.00, a bargain I had thought...
Had some aftermarket thermostats that were horrible, running cold, another one surging hot, then too cold, back and forth continuously.
But heck, they were only $5.00, a bargain I had thought...
Yeah the thermostat really has to do its job properly. I'm not that concerned about the cost, if it doesn't solve the fuel economy issue I still have to buy two oxygen sensors at a cost of $60 each and that is the price for the Fuelmiser aftermarket brand not genuine toyota. After I replace this thermostat I will run additional fuel economy tests and see if its improved or not, if it has then I will skip replacing the oxygen sensors for the forseeable future.
I want to bring this engine and transmission up to factory specs with as many new parts as possible but I won't replace components which are currently still working and in good condition with no visible plastic fatigue.
The primary concern with restoring this car is the plastics, interior plastics are fine with a little bit of wear due to constant use which is odd considering that an identical car (my mothers) has little wear but is older. What I'm concerned most about is the plastics of the sensors underneath the hood. This model of car has a sophisticated vacuum solenoid and switch mechanism designed to open and close the TVIS system among other tasks like opening/closing the EGR valve and giving vacuum to the fuel regulator. I've replaced all of the hoses with new rubber hose but the plastics are still decaying.
I'm not really concerned at all at the cost of bringing this car to factory standards at 350,000km, I still have to spend another $1,000 on struts/springs and I'm glad to. Its a great car and I will keep it until it starts to rust significantly and I cannot control the rust any longer.
I really don't like the design and the style of newer cars at all, too toaster looking. This car looks more like a modern 86 than it does a basic sedan and yet it has the towing capacity of a sedan. You can't overlook the fact that 1300kg towing capacity is pretty good and having that in a car that has the same size and wheelbase as an 86 is a pretty good deal especially for the price.
I couldn't get the same looks and weight as this has for the same price in a modern car and I love its light and nippy response at the throttle and steering wheel without going overboard with interior space like modern cars do.
The slightly more modern 20 series camry is very restrictive interior wise aswell, my legs are constantly up on the edge of the dash yet in my 10 series I feel very comfortable.
Pic attached is of the coupe vcv10 series, mine is the sedan but because its a v6 grande I get the leather interior and same twin tailpipes & alloy wheels. Same body, but the american coupe has the different 20 series interior that I hate. But you get the idea of what I get to look at whenever I walk down to my car. Snappy sporty body design.
Attachments

Last edited:
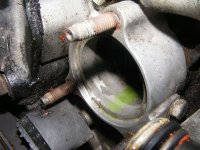
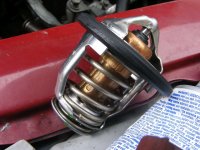
I pulled apart the car today and removed the old thermostat housing and thermostat. which was butchered by the previous owner, he had cut off the spring mechanism and left only the ring in place, I know this because there are cut marks of some cutters on the edges.
My thinking here is that the previous owner was on the incorrect assumption that the head gaskets were done however when I got the car it was only leaking from the tappet cover gaskets as far as I could see.
As soon as I've completed the installation of the new thermostat and cleaned everything up with some new permatex permaseal and start the car it will pressurise the water cooling system and I will be able to check for any smoke from the rear tailpipe.
I'm not expecting any, this car has never given me the typical signs of a headgasket failure, which was the primary reason why I bought it, I made a thorough and well informed inspection when buying it.
I'm hoping that the previous owner was going on the assumption that no thermostat = good which is the old way of thinking which seems to be prevalent around here, But he wouldn't have understood or known what a computerised engine is supposed to do or does whenever the temperature isn't adequate which is keep the injectors open for longer.
Anyway at least I've found why its not warming up as quickly as it should.
I've cleaned the entire area with a wire brush and then sprayed degreaser to remove the old oil from when the tappet cover gaskets were blown and its all ready to be reinstalled and buttoned up.
As a side note the alternator was covered in oil on the bottom of it, I suspect that it might also have a faulty diode pack as the current draw from the battery is 0.045 Amps once connected and settled down. A cheap fix as they are only $150.
Last edited:
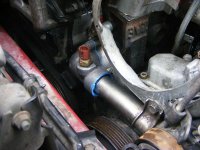
Finished the reinstallation of the thermostat today. Added a liberal but not excessive amount of Permatex Ultra Blue sealant to the mouth of the thermostat housing and the thermostat housing contact area on the water pump. Should hold up for another 20 years at least.
I will wait until tomorrow before I refill the cooling system with new coolant as I want the Permatex to dry. I rotated the thermostat so that the air bubble bleeder hole is at the very top.
An interesting footnote is that the thermostat opens at 82c.
I will wait until tomorrow before I refill the cooling system with new coolant as I want the Permatex to dry. I rotated the thermostat so that the air bubble bleeder hole is at the very top.
An interesting footnote is that the thermostat opens at 82c.
Attachments

Last edited:
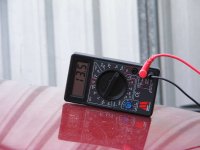
I just did a measurement of the alternator with only the alternator connected to the battery and nothing else except for the starter motor solenoid positive lead. My reading was 0.4mA which is almost half a milliamp. Exceedingly low.
It might be likely then that the alternator regulator is faulty in some way if there is indeed any fault at all. It could be that I have simply not had the car running for long enough to fully charge the battery.
However I had run the car for approx 30 minutes the other day and the alternator voltage dropped to approx 13.8v, then left it for 1 day before I disconnected the battery negative lead.
Either the battery wasn't fully charged, or the battery no longer has any capacity left so it therefore no longer has the ability to hold a charge, OR I haven't been charging it for long enough.
Or there is a parasitic load inside of the car somewhere, possibly the newly installed LED lights are not compatible and have a high amount of diode leakage.
Last edited:
I've tracked down the phantom current draw (40mA) to the "DOME" light fuse circuit, which feeds everything including the kitchen sink in terms of lighting on the instrument cluster and the instrument cluster only but inclusive of the automatic transmission light indicator and the clock. Eg, cigarette lighter socket light, ashtray light, glovebox light, hazard light light, clock, light for lighting the ignition key, courtesy light for your feet when you enter and exit the car. Basically everything that you can see from the drivers position is energized by this dome light circuit.
It appears that this is a problem that is caused by myself, I've gone through and replaced all of the interior lights with LED ones both in the dash and on the roof and doors. This was apparently a bad idea as now the LED lights are drawing well in excess of a few milliamps even when they are turned off, the combination of all of the light globes are apparently contributing to the large 40mA current draw.
No matter, I still have tons of the old incandescent lights around I will simply put the old ones back into their respective positions.
Last edited:
Something I always try to replace are the injector seals, can leak vacuum when they get dried up. Also make sure the pcv valve is flushed out well with some brake cleaner, will help driveability and consumption.
mmm a good tip thanks phase!
An update on the current draw problem.
I was mistaken earlier, current draw was from the ECU/EFI circuit. Yes the DOME circuit draws some current but only a milliamp or two. The real culprit is the ECU which is drawing 40mA depending upon conditions. Far too high for any worthwhile standby current to remain connected to the battery.
I'm considering adding a switch which will turn the ECU on when the ignition key is in the on position.
I'm going to start my diagnostic process by disconnecting connectors from sensors and switches in the engine bay and monitoring the current draw from the ECU to see if it drops at all whenever I disconnect a device. That will tell me if one of the solenoids or sensors are faulty and need to be replaced.
But first before I start to do that I'm going to wait for 2 minutes and see if the current draw from the battery drops at all after waiting for 2 minutes.
But first before I start to do that I'm going to wait for 2 minutes and see if the current draw from the battery drops at all after waiting for 2 minutes.
I discovered the "problem". There is no problem.  If there is then the problem is with me. The car's inbuilt factory alarm system was causing the error and it was keeping the computer awake for as long as I had the bonnet open. As soon as I decided to wait 2 minutes I made the descision to run the multimeter leads out of the car underneath the bonnet and close the bonnet and that is when I made the discovery that the computer actually isn't faulty but is operating normally.
As soon as I closed the bonnet the multimeter reading dropped to 13.5mA within approx 30 seconds.
I had the dash and clock unplugged at that point and I did some further tests which resulted in the clock drawing an additional 2.5mA which brought the total current draw up to 15.5mA.
I then disconnected the car radio and the car radio was drawing 1.5mA. With both the factory VFD clock and the sony car radio disconnected I managed to get the current draw down to 12.0mA.
All in all I've discovered some new things about my car and how it operates and also discovered that its electrical system is still in good shape.
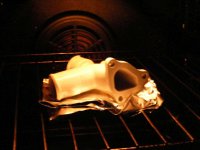
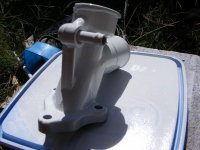
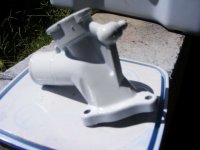
Pics below are of me spraying and baking some rust inhibiting paint on the aluminum water body which bolts ontop of the engine. I "baked" it in the kitchen oven with all of the windows open for 2 hours last night at 80-100 deg C. It seems to have done a good job of setting the paint.
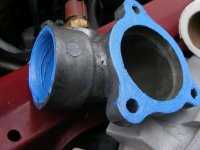
This morning when I refilled the engine I noticed that the neck which plugs into the thermostat housing is leaking some water, however its going to be a pain to get to it so I'm going to leave it for today and revisit it maybe on monday or tuesday and really seal it up properly this time.
If there is then the problem is with me. The car's inbuilt factory alarm system was causing the error and it was keeping the computer awake for as long as I had the bonnet open. As soon as I decided to wait 2 minutes I made the descision to run the multimeter leads out of the car underneath the bonnet and close the bonnet and that is when I made the discovery that the computer actually isn't faulty but is operating normally.As soon as I closed the bonnet the multimeter reading dropped to 13.5mA within approx 30 seconds.
I had the dash and clock unplugged at that point and I did some further tests which resulted in the clock drawing an additional 2.5mA which brought the total current draw up to 15.5mA.
I then disconnected the car radio and the car radio was drawing 1.5mA. With both the factory VFD clock and the sony car radio disconnected I managed to get the current draw down to 12.0mA.
All in all I've discovered some new things about my car and how it operates and also discovered that its electrical system is still in good shape.
Pics below are of me spraying and baking some rust inhibiting paint on the aluminum water body which bolts ontop of the engine. I "baked" it in the kitchen oven with all of the windows open for 2 hours last night at 80-100 deg C. It seems to have done a good job of setting the paint.
This morning when I refilled the engine I noticed that the neck which plugs into the thermostat housing is leaking some water, however its going to be a pain to get to it so I'm going to leave it for today and revisit it maybe on monday or tuesday and really seal it up properly this time.
Attachments

Last edited:
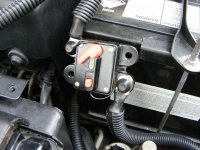
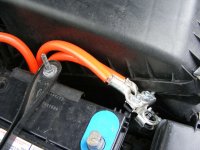
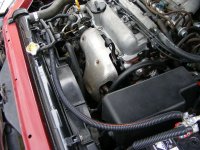
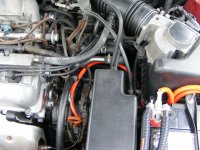
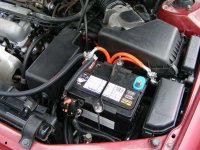
Here are some pics of the "big 3" wiring job that I've done. I realise that the alternator could do with fusing and I'm going to entertain the idea of placing it on a circuit breaker. The circuit breaker shown feeds the pioneer amplifier(s) and SB50 connectors inside of the car. All of the wiring is 35mmSQ, I have yet to finish heatshrinking the ends of some of the wires and adding conduit to the negative earth leads going to the transmission and body. I just mocked it up really as a proof of concept and the conduit hadn't arrived yet when I did this wiring job. But I will disassemble it and redo it soon.
I might end up riveting the circuit breaker(s) to the housing for the cruise control motor which is just beside the battery. They would have to be shallow as I don't want the rivets or bolts to interfere with the throttle linkages and mechanisms inside.
You might notice that I've left the existing factory wiring for the alternator in place and simply bolted the additional 35mmSQ cable over the top of it, this is so that the current going from the alternator to the accessories has the best possible connection to the original factory harness. This might end up being a fire hazard for the time being until I add a circuit breaker to the new 35mmsq alternator cable.
The new alternator positive lead runs along the top of the radiator, I got this idea from my old falcon which had a similar arrangement.
The car starts within a quarter of a second with a fully charged battery (topped it off yesterday) and immediatley jumps to 2,000 rpm for approx 10 seconds before beginning to settle down, it sounds very nice to hear the engine run as smoothly as it does but it still sometimes misses, not entirely sure what that is but it could be simply the ecu training or it could also be an ignition cable problem.
Attachments

Last edited:
Went down to Disneyland for a couple days, and grabbed a nice stainless exhaust for my bug while in the area, I've gone through three in two years, and no matter what rust eats them alive ( and this is in California, San Francisco bay area!!!) So I said screw it, and splurged on a nice unit made by Vintage Speed. Much quieter and deeper sounding than the cheapo header and muffler pack, and it just plain looks good. Everything fit perfectly, and is adjustable to work on different setups. Quieter on the highway too. Nice to have my tailpipes where they belong, too. Also installed my new carb linkage too, also perfect fit, and easy setup.
Attachments

Those short exhausts are hard on mufflers too, most have glass packing which burns out. That whole scenario reminds me of the stacks of “Hot VWs” magazines that I had around growing up.
If the engine is missing, maybe try and spray some not-too-extremely-combustible cleaner around and see if you can isolate it. Heck windshield cleaner fluid would work. Also can check the o-ring on the dipstick for a good seal. Can check the throttle body for gunk residue from the pcv valve too, but that won’t be a part of the rough running.
If the engine is missing, maybe try and spray some not-too-extremely-combustible cleaner around and see if you can isolate it. Heck windshield cleaner fluid would work. Also can check the o-ring on the dipstick for a good seal. Can check the throttle body for gunk residue from the pcv valve too, but that won’t be a part of the rough running.
- Home
- Member Areas
- The Lounge
- The car thread