Hey Guys!
We cutted 12mm Plywood to the measurements given in the sketchup 2015 model (newest model). Is it right, that the middle part for the electronics is only 6.6 cm wide? Our battery (biggest model on accusafe.nl) does not fit in this space at all. Is it better to buy a smaller battery or is it possible to cut a few cm off of the wood parts inside (the two parts with all the holes in it)?
And how do you solve the problem of accessibility to the electronics? On a festival, or while transporting the boominator to some, there could be easily some vibrations which can cause some ripped-of cables or something like this. Therefore we would like to build an easy access to the center. Our idea is to drill a hinge at the one end of the top plate and a handle on the other side. So we would be able to unfold the top plate to check the electrics. We want to use sealing tape and a strong fastener to secure a strong fit to the rest of the glued boominator.
Furthermore we did not found any pictures of the boominator cabling or the placement of the electronics IN the boominator. We checked saturnus, lutkeveld and this build log Boominator - Album on Imgur. Please send me some pictures or links or links or whatever that show me how to settle the battery, the amp and so on.
The next important questions is can you send me a link of the part i have to order to be able to switch between battery, solar panel and 230 V source? We already have got a cold appliances connection (known by PCs etc.). And please tell me how to connect it between the parts that we have got.
My next question is the choice of the right glue. Like Lutkeveld we want to glue the whole box as well as the speakers and piezos. Which glue (please name the product name, so i can order it) should we use for boominator itself. Which glue should be filled into the grooves or dimples of the piezo? and is this glue the same that is used to glue the speakers and the piezos to the frame`? In Our stores we know the manufacturers of glue like ponal, loctite and stuff. Please name no only-available-in-the-us-stuff :-D !!!
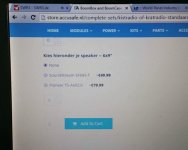
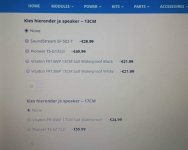
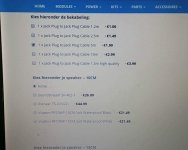
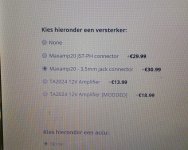
Here are some pictures for you to know which parts were bought until now.
We cutted 12mm Plywood to the measurements given in the sketchup 2015 model (newest model). Is it right, that the middle part for the electronics is only 6.6 cm wide? Our battery (biggest model on accusafe.nl) does not fit in this space at all. Is it better to buy a smaller battery or is it possible to cut a few cm off of the wood parts inside (the two parts with all the holes in it)?
And how do you solve the problem of accessibility to the electronics? On a festival, or while transporting the boominator to some, there could be easily some vibrations which can cause some ripped-of cables or something like this. Therefore we would like to build an easy access to the center. Our idea is to drill a hinge at the one end of the top plate and a handle on the other side. So we would be able to unfold the top plate to check the electrics. We want to use sealing tape and a strong fastener to secure a strong fit to the rest of the glued boominator.
Furthermore we did not found any pictures of the boominator cabling or the placement of the electronics IN the boominator. We checked saturnus, lutkeveld and this build log Boominator - Album on Imgur. Please send me some pictures or links or links or whatever that show me how to settle the battery, the amp and so on.
The next important questions is can you send me a link of the part i have to order to be able to switch between battery, solar panel and 230 V source? We already have got a cold appliances connection (known by PCs etc.). And please tell me how to connect it between the parts that we have got.
My next question is the choice of the right glue. Like Lutkeveld we want to glue the whole box as well as the speakers and piezos. Which glue (please name the product name, so i can order it) should we use for boominator itself. Which glue should be filled into the grooves or dimples of the piezo? and is this glue the same that is used to glue the speakers and the piezos to the frame`? In Our stores we know the manufacturers of glue like ponal, loctite and stuff. Please name no only-available-in-the-us-stuff :-D !!!
Here are some pictures for you to know which parts were bought until now.
here are the pictures 😱
Attachments
-
 received_1260408590640374.jpeg48.2 KB · Views: 382
 -
 received_1260408547307045.jpeg46 KB · Views: 370
 -
 received_1260408463973720.jpeg59.4 KB · Views: 374
 -
 received_1260408023973764.jpeg181.9 KB · Views: 368
 -
 received_1260408087307091.jpeg57.7 KB · Views: 358
 -
 received_1260408203973746.jpeg98.4 KB · Views: 101
 -
 received_1260408377307062.jpeg96.9 KB · Views: 114
Is it right, that the middle part for the electronics is only 6.6 cm wide? Our battery (biggest model on accusafe.nl) does not fit in this space at all. Is it better to buy a smaller battery or is it possible to cut a few cm off of the wood parts inside (the two parts with all the holes in it)?
Wrong battery. The case is made for "standard" 12V 7.2Ah. (Or even 9Ah when using some deep cycle types)
There are also LiFePO4 batteries available in this size.
And how do you solve the problem of accessibility to the electronics? On a festival, or while transporting the boominator to some, there could be easily some vibrations which can cause some ripped-of cables or something like this.
If things like this worries you, you should overthink your system electronics design. There's so much PA stuff around which doesn't suffer from this problems - have an eye on the internals to do you build in the right way.
Hi guys,
I've ordered pretty much everything I need for a "halfinator" with hp10w and pht407n.
I've got the wood off to a cnc shop, batteries, amp, drivers, grills etc on the way.
The only part im struggling with is the crossover.
I've ordered this amp:
Nobsound TPA3116 Bluetooth 4.0 Audio Receiver HiFi Stereo Amplifier Board 50W×2 | eBay
I have found details in this thread on how to sum the L+R inputs to a mono signal, that's no trouble. I was planning to feed the identical mono signal to both channels on the amp and use each channel to drive one woofer and one tweeter.
The recommended crossover seems to be this:
http://www.diyaudio.com/forums/clas...b-ultimate-party-machine-605.html#post4423615
but this is for driving 2 woofers and 2 tweeters in parallel. Is there a crossover for a single woofer and single tweeter?
Maybe I would be better off using 1 channel of the amp to drive both woofers and the other channel to drive both tweeters? That would also have the advantage of requiring only half the xo components. My worry is that the woofers will need a lot more power than the tweeters and so the max volume would be reduced. Is this correct?
Any help much appreciated!
Thanks
crazy legs, for switching between solar, charger, and power, I think you might be speaking of the accusafe? this device will allow you to manage battery properly internally, that is the most important thing, and if you search on here you will find other diagrams and links for how to wire up charger, solar, etc.
This is thing I am talking about: AccuSafe - Kistradio en Kratradio Onderdelen
of course, if I could plug it again, the C-Amp from Canopy Sound Gmarsh handles everything like this on one card, very simple, seems expensive at first but it does everything you need.
I basically ended up spending so much extra money I didn't need to because I bought all the little parts separately that the C-Amp does on the single card.
okay guise,
moving along now.
started fabbing up wiring, hooking up C-amp, and testing all the little functions.
wired up 12v 15ah bioenno battery, amp switch, indicator LED, speakers, USB charging port, speaker, and hooked up bluetooth module...
attached to some modified Dayton B652s and...
IT'S ALIVE!
All features worked flawlessly, first try.
The most difficult task was getting the bluetooth dongle to pair with my phone and tablet.
Sounds great, works easy, little LED blinks out battery status, tablet can charge, or charge/power the bluetooth dongle.
No hums, no issues. 12v battery power is REALLY quiet--I run a YJ blueblack board off my computer and there all kinds of EMI whirs and whines...
This board is great, an idiot like me can just make wires, hook them up, and you're good to go.
Only thing left to do with C-Amp now is fab the solar power wiring and test that out and see how the battery charges.
Then, I will attach speaker crossover and hook up the HP10w and PHT 407ns and make sure drivers are okay before I box it up, take it to my carpenter pal's house and commence cabinet assembly--hopefully next week.
Problems noted:
1. As mentioned above, no issues with the C-amp, works great, simple, easy, it's safe in its little enclosure so all you have to is attach the wires. BE CAREFUL here, even though I labelled everything clearly, I still ended up moving a couple wires over a space or two on the terminal block (power switch and LED wiring). Nothing crucial, like the battery, and I caught it before I ever applied power.
But again, double check all this, C-Amp has no protection for polarity, if you screw that up you will cook it.
2. I got the big 12v 15ah bioenno power LiFePO4 battery because I saw it on DIY UNF boominator build log from here. BEWARE! specs on that battery have changed slightly, it is now too big to fit into standard boominator electronics compartment without routing and some changes there. The way they attach the BMS means that the casing of the battery is wider than 66mm on one end. It will NOT fit into the compartment "as is."
Because I got the Aterren flat pack boominator, I did not want to hack up the inside in an effort to make the battery fit. So, I contacted bioenno and they were very easy to work with and hooked me up with batteries that would fit as expected. I should have called them first to confirm the dimensions of the 12v 15ah battery.
Anyway, excellent customer service from bioenno, and I now have two 12v 6ah LiFePO4 batteries which easily fit into the compartment as expected. Simple to parallel them up and have almost as much run time as the 15ah without having to mess up the inside of the boominator flatpack from aterren.
I will make a spare battery/device charging pack from the 12v 15a battery in a surplus .30cal ammo can, the battery fits great in there and I figure this way if the suns not shining or something I have plenty of spare power and can also charge phones and devices while the boominator is playing.
couple of pics of the C-Amp and hook ups being tested...
https://www.flickr.com/photos/61137825@N03/26052134504/in/dateposted-public/
https://www.flickr.com/photos/61137825@N03/26053880153/in/dateposted-public/
Thanks for the advertisment steveeboy 🙂 Glad everyone's happy with the card so far.
I'm pondering what I'm going to build for version 2 of the card now. The awesome card design Saturnus has in his crowdfunded project makes me feel the need to play catch-up, I might steal some of his ideas and go for a bluetooth-input design. I won't do the dynamic DC/DC regulator/biamping/psychoacoustic DSP stuff that he's doing in his card, instead aiming for a lower power design that takes much less time to develop 🙂
Maybe I should fill in Viktor on my plans...
seems like built-in player/card reader/thumb drive thing/option would be nice, maybe even full-on hifi berry option?
so you don't have to be using phone/tablet for the thing.
but I guess that hogs power.
maybe built in filters on card like the dip switches on the weiner?
So, you don't have to make crossovers, just set dip switched on card for most common boominator driver set ups and such?
or not.
For people who are not EEs, this set up seems like the best option, as long as you can wire it up, it seems pretty fool-proof. I wasn't advertising, stating the truth, over the past two years I bought amp card, solar charger board, accusafe, etc. by the time you add that up you are getting close to costs of C-Amp AND you have to be able to wire it up properly and get it working.
I'd go the Bluetooth route because the standalone MP3 player is pretty much dead, everyone uses their cellphones as their MP3 players these days. Even some of the last remaining MP3 players like the iPod Touch do Bluetooth.
Plus, a cellphone lets you fire up a streaming internet station or Youtube as your music source, things you can't do with a built-in audio player.
I'll have to contemplate the filter selection thing. Either DIP switches on the card, or some sort of Bluetooth configuration method if I can find a module that can simultaneously do A2DP audio and SPP (or whatever).
I'd go the Bluetooth route because the standalone MP3 player is pretty much dead, everyone uses their cellphones as their MP3 players these days. Even some of the last remaining MP3 players like the iPod Touch do Bluetooth.
You know that last remaining puzzle is how to hack bluetooth to make two receivers that can latch onto one bluetooth transmitter (phone).
So you can be cable free and in stereo. I find it funny how people can carry on about sound quality of MP3s but find nothing disturbing about all these monopole speakers.
If you're complaining about the sound of MP3s, you really don't want to read up on the SBC codec, which is the standard lossy codec used for Bluetooth audio.
Bluetooth audio can also do AAC, AptX and MP3, except implementing any of them in a bluetooth device involves licensing/patent royalties. I'm not sure how common any of them are.
Bluetooth audio can also do AAC, AptX and MP3, except implementing any of them in a bluetooth device involves licensing/patent royalties. I'm not sure how common any of them are.
Guys, my buddies and myself are hoping to be able to glue the speakers to the plywood today.
Please give me Product names of the glue for the connection wood to wood and the glue for speakers to wood (and the stuff that goes into the grooves or dimples of the piezos).
I searched "boominator glue" but didn't find any recommondations. I often read of epoxy. But for which parts is it really and is it available in german markets?
After a lot of sweat and hardships I am now finally finished building! Only got painting left now. This really isn't a beginners project though but thanks to ya'll even a dingus like me made it!! Thank you all for the help!
My Fiio x1 plays super loud on it (mandatory blasting of Tchaikovskys 1812 overture as first track) but cellphones don't really pack much punch. Since everyone wants to DJ I guess the camp's gotta get a preamp for phone use. 😀
took very few pictures of the build process apparently but here they are
Boominator build - Album on Imgur
don't have a cellphone, don't want a cellphone, you couldn't pay me enough to microwave my brain thank you. i wonder too, just how many if any cellphones play full fidelity wavs. i'm planning on getting the next generation sansa clip zip because the last generation had pretty crisp sound, they play WAVs, they accept memory cards, and especially because it's so small i can mount it on my bike's handlebars for thumb control. i seriously doubt any cellphone can match the sound quality of a high end DAP like an astell & kern tooI'd go the Bluetooth route because the standalone MP3 player is pretty much dead, everyone uses their cellphones as their MP3 players these days.
Last edited:
Hey Guys!
We cutted 12mm Plywood to the measurements given in the sketchup 2015 model (newest model). Is it right, that the middle part for the electronics is only 6.6 cm wide? Our battery (biggest model on accusafe.nl) does not fit in this space at all. Is it better to buy a smaller battery or is it possible to cut a few cm off of the wood parts inside (the two parts with all the holes in it)?
And how do you solve the problem of accessibility to the electronics? On a festival, or while transporting the boominator to some, there could be easily some vibrations which can cause some ripped-of cables or something like this. Therefore we would like to build an easy access to the center. Our idea is to drill a hinge at the one end of the top plate and a handle on the other side. So we would be able to unfold the top plate to check the electrics. We want to use sealing tape and a strong fastener to secure a strong fit to the rest of the glued boominator.
Furthermore we did not found any pictures of the boominator cabling or the placement of the electronics IN the boominator. We checked saturnus, lutkeveld and this build log Boominator - Album on Imgur. Please send me some pictures or links or links or whatever that show me how to settle the battery, the amp and so on.
The next important questions is can you send me a link of the part i have to order to be able to switch between battery, solar panel and 230 V source? We already have got a cold appliances connection (known by PCs etc.). And please tell me how to connect it between the parts that we have got.
My next question is the choice of the right glue. Like Lutkeveld we want to glue the whole box as well as the speakers and piezos. Which glue (please name the product name, so i can order it) should we use for boominator itself. Which glue should be filled into the grooves or dimples of the piezo? and is this glue the same that is used to glue the speakers and the piezos to the frame`? In Our stores we know the manufacturers of glue like ponal, loctite and stuff. Please name no only-available-in-the-us-stuff :-D !!!
Here are some pictures for you to know which parts were bought until now.
Hi, have a look here, my build log I think should help with most of your questions.
Boominator build (UK)... - Speakerplans.com Forums - Page 1
Dupe...
crazy legs.
I just re-confimed this stuff with aterren.
wood glue:
loctite PL Premium, or, if using non-phenolic coated plywood, Gorilla glue or other polyurethane glues for wood.
speaker magnets to plywood:
"jb weld" in US or "liquid metal" in europe
front of speakers and grills to plywood:
low modulus, neutral cure silicone.
here in the US that is GE Silicone II
YOU MUST USE "neutral cure' silicone. the stuff that smells like vinegar will eat the electronics and wires.
coating for piezos:
low modulus, neutral cure silicone
THANK YOU GUYS FOR ALL OF YOUR ANSWERS - very helpful!
We are ordering the resistors for the speakers today. For the piezos: 3W 47ohm axial, right?
Which one for the HP10W speakers?
can anybody recommend (with an amazon-link) any LED-Strips? and how they are wired to a power source (maybe directly behind the cold appliances connection (230V) to have them only lightening up when the boominator is connected to an extern power source (230V).
Best regards!
Alex
okay, mocking up the electronics compartment here.
I didn't want to start hacking Aterren's nice phenolic plywood flat pack up so I got two crappy pieces of regular plywood from home depot cut to size so I can try and find the optimal placement and make sure everything fits.
For some reason, photos of the inside of the electronics are hard to come by, I figure everyone forgets, or it is a rat's nest they are hiding!
But, I cannot fab up something totally sano and convenient like a pull out shelf/drawer as some have done.
So, that means stuff has to be attached to the inside walls of the compartment.
But, I want to be able to remove components that are critical and may fail, be swapped out, or upgraded in the future--like crossovers, the amp enclosure, the battery (of course)>
Things that are less crucial, need less ease of re-movability--terminal block, speaker terminals, power relay (if used.)
All this stuff has to fit, has to be able to be dealt with before, during, and after final glue and assembly.
So, laying it out.
Issues:
1. idea to utilize two 12v 6ah batteries was quickly scrapped. Given the fact that I am mounting the amp in an enclosure and the crossovers internal rather than remote in the speaker compartments means that I just couldn't find a solution there. But, removing one battery made it much more doable. I figure if the battery is easily swappable, it's no big deal to just run one internally and then if it dies, swap in a freshie.
In addition, I plan on making a big auxiliary pack with the 12v 15ah battery that did not fit the compartment. So, no crucial to have both of the 12v 6ah batteries onboard.
battery mount is easy, use some corner brackets from home depot, 3/4" and 2" size in appropriate spots. Only remaining concern there is the lock down of the vertical motion, need to figure out something for holding the top down, which can be easily released to allow removal and replacement.
Anyone have any ideas there?
2. crossovers
These are on standoffs with socket cap screws. put them in the middle because I figure those are the least likely to be swapped out unless I upgrade to four channel amp and dsp. I figure I can install those and still do glue up with little problem. Some clearance issues with the wiring, but I bent the plates to clear each flag terminal and I think I will not have too much difficulty with that wiring.
3. Terminal barrier strip
This is gonna be tough, need to figure out how to set that up with the relay and all so that it can be screwed down to board and some wiring can still be done after assembly.
4. Speaker terminals
not sure how to handle this yet. Will need to keep wiring loose and accessible during glue up, and then remove excess and screw these into place once the baffles are attached.
Anyway, if anyone has any thoughts, or better yet, PHOTOS of boominator internals, would love to hear/see them...
one side, with amp enclosure, half the battery stops, and the crossovers
https://www.flickr.com/photos/61137825@N03/26440907160/in/dateposted-public/
other side, with half the battery stops, and that preliminary placement of the barrier strip--still not sure how many terminals I need, will trim it down to correct size once I figure out fuse, relay, key switch, etc. attachments and proper jumper set up.
https://www.flickr.com/photos/61137825@N03/26620417962/in/dateposted-public/
tried to add photos, but it wouldn't let me, so, here are some additional things...
close up of amp enclosure, half the battery stops, and the crossovers
https://www.flickr.com/photos/61137825@N03/26714189555/in/dateposted-public/
And each side in mock up assembly for checking accessibility and such...
terminal strip side, this will be the side with power switches--main and amp, power inputs--solar/dc supply and aux battery, led indicator, usb charger output, and the signal input.
https://www.flickr.com/photos/61137825@N03/26110394693/in/dateposted-public/
battery side--without battery in place. I am trying to keep the front panel pretty minimal. Just the two vents and the volume knob will be on this end. If space is tight, I may put the indicator led and the amp off/on switch on this end as well but I am trying to avoid that.
https://www.flickr.com/photos/61137825@N03/26110392253/in/dateposted-public/
Last edited:
- Home
- Amplifiers
- Class D
- The Boominator - another stab at the ultimate party machine