
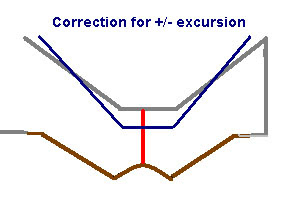
This is for 'regular' drivers. For drivers with extreme Xvar and Xlim and high Bl, the "V" shape needs to be lowered even further... If you would do that for 'regular' drivers they will run into their dynamic compression too soon. So my suggestion is to make two drawings for each type of driver or go for an in between solution with an attachable piece on top of the "V" for the strongest drivers...
Last edited:
Follow up for post#917
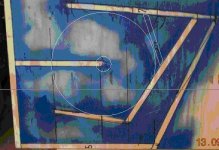
In order to compensate for the changing cone volume as result of excursion (towards S4) you increase the compression factor at S2 by lowering the "stub" or "V".
In order to compensate for the increasing 'overall' compression when the cone moves into the other direction, you need to decrease the compression by making the base of the "stub" or "V" smaller.
(see my ealier post on 'ideal' models)
So just wondering... What are you basing all of this on? Is it from a computer simulation or just an educated guess? Not trying to argue im just curious.
For drivers with relatively low xmax, like the 18ps76 (8mm?) Does one have to worry about changing volume with excursion as much? The cross sectional area will only change ny about 10% with full excursion, which seems to be an acceptable tolerance.
Hi Cresendo,
I have been looking and learning about building X0's🙂 Th-18 and understand you have a layout for cone correction,I will be using B&C 18PZB100 and was wondering if you would be so kind as to share your finding and how I should change the cut list as this is new ground,I do ok following a design but not well at doing my own but I am getting more informed from the infomation here at DIYAUDIO !
So Thanks in advance,
NS😀
Sorry, missed this post..
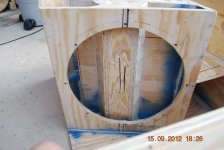
I added my cone correction to his original plan. Mount the baffle cut-out on the panel the driver faces, centered with the driver (use a right angle or T-square to find the center on the opposing panel). Then, measure & calculate how much volume the 18PZB100 has. I screwed and glued strips of wood on top of the baffle cut-out (also centered) to make up my preferred cone volume amount (try somewhere between half the cone's volume and up - I went with half and had nice results). I'll be able to take a picture of what mine looks like pretty soon.
For SPL testing get the "Goodies" and use REW's metering function. The siginal you want is in:~Keele - Tone Burst Testing Files/Composite Octave Bass Bursts
"Sorry, we are unable to retrieve this document."
Hey NEO Dan,
I've got everything ready to do some REW measurements, but REW is trying to measure & calibrate with my laptop mic :/ I've got "AudioFire4 (3363)" selected in the 1st drop-down under "Input Device and Input". The second drop-down only gives the option of "Default Input". Am I missing something?
I've got everything ready to do some REW measurements, but REW is trying to measure & calibrate with my laptop mic :/ I've got "AudioFire4 (3363)" selected in the 1st drop-down under "Input Device and Input". The second drop-down only gives the option of "Default Input". Am I missing something?
Hi All
The Tour of Britain Cycle Race comes to our town tomorrow, and a I have a gig in town so I have been busy rebuilding and configuring my PA rig.😱
 Don't forget your camera
 😛
😛Hey NEO Dan,
I've got everything ready to do some REW measurements, but REW is trying to measure & calibrate with my laptop mic :/ I've got "AudioFire4 (3363)" selected in the 1st drop-down under "Input Device and Input". The second drop-down only gives the option of "Default Input". Am I missing something?
Go to sound preferences and set the IO devices on the Mac to your external sound card then restart REW...
edit: I meant Mac system preferences > sound preferences... Then the external sound device can be selected so you can use the default device in REW settings...
Last edited:
Hi Crescendo,
I have one cabinet all most completed ,Have you posted your build ? I would like to see it and read your info,I am a newbie at testing and adjusting speakers,but I get a lot of help here and it's appreciated!
I will finish the cabinet tomorrow and start with the test set up ,first time so I might be a while till I get it figured out,lol.
NS
"Sorry, we are unable to retrieve this document."
🙁 bummer. I'll PM you in a couple...
here's some more Pics
Hi,😀
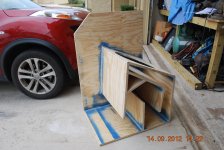
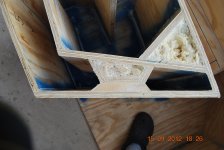
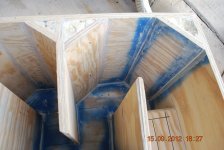
I added some reflectors and the cone corrector spec by Djim and Martin,It was a pain cutting these angles but I drew them full scale and marked the wood and sawed them out ,took some time but Testing will tell,lol.All is glued and screwed ,I'll finish tomorrow,and give it a day to dry,Then it gets the juice,lol.
NS🙂
Hi,😀
I added some reflectors and the cone corrector spec by Djim and Martin,It was a pain cutting these angles but I drew them full scale and marked the wood and sawed them out ,took some time but Testing will tell,lol.All is glued and screwed ,I'll finish tomorrow,and give it a day to dry,Then it gets the juice,lol.
NS🙂
Attachments

I like the JUKE it ain't good on gas but it will fly,I dumped a lot of them hot machines off the line ,and made them eat weeds,lol. I like the CV transmission in it ,Honda made one too ,Push the gas and hold on,lol.
NS
NS
No no no your doing it all wrong...
2D>3D see:
Is it just me or is my translator messed up??? 😛
That whole 65° angle thing earlier must have been a mistake then eh?
Sorry Dan, I wasn’t aware you couldn’t see the difference between a correction suggestion for an existing cab or a whole different new lay-out.😛
Last edited:
I didn't see that reflector left in the corner,LOL. I wonder if it would benefit using 2 more on the other side of that camber?I guess volume is the key?
I did think of making a side panel for temp purposes out of lexan ,that way you could inject smoke in the speaker camber and watch what's going on inside while you sweep the spectrum,Do you think that would work? OR just a waste of time and money.
NS
I did think of making a side panel for temp purposes out of lexan ,that way you could inject smoke in the speaker camber and watch what's going on inside while you sweep the spectrum,Do you think that would work? OR just a waste of time and money.
NS
Last edited:
New ~10 years ago methinks. 🙁
Well when you have both where this started and where you are going in 3D CAD, yes you can definitely see the difference.
Well when you have both where this started and where you are going in 3D CAD, yes you can definitely see the difference.
Hi noSmoking,
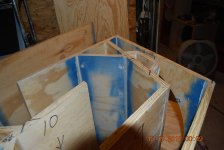
Just as an aside, take a look at the intermal dimensions/locations of dividers. They just look off in the pictures (I know forshortening and all that). You want to make sure that the overall flow of the horn is opening up without restrictions.
Regards,
Just as an aside, take a look at the intermal dimensions/locations of dividers. They just look off in the pictures (I know forshortening and all that). You want to make sure that the overall flow of the horn is opening up without restrictions.
Regards,
Attachments
Hi guys,
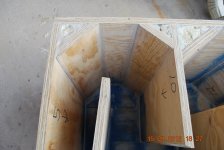
I'll take a look but I did check them and they were close some not perfect but with in a 1/4" .
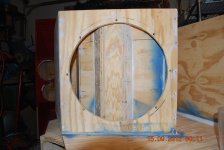
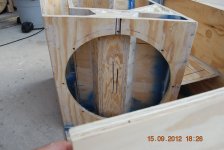
I made some more pics I have to put in one more stiffener and put the side on,
NS
I'll take a look but I did check them and they were close some not perfect but with in a 1/4" .
I made some more pics I have to put in one more stiffener and put the side on,
NS
Attachments
Last edited:
Hi Djim,
I all done, gosh took this old man 4 days to get one cabinet together,looks like the dems are off 10 to 15 mm in some places ,I'm not going to tell the speaker cause it can't see around the first bend,lol.just kidding
We will see tomorrow, I wonder how long it will take to break that woofer in,any Ideas?
Thanks !
NS
- Home
- Loudspeakers
- Subwoofers
- TH-18 Flat to 35hz! (Xoc1's design)