Hi Y'all,
I have used T-nuts for a long time, and if you watch what you're doing they are fine; but, so called hurricane nuts are probably better, e.g.: http://www.parts-express.com/pe/showdetl.cfm?partnumber=081-1084, and the barbed body inserts are better yet: http://www.parts-express.com/pe/showdetl.cfm?Partnumber=081-1094. The hurricane nuts,and barbed inserts need well cut clean holes, the T-nuts are a little more forgiving, but have a tendency to fall out unless expoxied in place.
In the LAB12 TH thread, Post #25/27(corrected link) layertone gives a link to self-tapping, threaded inserts (in my opinion they are the best):
http://www.diyaudio.com/forums/subwoofers/143714-lab12-tapped-horn-3.html
And make certain you get the blue Loctite #242, or you'll be in trouble.
Regards,
Last edited:
I would hate to use locktite wtih a wood tee nut, it could "strip"..Now that would be a mess, never get that out.
nice to see your making sawdust🙂
make sure you post the finnished pics.
make sure you post the finnished pics.
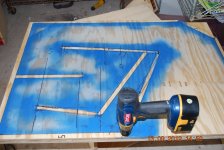
i think its an easy way to mark the pannels for holes and glue.....whats with the blue paint?
Yes I did think of that, but never seal wood before glue (in case something moves)
btw, How flat of a response will it have? How low will it go?
Would really like to see it finished also!! But that said I wish I never saw the first set of Pics.
[becuase I want one]
btw, How flat of a response will it have? How low will it go?
Would really like to see it finished also!! But that said I wish I never saw the first set of Pics.
[becuase I want one]
i think its an easy way to mark the pannels for holes and glue.
Last edited:
hi all,
The blue paint is there so when I take it back apart(I make a mockup assembly first minimal screws) and then spray paint the edges,then you can drill 2 sides at once and have them square and in place and make sure the screw hits the middle of the board,I also use a magic marker to show screw lines across the top of angled boards for pre drill/counter sinking,
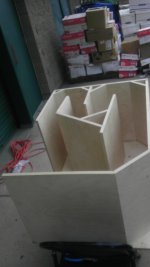
I found out it will be best to start reassembly from the inside out, my power drill won't fit in the smaller spaces outherwise,
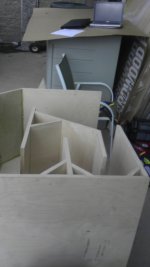
Thanks Epa ,I got sawdust and a bunch of long skinny triangles,They might work as gussets,lol
Cheers!
NS
The blue paint is there so when I take it back apart(I make a mockup assembly first minimal screws) and then spray paint the edges,then you can drill 2 sides at once and have them square and in place and make sure the screw hits the middle of the board,I also use a magic marker to show screw lines across the top of angled boards for pre drill/counter sinking,
I found out it will be best to start reassembly from the inside out, my power drill won't fit in the smaller spaces outherwise,
Thanks Epa ,I got sawdust and a bunch of long skinny triangles,They might work as gussets,lol
Cheers!
NS


Here's my contribution...
I hope mine live up to all the others that have been put up recently 🙂
I should get some better pics as I build. I got a CM140 SPL meter for my measurements, so I can throw up those once this one is done and I can take it down to the field.
This sub is 1 of 4 🙂 Still have to add cabinet hardware and paint, should be able to do some testing next week
Attachments
Is it ok just to attach the driver with wood screws? If I have to go back to home depot it means purchase orders and purchase orders and purchase orders and purchase orders...
I must say that the paperwork associated with doing all of this for the school is very annoying, I am used to just doing my own thing and just buying things when I need them
I must say that the paperwork associated with doing all of this for the school is very annoying, I am used to just doing my own thing and just buying things when I need them
Use #10 Pan head sheet metal screws instead.
I can probably wrangle up something similar to those, thanks.
I think he was hoping to use at hand items (to avoid a PO).
Precisely
hi,
Looking good ,I almost got one done I want the PL to dry so I can sand a few spots,lol
What speakers are going in those bad boy's?,lol.
NS
Here's my contribution...
I hope mine live up to all the others that have been put up recently 🙂
I should get some better pics as I build. I got a CM140 SPL meter for my measurements, so I can throw up those once this one is done and I can take it down to the field.
This sub is 1 of 4 🙂 Still have to add cabinet hardware and paint, should be able to do some testing next week
Looking good ,I almost got one done I want the PL to dry so I can sand a few spots,lol
What speakers are going in those bad boy's?,lol.
NS
Last edited:
I used 5/16 bolts and T-Nuts,I am going to tighten them ,and run it and see if it loosens if yes ,Blue locktite,some of the preveous threads say hurricane nuts and barbed nuts work better ,I glued the T-Nuts in tight holes ,I used a vice to set them,I think they will be fine,
A question you added reflectors ,I was wondering why? and if it simmed better or just a good Idea ,
Thanks,
NS
A question you added reflectors ,I was wondering why? and if it simmed better or just a good Idea ,
Thanks,
NS
reflectors
Would someone that has simmed this horn please put 3 more reflectors in and run the sim and post the results,I am almost ready to put the side on and could change it now ,But Xoc1 says he has kept it as is so It's built per the plans,
Thanks alot,
NS🙂
Would someone that has simmed this horn please put 3 more reflectors in and run the sim and post the results,I am almost ready to put the side on and could change it now ,But Xoc1 says he has kept it as is so It's built per the plans,
Thanks alot,
NS🙂
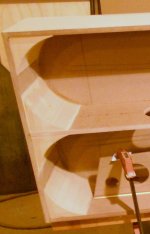
If you're not in to too big of a hurry at this point (and I would want to finish). I would glue up scrap and make "C" conner braces. Pic
OR at least pick up non-expanding window/door foam and fill the voids (tape all edges).
Light Blue Can: http://greatstuff.dow.com/products/window-and-door/
OR at least pick up non-expanding window/door foam and fill the voids (tape all edges).
Light Blue Can: http://greatstuff.dow.com/products/window-and-door/
Attachments
Last edited:
Looking good ,I almost got one done I want the PL to dry so I can sand a few spots,lol
What speakers are going in those bad boy's?,lol.
NS
I'm using the B&C 18ps76
Hi noSmoking,A question you added reflectors ,I was wondering why? and if it simmed better or just a good Idea
These are not reflectors but corner volume corrections. In other words, the sim is based on these corrections but you can leave them out. Btw have you thought about using braces?
Although you don't seem to be fond on cone correction ;-) it is meant for the same reason as the corner corrections. They are used to bring the actual build closer to the sim. Without the cone-volume-correction the driver looses control over excursion sooner below 38Hz and looses 1 to 2dB in maximum output around 38Hz.
Last edited:
Hi Djim,
🙂
I do not know how to figure cone correction,I am using a B&C Speakers 18PZB100,would you tell me how to correct for this speaker please?
I do plan to put in some stiffeners ,I have not cut them out yet ,that's today's project.
Thank you for your help and all the suggestions!
Cheers,
NS
🙂
I do not know how to figure cone correction,I am using a B&C Speakers 18PZB100,would you tell me how to correct for this speaker please?
I do plan to put in some stiffeners ,I have not cut them out yet ,that's today's project.
Thank you for your help and all the suggestions!
Cheers,
NS
hi Doug Bo
The pl adhesive is a expanding product it help fill gaps and seals the joint so it won't leak air,
Nice bandsaw work on those pieces!
NS😀
🙂If you're not in to too big of a hurry at this point (and I would want to finish). I would glue up scrap and make "C" conner braces. Pic
OR at least pick up non-expanding window/door foam and fill the voids (tape all edges).
Light Blue Can: GREAT STUFF? Window & Door | Draft Stopper for Windows and Doors
The pl adhesive is a expanding product it help fill gaps and seals the joint so it won't leak air,
Nice bandsaw work on those pieces!
NS😀
- Home
- Loudspeakers
- Subwoofers
- TH-18 Flat to 35hz! (Xoc1's design)