
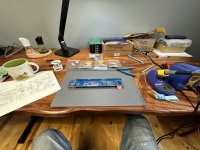
best to bolt them to bottom plate
proper and simplest way to keep them cold
thermal goop and split washer, must
proper and simplest way to keep them cold
thermal goop and split washer, must
Kinda tough to do that….but there is a hole….hummmmm
Attachments
Last edited:
The inline leaded rectifiers can work in the upright position with a little help..
I have these in my Aleph J; they do run pretty warm, about 55° by the Papa scale.
ZM is still correct; the baseplate of a chassis makes a good heatsink for the brick style rectifiers.
I have these in my Aleph J; they do run pretty warm, about 55° by the Papa scale.
ZM is still correct; the baseplate of a chassis makes a good heatsink for the brick style rectifiers.
Attachments

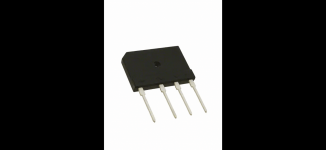
TA, what’s the specs on that baby? The one I’m looking at is 600v, 35a. Will bolt to bottom plate. Thanks
ZM bitten too many times, to even consider using small plasticky drek in any amp drawing 1A5+ per channel and having ooomph caps
35A is smallest bridge ever going in any of my amps
35A is smallest bridge ever going in any of my amps
Glass Passivation (melting glass) is applied at 800degrees I think. Should be pretty good. Guess I’ll find out.
I prefer more something like this...
https://www.mouser.de/ProductDetail...=sGAEpiMZZMvplms98TlKY6I1zmttAFjhDacDtzkuvZk=
Cheers
Dirk
https://www.mouser.de/ProductDetail...=sGAEpiMZZMvplms98TlKY6I1zmttAFjhDacDtzkuvZk=
Cheers
Dirk
The GBPC series rectifiers use spade terminals, not screw. I only use these for ground lift circuits.
Here is a different series of high current (60A) rectifiers that can be used with larger amps. Screw terminals, chassis floorplate mount, and still fairly low Vf.
Here is a different series of high current (60A) rectifiers that can be used with larger amps. Screw terminals, chassis floorplate mount, and still fairly low Vf.
Attachments
Thanks for memory spark. That’s the one I’ve used before. Just couldn’t find it. Spendy little buggers. They sure make excellent terminations.
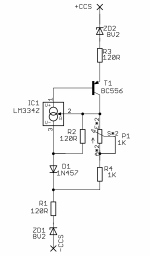
you know your way around CCS Daughterboards?And so it begins….thanks to Mr. ZM.
I mean,there is only left for you to solder LM334, BC556 and trimpot, all being in bag with pcbs
and then, be sure to solder them with copper studs at least 5mm elevated from main pcbs
just a reminder ( for me, as first) - this is R.3 thread, while you have lastlast blingy - (42)
posted also in original (42) thread, post #109 https://www.diyaudio.com/community/...o-sissysit-42-as-a-cradle.387767/post-7256125 , note added in opening thread post
Attachments

Last edited:
Holy cow……I just read. Learning the ways of the mighty ZM is taxing & exciting all at once but nevertheless I remain diligent. I have so much to learn….”I’ll be Bock”.. 🍻

You must really enjoy the SHI@ out of it as your approaching 50,000 messages!!!
I for one am very glad their folks like you out there.
I for one am very glad their folks like you out there.
- Home
- Amplifiers
- Pass Labs
- SissySIT R.3