Beginners beggings
Hello!
Finall, I got here:
Use my Quasimodo.
Never having played with this kind of stuff (scope, 😱), I don‘t know what to ask to get to useful results.
I already hooked everything up, and all seems to be running as expected:
Tranny connected, Q powered with a 9V battery, scope connected, when turning the trimpot the curve (which looks quite like those in Marks doc!) moves and flattens until a certain point when it ( the curve on the scope‘s screen) kind a runs away before it is fully flattened after that first spike.
If you read until here you‘ll understand I don‘t quite understand all this…
So if you could point me to a manual/handholder so that I could get along, this would be great…
Thanks a bunch!
David
Tap into the collective wisdom of diyAudio's 200K+ members!
Start a brand new thread in the "Equipment & Tools" Forum, with a catchy title that will attract the attention & pique the curiosity of many people. Maybe something like:
Help! I bought an oscilloscope but don't have any idea how to use it! Teach me please??
Then write your post #1 carefully. Demonstrate that you are earnest, eager, and the exact opposite of lazy. Talk about the oscilloscope tutorials you've already read and the YouTube training videos you've already watched. Talk about specific individual successes and failures you've had when trying to teach yourself. Mention the other lab equipment you have available (DC power supply, digital multimeter, signal generator, solderless breadboard, lab bench audio amplifier, etc.)
Make it easy for people to help. Make it easy for people to WANT to spend their precious hobby hours, training you.
Google found those links in less than 1 second.
Thank you, Mark.
From these suggestions, I conclude I'm supposed to know what I'm doing, am I not?
I'm going through that stuff right now and will dig further. I may be able to figure out how to apply it on Q, if not, I might use a click or two. ("Tri Ethyl Borane", you know 😉 ) (But since I'm one of those who often miss a corner...)
...
d🙂
.... (scope, 😱), I don‘t know....
Technical books online
Know Your Oscilloscope
Oscilloscope Techniques
Troubleshooting with the Oscilloscope
Thank you PRR!
Started with what should go first: "How NOT To Blow Up Your Oscilloscope!" 😀
(And I stop right here cluttering up the thread, everything else somewhere else)
Started with what should go first: "How NOT To Blow Up Your Oscilloscope!" 😀
(And I stop right here cluttering up the thread, everything else somewhere else)
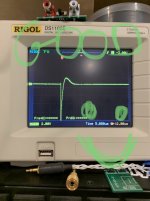
I think I am quite close to a valid result on a toroid.
I have
Cx 10nF
Cs 150nf
Rs 46R
A variation with Rs = 36R seems to be good too. Not sure where the sweet spot is? Practice!
The curves are below.
(Screenshot-export not yet figured out, but I'm closing in)


I have
Cx 10nF
Cs 150nf
Rs 46R
A variation with Rs = 36R seems to be good too. Not sure where the sweet spot is? Practice!
The curves are below.
(Screenshot-export not yet figured out, but I'm closing in)
Analog Devices (nee Linear Tech) guru Jim Williams wrote many ap notes with comments on probing -- ADI makes it easy if you put his name in the search engine with "probing". Here's one: https://www.analog.com/media/en/technical-documentation/application-notes/an94f.pdf
@myleftear - neither of those are correct. Be sure you look at page 1 and download the notes from Mark and read them. The top picture is underdamped, the bottom picture is overdamped from what I am seeing.
Are you using a potentiometer to find the sweet spot?
Are you using a potentiometer to find the sweet spot?
Hi myleftear,
.. but your second 'scope pic is pretty close. 😀
I'd say you're doing pretty good for just 'getting the hang of' an excellent new 'scope!
Was the 2nd trace the 36 or the 46 ohm resistance? If it was the 36, then 46 ohms is probably just about right.
Cheers
.. but your second 'scope pic is pretty close. 😀
I'd say you're doing pretty good for just 'getting the hang of' an excellent new 'scope!
Was the 2nd trace the 36 or the 46 ohm resistance? If it was the 36, then 46 ohms is probably just about right.
Cheers
Last edited:
This is the shape you should adjust for…
Smiley face optional, but it certainly does not hurt…. 😀 😀 😀
@myleftear - neither of those are correct. Be sure you look at page 1 and download the notes from Mark and read them. The top picture is underdamped, the bottom picture is overdamped from what I am seeing.
Are you using a potentiometer to find the sweet spot?
Thanks to everyone helping me!
Rick, the underdamped one is actually undamped (trimmer removed).
With the overdamped one I wasn‘t sure about where to stop. I of course read the manual (omitting the „f“ in the acronym)
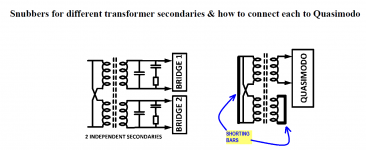
I use a Quasimodo V4 with everything on it, thus it is a 1K trimpot.
But I obviously didn’t catch the sweet spot‘s signs. Is it more like „make the curve look like this“ or rather „make the curve not go into a „flat-but-still-present-negative-curve“?
Will read rhe manual again as soon as I made the dishes 🙂
…
Jim, I don‘t know how to adjust the jig + oscillator to get a smiley onto the screen
no seriously, what’s the 6000 saying to me? (Can’t relate)
Last edited:
Was the 2nd trace the 36 or the 46 ohm resistance? If it was the 36, then 46 ohms is probably just about right.
Cheers
Thanks Rick 😀
It was 46 R.
I had a 36 R result too, and although it was very close to the 46 R variant, it seemed better to me. but didn’t pictured it. And it wasn’t the shape Jim advised me…
Nevermind, it‘s just plain fun, and I have my toe in the scope-water (learning, woohoo [emoji322]!)
a 200 or 100 ohm pot will allow you to tune it very nicely. I think I have a 1k, a 500 and a 200 ohm pot.
IIRC (a big 'if'), *optimum damping* is when the area under the curve below '0', and the area under the curve above '0', are equal. But I could be wrong (considering my lack of success in college calculus 😱)!
And try not to get frustrated by those trimpots with a little too much 'slop' in the mechanism.
Regards
And try not to get frustrated by those trimpots with a little too much 'slop' in the mechanism.
Regards
Last edited:
"quasimodo lumpity bumpity" :ROFL:
It seems to me I will never ever be able to follow up on such illuminati-only knowledge...
But—on to the posts!
It seems to me I will never ever be able to follow up on such illuminati-only knowledge...
But—on to the posts!
This is the shape you should adjust for…
Smiley face optional, but it certainly does not hurt…. 😀 😀 😀
It is a „good“ and not a „6000“!
So much to my thickness, beg your pardon.
I'll try really hard not to fill this great thread with my blabber, but that is really difficult—MJ's eloquence, and ironic ways of saying ... well ... something like "no", or "please, think/read". Even or especially when I am the prey (victim, target), makes me smile from ear to ear.
BTW, as I understand the Introduction, we're supposed to get to ζ > 1 (overdamp the beast and thus go further than critically damp it), I still can't quite relate the "optimal" curve as the "target" and not just the "starting point"? Or not? Do we aim ζ ≥ 1 ?
I don't don't believe you, I just don't understand it (the lumpity bumpity thing).
- Home
- Amplifiers
- Power Supplies
- Simple, no-math transformer snubber using Quasimodo test-jig