
are there anyone build DSC with tube output??
what tube can be used?
any IV resistors must be calculated?
thanks
what tube can be used?
any IV resistors must be calculated?
thanks
you can put a low gain DHT stage after
https://www.bartola.co.uk/valves/2021/11/20/801a-preamp-revisited-part-i/
https://www.bartola.co.uk/valves/2021/11/20/801a-preamp-revisited-part-i/
Hello, it's me again. This time I'm getting stuck while flash pure for BBB, I write img from puredsd.ru to my sd card. But when inserting to BBB, hold S2 and the userLED0 only flash 2 times, there is no way to light up all 4 LED. So anyone know what I'm wrong?
Thank so much!
Thank so much!
I think the manual is a bit outdated. The new BBB boards automatically go to your SD card for startup when it is inserted. So do not push S2, it will affect the startup negatively.
Important thing is the BBB is connected to LAN. It has to see an active UTP connection.
Then when after powering up and 10sec blinking, ALL LEDs go out, the BBB is running pure. Maybe that startup from SD card take a bit longer, I do not remember, but it should never last longer than 30sec. The only blinking that remains is green and orange from the UTP connector.
Then you can acces the pure software with the http://pure.local and flash the SD card contents to eMMC using the system tab in the web browser menu from the pure software.
Last edited:
Thanks! I did it. There are too much painful for me. After two weeks I found the mistake was the mclk line didnt fully connect to bbb.I think the manual is a bit outdated. The new BBB boards automatically go to your SD card for startup when it is inserted. So do not push S2, it will affect the startup negatively.
Important thing is the BBB is connected to LAN. It has to see an active UTP connection.
Then when after powering up and 10sec blinking, ALL LEDs go out, the BBB is running pure. Maybe that startup from SD card take a bit longer, I do not remember, but it should never last longer than 30sec. The only blinking that remains is green and orange from the UTP connector.
Then you can acces the pure software with the http://pure.local and flash the SD card contents to eMMC using the system tab in the web browser menu from the pure software.
Now everything is good!
Well, I tried and the low range is quite blurry. I think it’s because of the mismatch in impedance. So I have to find the othersYou could try 1:1 and see what you think. Its probably not going to be optimal in various ways, but it might be acceptable enough. Have to try it and see.
OTOH, if you want to try something more high-end maybe consider: https://www.lundahltransformers.com/wp-content/uploads/datasheets/1588.pdf
Best regards!
Hi there 🙂
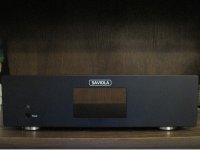
Im the next happpy owner of the DSC3 .... VERY thanks to @jeroen_d for help with some problems 🙂
I had DSC2 ... DSC3 is much more detailed wide/deep soundstage .... I play with my GU81PP ant other amps ... ES9038 had no chance, PCM1704 too ... For me DSC3 is the best source!
Now i'm fighting with DSDit 😀 can some tell me how to program it 😀 and with jumers I need to use with DSC3?
Thanks!
Marcin
I do the programming of the ATTINY85V-10SU with the SparkFun PGM-11801 Tiny AVR Programmer.
I took quite some research to find out how to do it exactly as I had zero experience with Arduino.
But in the end I succeeded and have the program and configuration ready. If people need support, I could send pre-programmed ATTiny chips. But I will have to ask € 15,00 each excluding shipment.
I took quite some research to find out how to do it exactly as I had zero experience with Arduino.
But in the end I succeeded and have the program and configuration ready. If people need support, I could send pre-programmed ATTiny chips. But I will have to ask € 15,00 each excluding shipment.
Last edited:
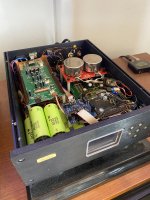
The jumpers that you need to close are JP1 1-2 because you need to derive a 22-24MHz clock from the Crystek clocks for the SRC and AK chips. Also JP2 needs to be closed for this. Then depending on whether you use Amanero JP3 1-2 needs to be closed and with Xing U30 JP3 2-3 needs to be closed. Leave JP4 open!Hi there 🙂
Im the next happpy owner of the DSC3 .... VERY thanks to @jeroen_d for help with some problems 🙂
I had DSC2 ... DSC3 is much more detailed wide/deep soundstage .... I play with my GU81PP ant other amps ... ES9038 had no chance, PCM1704 too ... For me DSC3 is the best source!
Now i'm fighting with DSDit 😀 can some tell me how to program it 😀 and with jumers I need to use with DSC3?
Thanks!
Marcin
You better also buy this with the PGM-11801: https://www.sparkfun.com/products/13153?_ga=2.181346855.1244100876.1713855901-285933747.1713290558 and https://www.sparkfun.com/products/9385?_ga=2.106965506.1244100876.1713855901-285933747.1713290558Thanks @jeroen_d for the replay 🙂... I juz buy a SparkFun PGM-11801 .... It is hard to program it with this AVR?
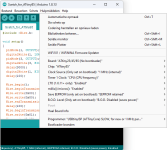
If you use Windows then use the program Zadig to install the correct drivers and so that Windows will be able to recognize the AVR programmer.
The AVR programmer then will perfectly run the test program with the LED blinking when you program with Arduino (I use version 1.8.13). See the hookup guide: https://learn.sparkfun.com/tutorial...76.1244100876.1713855901-285933747.1713290558
Use a 1MHz internal clock setting! And it will correctly show the LED blinking with a frequency of 1Hz.
But it will not be able to program the scetch provided with the DSD'it design by Pavel. For this, you need an extension of the Arduino software to be able to be fully compatible: https://github.com/SpenceKonde/ATTi...-head-submit-PRs-against-this/Installation.md
After this installation, you will be able to choose the right settings under "hulpmiddelen" tab which will probably be "tools" with an English version.
Attachments
Last edited:
- Home
- Source & Line
- Digital Line Level
- Signalyst DSC1