I didn't know the AKG 240 Studio were good enough to bother plugging in to this project.
That's why I didn't buy a kit from Tbag, because I don't like the idea of buying more headphones.
I might have to reconside this decision.
Transducers are a very subjective category. As much as a DL-103 MC "budget" cart no matter its quirks is loved by many and will still respond to any better turntable and arm, in the same way each cheaper classic headphone can be interesting on different preamps. Don't worry about what headphones you now got. They will come up better with a good preamp. This guy describes the Studios well enough I think https://www.youtube.com/watch?v=mC9sh4eCcfQ
🙂 Oppsss... forgot.
I am quiet at moment, using a lot of time finishing this nice pre. up
Jesper.
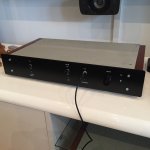
Looks nice. Are those front panel letters done by a panel maker or are hand transferable from a stencil?
P.S. Can you post the photo in higher analysis like 1024 pixels wide so we can see better?
Looks nice. Are those front panel letters done by a panel maker or are hand transferable from a stencil?
P.S. Can you post the photo in higher analysis like 1024 pixels wide so we can see better?
They are dry transfer's... But there are some small failures. When it's all done, frontpanel will be repainted and re drylettered transfered.
I will take better picture, when i got home from work 🙂
Jesper.
So... This is the best picture i can take with my phone.
But when i am all finish with the chassis, and everything is ready, one of my collegues will take pictures with a real pro camera, with right light and such stuff.
As you can see, there are some faults in both paint and dryletters.
This is something i cannot accept 😱
Actually it's quite normal, that i have to repaint/reletter my faceplate. I think i did not one single time success in first try 😛 ... Nevermind it's just have to be done right.
The dryletter sheet's i bought many years ago, and still my only best solution for this kindoff art.
Now i just wait for the very last final parts to arrive (some tinyxlr for headphones etc...)
Jesper.
Attachments
What size of chassis would you recommend?
Thanks
Jim
Mine has around 390mm. X 65mm. free space inside.
The chassis is 430mm. X 78mm. outside dimensions.
Besides two torrids, two psu's and one preamp. board, i have input/output selector (2 input's and 2 output's), where one of the input's is from an Raspberry pi with an DAC on top of it.
Then i have a relayswitch for feeding a IEC 230vac outlet for turning on my poweramp. Besides that, there is also some space used for headphones outlet, and switchs and so on.
Mine chassis is filled 100% 🙂
Jesper.


Jesper,
Is that chassis 430mm wide, 390mm deep (front to back) and 78mm high? And if I have that right it leaves you with a space from front to back (390mm) that is 65mm wide. So a reasonable choice might be the DIY Audio Store Pesante 2U with the optional 400mm depth. It is 430mm wide, 400mm deep and 80mm high. Are your boards similar in size to Salas's? Thanks for your help with this. I have found that while I can make my own chassis, the projects seem to take forever when I do.
Jim
Jesper,
Is that chassis 430mm wide, 390mm deep (front to back) and 78mm high? And if I have that right it leaves you with a space from front to back (390mm) that is 65mm wide. So a reasonable choice might be the DIY Audio Store Pesante 2U with the optional 400mm depth. It is 430mm wide, 400mm deep and 80mm high. Are your boards similar in size to Salas's? Thanks for your help with this. I have found that while I can make my own chassis, the projects seem to take forever when I do.
Jim
Opss... ofcause dimensions area wide=430, depth=240, height=78 all mm.
Internal is ~390, 235 and 65 - Hole chassis is diy... and yes it's amazingly time consuming 🙂
Jesper.
Mine has around 390mm. X 65mm. free space inside.
The chassis is 430mm. X 78mm. outside dimensions.
Besides two torrids, two psu's and one preamp. board, i have input/output selector (2 input's and 2 output's), where one of the input's is from an Raspberry pi with an DAC on top of it.
Then i have a relayswitch for feeding a IEC 230vac outlet for turning on my poweramp. Besides that, there is also some space used for headphones outlet, and switchs and so on.
Mine chassis is filled 100% 🙂
Jesper.
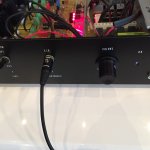
Nice work! Where did you source the relay switch?
Nice work! Where did you source the relay switch?
Just a plain 12vdc relay (250vac/10A)
https://www.omron.com/ecb/products/pdf/en-g5le.pdf
Jesper.
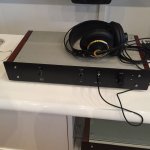
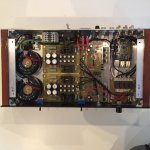
Finalizing this wonderfull preamplifier
Hello.
I need some inspiration for finishing my chassis.
I really would like to cut out some holes/squares for acryllic; so that the cool LED bars at the psu's could bee seen ?
Any hint's / idea's
Really this is the last thing i need to complete the build now!
I can only confirm, what i allready wrote, that this pre. is very very good, and especially the headphone outlet is surprises me the good way 🙂
Jesper.
Attachments
-
 6AEC3A55-881B-4D78-B0FD-B1EA487A7F8C_zpseywvxewb.jpg167 KB · Views: 643
 -
 513CDA58-FFEF-4E15-9126-DCBCC1931EE9_zpstxhxu4ej.jpg171.1 KB · Views: 628
 -
 52502C57-A437-47BC-932B-8389647DA090_zpsiclznspn.jpg257.2 KB · Views: 624
 -
 9AC008E4-471D-4DCA-8614-520EBA54342C_zpswo6bnzsj.jpg188.7 KB · Views: 632
 -
 FF69E03B-CD60-42EF-AB5B-3B83B6583E12_zpsxgvjrkbz.jpg~original.jpg267.1 KB · Views: 598
 -
 24C9A97B-331C-486D-BBD1-06C34A3634FB_zpsmnpq7fju.jpg~original.jpg194.6 KB · Views: 390
 -
 D683296C-E231-4B2F-A575-E22D62CC5320_zpss9zoemqq.jpg~original.jpg272.1 KB · Views: 384
Please attach your pics/info.
Hi...
Can't you see the pic's ?
I know it's a bad thing to use photobucket, but i cannot upload big pictures directily here on diyaudio!
Jesper.
then crop them to show only the important DIY elements.
And save them with a smaller pixel count that is sufficient to show the detail you want us to see.
.png with 1000 to 1500 wide pixels are often only 100kbits to 300kbits and quickly download (as thunbnails) from the DIYaudio server and stay with us for the duration that DIYaudio exists.
And save them with a smaller pixel count that is sufficient to show the detail you want us to see.
.png with 1000 to 1500 wide pixels are often only 100kbits to 300kbits and quickly download (as thunbnails) from the DIYaudio server and stay with us for the duration that DIYaudio exists.
Hi Lykkedk,
Nice build! Do you have a part number for the switches on the front panel and that grey mains connector (the device that you connected the transformer's wires)?
Nice build! Do you have a part number for the switches on the front panel and that grey mains connector (the device that you connected the transformer's wires)?
Hello.
I need some inspiration for finishing my chassis.
I really would like to cut out some holes/squares for acryllic; so that the cool LED bars at the psu's could bee seen ?
Any hint's / idea's
Really this is the last thing i need to complete the build now!
I can only confirm, what i allready wrote, that this pre. is very very good, and especially the headphone outlet is surprises me the good way 🙂
Jesper.
Acrylic hmmm... Or wire mesh area(s) better for more mysterious glow and some airflow?😉
If you don't mind taking the extra time. Your sheet of metal could have a lot of holes drilled in to make a pattern. The shape could be geometric, symbolic, an outline of some interesting creature/scene or artistic.
PS: Thanks very much for the dimensions.
Have fun
Jim
PS: Thanks very much for the dimensions.
Have fun
Jim
then crop them to show only the important DIY elements.
And save them with a smaller pixel count that is sufficient to show the detail you want us to see.
.png with 1000 to 1500 wide pixels are often only 100kbits to 300kbits and quickly download (as thunbnails) from the DIYaudio server and stay with us for the duration that DIYaudio exists.
Your'e right... Will do it next time AndrewT
Jesper.
Hi Lykkedk,
Nice build! Do you have a part number for the switches on the front panel and that grey mains connector (the device that you connected the transformer's wires)?
Hey...
The small switches is from RS-Online, but thet are old, and i can't find the number on them sry... The big switch is from some wornout industrial circuit for some crane stuff (very old).
Jesper.
- Home
- Source & Line
- Analog Line Level
- Salas DCG3 preamp (line & headphone)