Have had some time to work on the mcu software...
Code:
preamp controller v2.0.784 2024.11.14 19:35:30, � 2024, astx@astx.at
h=help

ntc type:               j=2
lcd dimmed:     k       1
lcd bright:     l       255
temp sensors t,u,v,y:   0|0|0|0 �C
delay repower:          n=5000 ms
ir nec device id        r=43147 (0xA88B)
delay inrush:           o=250 ms
delay mute:             p=1000 ms
power button type:      f=3
delay power button:     g=300 main loops
last selected input:    1
power on volume:        57
balance:                127
input1: delta volume=127        name=<MM/MC  >
input2: delta volume=127        name=<CD/DVD >
input3: delta volume=127        name=<USB DAC>
input4: delta volume=127        name=<TAPE   >
input5: delta volume=127        name=<BLURAY >
input6: delta volume=127        name=<TV/AUX >
maximum inputs active:  6
monitor set to input:   m=2     <CD/DVD >

b       : reboot
c       : switch to configuration mode
d       : toggle debug
f       : select power button type (switch=1, push=2, push_save_state=3)
g       : delay power button. number of main loops
j       : temperature sensor type: 1=NTCLE100E3222 (2.2k), 2=NTCLE100E3103 (10k)
k       : set lcd dimmed contrast 0 - 255 (low to high)
l       : set lcd bright contrast 0 - 255 (low to high)
m       : set monitor output to input number e.g. from 1 to max. 8
r       : ir nec 16bit device id, default 43146 (0xA88A, 0-65535)
t,u,v,y : temperature sensor 1 - 4 trip values
                  (0=ignore; 1=use port like digital low for poweroff; 2-99 max. celsius)
n,o,p   : delay (repowering, inrush, mute) 1ms steps
i       : list configuration info
w       : save configuration to eeprom
q,x     : exit
remote commands:
F,N,S   : power off, on, current power status
RI      : get, set input e.g. RI=3
RM      : get, set monitor input RM=4
RV      : get, set volume e.g. RV=99 (range 0-151; -63.5dB to +12dB)
K,L,M   : get current mute status, set mute off, set mute on
T       : get temperatures

Change input related settings - some examples:
IV4=127         : delta volume input 4, 127=0dB, 95=-16dB, 151=+12dB
IN1=AUX6        : rename input 1 to 'AUX6'
IM=8 : maximum active inputs- Monitor output can now be selected independently from current input selection. Good for e.g. tape recording from MM/MC during listening from USB DAC.
- More remote control commands: via USB you can control Volume, Input, Monitor
- bug fixes
- better eeprom retention control. Have implemented a home brew wear leveling protocol to keep the 1024 eeprom bytes as long lasting as possible.
- the power button, selected input state is even saved in eeprom to make a classic power on/off timer work. The boot up volume can be stored too
- a bootloader allows a field update via USB, if an internal jumper is set to allow programming. This speeds up development. Unfortunately from usable ROM of 64k I have used now 45k. Some, but not much space for future extensions.
Last edited:

Have seen that AK4497S is as reincarnation of the famous AK4497EQ on the way, shipping Q1-2 2025 ... It has no "hardware only interface" but with a small extra MCU it could be a future upgrade to the PCM1794A USB DAC....
Just signed up for some development samples ...
Just signed up for some development samples ...
For those who want the front design made by schaeffer AG I have attached the fpd file. The 10mm 2HE Modushop silver front can be send to Schaeffer AG for manufacturing.
The light blue acryl still has to be made by yourself (CNC) or laser cutted ...
Have fun, Toni
The light blue acryl still has to be made by yourself (CNC) or laser cutted ...
Have fun, Toni
Attachments
I use openscad to generate 3D stl files.
Qcad professional is my preferred 2D CAD software for case and part design.
Openscad has powerful language to mathematically construct 3D parts.
Qcad professional is my preferred 2D CAD software for case and part design.
Openscad has powerful language to mathematically construct 3D parts.
... you want a clear definition I see 😉
From OpenSCAD website/wiki:
OpenSCAD Tutorial/Introduction
OpenSCAD User Manual:
From OpenSCAD website/wiki:
- OpenSCAD is software for creating solid 3D CAD objects.
OpenSCAD Tutorial/Introduction
- OpenSCAD is a solid 3D CAD modelling software that enables the creation of CAD models through a scripting file. The domain specific language designed for this purpose allows the creation of fully parametric models by combining and transforming available primitives as well as custom objects.
OpenSCAD User Manual:
- OpenSCAD is a 2D/3D and solid modeling program that is based on a Functional programming language used to create models that are previewed on the screen, and rendered into 3D mesh which allows the model to be exported in a variety of 2D/3D file formats.
Anyway its awesome for some things, see attached for a FIR filter visualization - rename it as just fir.scad and try it - set up animation and watch it go. The distance between the balls represents a FIR filter response, the animation variable controls the simulated frequency.
Attachments
Awesome! I have absolutely no idea whats going on here, but the animation is great 😉
So many interesting details regarding audio we can/could learn...
So many interesting details regarding audio we can/could learn...
Last edited:
Today got answer from the Austrian distributor of AKM - unfortunately AKM will not send me any development samples of the new AK4497S to develop an upgrade USB DAC ... have to wait for mass production and buy from mouser et al... 🙁
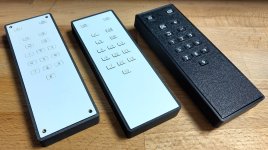
Remote control reloaded.
Have fun, Toni
- The left RC is the first working prototype (bottom 3D printed, top and buttons CNC milled from Alu Dibond; made at home)
- The middle RC is the currently working RC for SA2022 (bottom MJF nylon external printed, top and buttons CNC milled from Alu Dibond made at home)
- The right RC is a 100% 3D printing variant. (3D printed at home in ASA, buttons with filament change from black to white - works but optically not "high end")
Have fun, Toni
Attachments
Last edited:
Hah, that set is already sold - to me 😉Would you sell it, Toni? Please PM me about price, shipment procedure etc. ;-).
Best regards!
I guess that's a nice project for the next couple of months. Luckily it's all standard parts (unlike my Accuphase clones, which required months of sourcing EOL parts from all over the world. And that's at least 2.5k parts... Still missing some.)
This kit is really next level and two levels above all DIY projects I have seen so far.
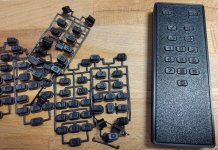
MJF printed buttons arrived...
The case top and bottom is 3d printed on my Prusa MK4S using black PETG.
Optically not high end, but works as expected.
The "buttons only" price for one remote (when buying 10 sets) is about EUR 16,-
Another method could be canibalize the buttons from an existing RC and redesign the top case.
Printing the case stl files quality depends on your 3D printer.
BR, Toni
Attachments
Last edited:
- Home
- Source & Line
- Analog Line Level
- SA2022 - Modular High End Analog Precision Preamp (with headphone amp, digital controlled relay volume, monitor output, IR remote, SE and bal. I/O)