It is the early version with the single bearing on top. I replaced the original with a new ceramic one that was recommended here or TAD. I am using a belt from Audio-Silente. I will contact Chris about my main bearing. i.e - maintenance possible needed?
I did just order new motor coils but maybe I will do a teardown anyway. Get in some more practice.
Thanks WntrMute2,
I was thinking a lightbulb but those heaters look good.
I did just order new motor coils but maybe I will do a teardown anyway. Get in some more practice.
Thanks WntrMute2,
I was thinking a lightbulb but those heaters look good.
I cranked the heat to about 24 c this evening and the TT got up to speed within about 15 minutes and that got me thinking. I have my brake set so it is sitting in the middle when it is fully warmed up. If I turn my brake to its lowest setting. The TT is at speed rather quickly. But then I am adjusting the brake every few minutes to slow it down over the next hour. Is that considered normal? When people say their TT is at speed with a single rotation of the platter. Do they have the brake turned off at the start?
m
m
Not me. I try and not adjust the brake as it can be quite sensitive. I find mine is up to about 90% of steady state within a few moments. The last 10% (estimate) within a song or two. I don't adjust it for that 10%>
.
.
Here are some more pictures of a TD124 for the internet. 🙂
I made an ugly frame to bolt it too and that has made working on it much easier. I found that there was very little oil in the bottom bushing felts of the motor. There was probably very little in the top as well. But I had spent the last few days applying oil to the spindle at the top. I have no idea where the oil has gone. I rebuilt the motor just over a year ago and it still looked just as clean inside as the day I closed it up.
I have put the felts back in some sae20 3 in 1 electric motor oil.
Should I bake some oil into my bushings? They are from Audio-Silente and I thought they arrived loaded with oil already. I really want as much oil as possible in there.
Attachments
I would add a little to the bottom bearing, I assume you have already thoroughly soaked the top bearing. Might just want to mop up any that got on the rotor so that it does not get flung all over the inside of the motor.
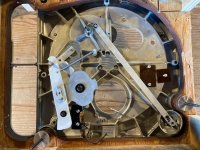
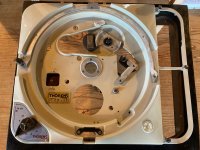
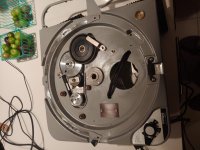
My table is back together now and is rotating the platter well. It takes just a turn or two to get up to speed though it struggles to get to 78 without a little help. I have just a few things left to do:
1. Create arm board and mount arm / cartridge
2. Create plinth
In terms of table upgrades, I would like to get a new idler wheel (or get it redone by Terry's rubber rollers). Any opinions on getting it redone vs getting a new wheel such as the one from Audiosilente?
I would like to get a new bearing end cap. Any opinions here? Was thinking about the Audiosilente one as well.
A new nylon washer for the thrust of the idler. Was thinking of just getting one from the local hardware store.
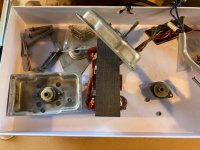
Finally, does anyone know what the pictured brass washer looking ring is for? It is 6mm and I had it bagged with the metal cam follower/switch actuator assembly.
1. Create arm board and mount arm / cartridge
2. Create plinth
In terms of table upgrades, I would like to get a new idler wheel (or get it redone by Terry's rubber rollers). Any opinions on getting it redone vs getting a new wheel such as the one from Audiosilente?
I would like to get a new bearing end cap. Any opinions here? Was thinking about the Audiosilente one as well.
A new nylon washer for the thrust of the idler. Was thinking of just getting one from the local hardware store.
Finally, does anyone know what the pictured brass washer looking ring is for? It is 6mm and I had it bagged with the metal cam follower/switch actuator assembly.
Attachments
I ended up going with the Woodsong Audio thrust cap. It allows the main bearing to be removed without taking the thrust cap off. The Audio-Silente thrust cap cannot fit through the main bearing hole.
It is well made and makes wrenching a little easier too.
m
It is well made and makes wrenching a little easier too.
m
Definitely get the Audio Silente idler wheel, it is much, much quieter than the stock idler or any of the several replacements I have tried including a very well preserved NOS one that was perhaps the closest but still a distant second to the AS idler.
Get an end cap that will fit through the chassis opening. Chris' end cap is excellent.
Get an end cap that will fit through the chassis opening. Chris' end cap is excellent.
How come it is important to be able to fit the end cap through the chassis? You could always remount it under the table but I must be missing something.
Because the bearing has oil in it, and it's messy amongst other reasons. It is also easier sometimes to work on it out of the chassis.
I had bearing caps that did not fit through the opening, and soon learned that fixing bearing issues was easier with it out of the table.
I had bearing caps that did not fit through the opening, and soon learned that fixing bearing issues was easier with it out of the table.
Ordered the Audiosilente Idler and will get the bearing soon. Curious if anyone had any idea what that little brass ring is?
There is a arm under the TT that engages with the speed cam. There is a brass ring on there. Is it that one?
m
m
It might be, where would it go on that arm? Odd since everything seems to be working pretty well.
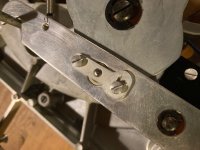
Brass washer
The brass washer is for the speed regulation don't loose it then you got a problem.
My table is back together now and is rotating the platter well. It takes just a turn or two to get up to speed though it struggles to get to 78 without a little help. I have just a few things left to do:
1. Create arm board and mount arm / cartridge
2. Create plinth
In terms of table upgrades, I would like to get a new idler wheel (or get it redone by Terry's rubber rollers). Any opinions on getting it redone vs getting a new wheel such as the one from Audiosilente?
I would like to get a new bearing end cap. Any opinions here? Was thinking about the Audiosilente one as well.
A new nylon washer for the thrust of the idler. Was thinking of just getting one from the local hardware store.
Finally, does anyone know what the pictured brass washer looking ring is for? It is 6mm and I had it bagged with the metal cam follower/switch actuator assembly.
The brass washer is for the speed regulation don't loose it then you got a problem.
Attachments
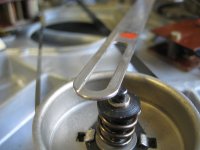
I have to polish the pulleys. What should I use to do it? I keep reading about crocus cloth and emery something or other. I would have to order some but have no idea what grit is appropriate.
Thanks,
m
Thanks,
m
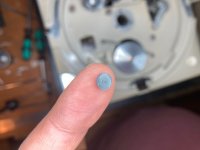
Do you mean the thrust washer? (That's what it looks like) The cap is the large metal part that bolts to the bottom of the housing in usual parlance.
My thrust washers are all the ID of the housing and can't move around for that reason.
Whatever that is looks more than a bit too small. To fix you probably need to get the right size thrust washer somewhere online and take the end cap off and install it.
Don't run it without one as the ball and cap might be damaged.
- Home
- Source & Line
- Analogue Source
- Restoring and Improving A Thorens TD-124 MKII