chassis GND
-is it hard to make it optional?
With simple jumper-pins, there can be permanent-jumpers/resistors/ext.gnd.lift-switch...
Arne K
-is it hard to make it optional?
With simple jumper-pins, there can be permanent-jumpers/resistors/ext.gnd.lift-switch...
Arne K
Hi Arne,
I do believe that is the plan...
Also, I think that I made a small mistake. The encoders will be 2" (50.8mm) from the LCD...
3" (76.2mm) seemed too far...
I have finished the micro board. Craig and I will get together to review.
The front panel board is 9.35" X 1.8" or (237.5mm X 45.7mm)
The LCD is centered on it. I will post some pdfs of the layout.
Dale
P.S. I will also post a BOM, so that people can get an idea of the parts involved.
New Volume controller scheme
Well, Once again, I had to make a command decision.
In order to satisfy the maximum number of people, and
to try to keep the price of the unit within reason.
I have split the volume control board into two boards.
A single board will handle two chains of 24 resistors.
Each volume board will have 24 DPST relays for this task.
I have also split the gnds on this board, so people using RCA
connectors(single ended) only need to get 1 volume control board. Fully differential L R users will need 2 volume control boards.
I also eliminated some of the decoder chips in favor of a cheap 40 pin microcontroller.
Actually I am glad I did this because the board layout is much simpler.
Each board has an I2C in and I2C out, for simple daisy chaining of the serial communication bus.
The volume boards will easily stack on top of one another
with standoffs.
Keep your suggestions coming!
Thanks,
Craig Beiferman
I will add to what Craig has posted.
This does not change the functionality in any way.
We have made some big efforts to reduce the price and allow people to buy only what they need.
Hey for power supply, would there be any huge objections to a wall wart style power source or should we just let people get their own.
A fully configured unit will only need 5V/1A max power. There is no 12V requirement anymore.
I will be getting two samples of the Optrex display tomorrow. We will attempt to take some pictures...
Also, does anyone know a source for big knobs?
Don't you hate it when real work gets in the way of fun...
Dale
Dale,
We will probably have to get those fabricated. Your idea about the power supply is geat, because some of us will be using this as a passive pre-amp and others will want to build buffers or gain stages into the unit.
Which brings to an important decision about the chassis. It should probably left to the individual at this point because of the switches and the number of inputs connectors required.
At some later point we could come to a decision on a standardized chassis for the preamp and then go for the group buy. It would be cost prohibitive to offer too many options.
Regards,
Jam
I think that the chassis design should be left up to the individual. A template for the front could easily be made.
As for the seperate boards with i2c interconnects, this is exactly what I was envisioning the project. I like that a single board can be used for non-balanced connections. Also, only putting 4 inputs on the input board would allow for easy scalability, for those more then 4, and even more then 8, if software allows for it. One question about this though, what is the cost difference from making a single large pcb, as compared to making a couple different smaller pcbs for this task?
As for knobs, I have been looking for knobs for quite a while, and have found little luck. Digikey does carry a bunch of different types, 71 different 1/4" knobs for the decoders.
If you are looking for buttons, I really like the ones that Mark Hennessy used for his:
http://www.mhennessy.f9.co.uk/preamp/control.htm
For the power supply, I see no problems with a wall wart power supply, as it should suit the task rather nicely. It could be optional if desired by the individual, and on the pcb, both a pcb mount wall wart connector, and pads for normal wiring could be implemented without much extra effort if desired.
Looks great
Hello again Dale and Craig,
I will be machining my own 3" aluminum knobs so I am ok with the centers set far apart! 🙂
As you change parts and move away from the original concept for a high performance product, please be sure to keep quality high. As far as the power supply is concerned I loathe the AC wall mounted adaptors myself I will probably power it from my Preamp anyway.
I take it there will be several ways to order the final product, from Bare boards to an everything but the kitchen sink? I prefer to use Holco resistors, someone else my prefer, VD or Mills. You can only carry the group buy philosophy so far, I understand that much.
Anthony
Dale/Craig,
Excellent progress guys, I'm at a loss to find fault with this now
Were you thinking of a DC or AC wall wart? AC might be better so that
those who wants to use an internal transformer will have the diode
bridge on board.
I'm more than happy about being able too use my own choice of buttons,
like BrianGT I like Mark Hennesy's choice of buttons. It won't be too
difficult to mount them on veroboard and wire to the main pcb.
For large rotary knob, I've found the best solution is to get some
machine turned on a lathe from aluminium bar. If you can get some made
I bet you'd do a roaring trade.
I'm looking forward to seeing some shots of the LCD and interface.
Looking forward to seeing the finished product!
How would the wall wart work? Is that an option or we must purchase it. I plan to go active and I'll probably have a separate small enclosure for the transformers and the rectifiers and filter so it won't make sense for me to have another appendix.
Although I agree we should wait for the final board, panel work is pretty much going to be necessary, unless you guys want to hack it through. I am especially referring to machining the rectangular hole for the LCD and the back RCA/XLR panel. I did it before I can do it again but I would much rather have a nice milled LCD hole and all the RCA/xlr perfectly lined up in the back.
The rest of the enclosure would be invisible and the distance between the front and back panels could be a variable that would be left to the individuals.
Brian,
the switches look real good I am looking for some right now.
Hi Grataku,
Most everything will be optional. I just didn't want to spend any time figuring out power options. Each board uses a two pin screw terminal for power connections.
It is my intension that people will either cut off the connector on the wall wart and put a more suitable connection (small DIN, etc..)
or mount a mate.
There will be no direct power connections from the wall wart to our boards.
After we get the boards finished and off to the fab, I will continue the software effort. I have decided that the programming of options will be thru a PC serial connection. Much simpler to write UI software in windows, then on a LCD display. The PC connection will also be useful for software upgrades (but my software has no bugs 😉
Craig will look into the panel options.
I just received a nice little mechanical encoder today. It has a switch. The price is 1.20 (qty 100). This is quite cheaper than the $20 optical. Of course the life is 30K versus 1000K.
The PCB layout is different as well.
One could also hard wire this connection as the encoder has a threaded shaft.
Dale
I Updated the web page with layout for the front panel board. The newest schematic is also posted if any cares.
noise
Hey guys, great work so far.. I have a question for ya though..
If I understand your schematics correctly, you're planning on putting microcontrollers on the same pcb as your attenuator boards and input select boards.. Are you not worried about the noise generated by such chips?
I don't know too much about minimizing cross-talk and high-freq. noise in PCB design, so I just put my controller logic on a seprate PCB (and will most likely shield my attenuator board). Did you do anything special to handle noise generated by the microcontroller, or is it not something worth worrying about?
--Jordan
You could use a micro which stops the clock when there is nothing to do->no noise. But then you better remove the display too (=noise). An external trigger then can bring the micro back to live.
Looking at this post, since i might want to change my motorised alps by the relay-board. See my webpage below for my current pre. Also RC5 code there for a pic!
Greetings,Guido
Looking at this post, since i might want to change my motorised alps by the relay-board. See my webpage below for my current pre. Also RC5 code there for a pic!
Greetings,Guido
Hi Jordan,
All very good points. As far as noise, the PIC we have chosen has an internal oscillator. All external signals are static (except during control changes or I2C activity) . If the PIC is well bypassed, the noise should be extremely minimal (if any). Guido is also correct that we will put the chips in sleep mode to be woken up by I2C activity. Since the grounds are isolated, the only noise would be capacitively or RF induced. Good bypass caps should eliminate any noise on the power supply pins (at least in theory)...
Brian asked why a PIC on every board. Well, we love microchip and want to support their company. 🙂
No, actually, the TI chips only have 8 outputs (microchip has a 16 I/O version), and the cost would actually be higher!
The display board should be far enough away to mitigate any noise. Some of these concerns seem to be audiophile myths. We will certainly offer a display off mode for those so disposed. Right now, I do have all appropriate input signals on interrupts that can "wake" up the processor from a sleep mode.
Best Regards,
Dale
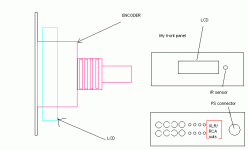
Dale here is my newest simplified panel.
I don't know how the dimensions are going to be, specifically the height of the LCD with respect to the encoder fastening height see sketch below. I like the front LCD to be flush with the front panle surface therefore the encoder may be a problem unless a second board is used to lift the LCD to the correct height.
So what I decided to do is to get rid of the encoders altogether and just have a fully remote control preamp. The front panel is going to have the lcd window and the ir senson hole, that's it.
The stdb mode could be shown on the lcd and the on mode would be obvious. That way once I hide the remote the kids will have nothing to push. 😉
The back panel is going to have all the ins and outs and a ps line connector. I indicated the In/out as a red square because I don't remember what's going on there. I would like to have both an RCA and an XLR out no matter what the input is. I would like to have an out dedicated for an headphone amp buffered or whatever.
In a separate enclosure I'll have all the mains stuff, big 0/1 switch etc.
Do you guys see any problem with/have any objection to this layout?
I have a PS here, what doese the STDBY mode actually do if the gain stage is powered and the control board is too?
Attachments
Noise ?
I do not think it wil be a problem.
Some of the "old" displays could induce noise(?), and I have found, when tweaking, that largest problem with them is mechanical ringing! When damped with rubber or glue between display and PCB, I could not hear difference anymore with display on or off...
Arne K
I do not think it wil be a problem.
Some of the "old" displays could induce noise(?), and I have found, when tweaking, that largest problem with them is mechanical ringing! When damped with rubber or glue between display and PCB, I could not hear difference anymore with display on or off...
Arne K
Hi Grataku,
I am a little confused by your post, but will try to address your situation. The LCD will be attached to the boards via a 16 pin header and then some standoffs. With this approach, you can mount the encoders to the front panel and then vary the height of the LCD above the board. You can buy some long headers from Samtec (0.1"). These are called board to board connectors and are used in PC104 or other BTB applications. We figured that you could either just use pins that go through the LCD and then solder them, or buy a header/pins that are the correct height.
Of course, we have opted to place the Standby LED and IR sensor to the left of the display. You are perfectly free to remote these anywhere. I don't think that a few inches of wire should pose any problems for the IR detector.
I am not sure about your PS question???
It is anticipated that the APOX supplies will be on most of the time. When the unit is powered up, it will be in standby mode or maybe you could program it to be in "on" mode after some period of time from power up. When in standby mode the opto would be off. In power on mode, the opto would be on. For many people, the unit will come up in the on state and the standby mode will not do anything.
Best Regards,
Dale
Note: potential earthing issue
Comments on file inputselectV1-0.pdf
This file looks great, but I have one issue on relay line splitting which does not appear to be completely thought out.
3 stereo relays are needed for each input. Due to the nature of how balanced mode works (cancellation provided signals receive same noise etc.), it would be advisable to use 1 stereo relay for left channel +/-, another for right channel, and use the third as a shared grounding relay (left ground, right ground). The earthing point (if available) on each Neutric (pin 4 if you like) could either be left hanging (my preference), shorted together with a resistive connection to cabinet or something like that.
Petter
Relay board and volume board schematics posted
Hello all, I have posted the lastest version of the volume control board and the input select board.
volume board
input select board
Petter,
I did use the same relay for the L+, and L-
and a seperate one for the R+,R-
The reference designators begin with a K. (The pin numbers may have threw you).
I have also added the ability to short (or resistively couple) the shield grounds to the signal grounds.
Thanks everyone for your advice. Dale is currently programming his new Optrex LCD with the Super Cool BLUE LED transmissive lettering.
I can't wait to see it!
-Craig Beiferman
I might be mistaken, but look at the latest input selection board and check out relays:
This is what I see (not symmetrical)
K4: Sig+, Sig- from XLR4
K5: Ground from XLR4, Sig+ from XLR8
K6: Sig- from XLR8, Gnd from XLR8
This is what I want to see (symmetrical)
K4: Sig+, Sig- from XLR4
K5: Ground from XLR4 and XLR8
K6: Sig+, Sig- from XLR8
Surely there must be an error here!
Petter
This is what I see (not symmetrical)
K4: Sig+, Sig- from XLR4
K5: Ground from XLR4, Sig+ from XLR8
K6: Sig- from XLR8, Gnd from XLR8
This is what I want to see (symmetrical)
K4: Sig+, Sig- from XLR4
K5: Ground from XLR4 and XLR8
K6: Sig+, Sig- from XLR8
Surely there must be an error here!
Petter
Oh crap! 🙁 Petter your right, I kept looking at the top of the input select lines. assuming the bottom was the same.
I sure am glad you caught that one.
Sometimes you just need a second (or third) pair of eyes.
I'll fix it right away.
Thanks again!
Craig Beiferman
I sure am glad you caught that one.
Sometimes you just need a second (or third) pair of eyes.
I'll fix it right away.
Thanks again!
Craig Beiferman
- Status
- Not open for further replies.