Thanx all 🙂
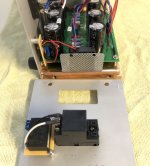
I dont have a proper digital thermometer, only the baby thingy, but that tops out at 40 deg cel. After and hour of listening, I stuck the tip against the heatsink, next to the output mosfet, and it went over the 40 deg reading LOL. Kinda freaked me out. Heatsink on the other hand, is nowhere close to that temp. I can keep my hands on there for a long time, without any discomfort.
When lockdown is over in SA, and I hope its soon, Im hoping to get one of these
Xh-w1209 dc 12v thermostat temperature control switch thermometer controller with digital led display with case Sale - Banggood.com
Hopefully it will look cool having the temp reading somewhere in the front panel
Well, I have nothing else to compare it to. So Im going to go with great. Very spacious sound indeed. I dont have the best sounding speakers either, but Im happy, well more than happy with the sound. Phone set to a flat EQ, and even then, its nice and detailed, especially the highs.How's it sound?
Just one question whether you have tried measuring the interior temp of
the amp as I don't notice any venting holes.
I dont have a proper digital thermometer, only the baby thingy, but that tops out at 40 deg cel. After and hour of listening, I stuck the tip against the heatsink, next to the output mosfet, and it went over the 40 deg reading LOL. Kinda freaked me out. Heatsink on the other hand, is nowhere close to that temp. I can keep my hands on there for a long time, without any discomfort.
When lockdown is over in SA, and I hope its soon, Im hoping to get one of these
Xh-w1209 dc 12v thermostat temperature control switch thermometer controller with digital led display with case Sale - Banggood.com
Hopefully it will look cool having the temp reading somewhere in the front panel
If you are going to continue to build get something like this:
AMES 12:1 Infrared Laser Thermometer for $17.99 – Harbor Freight Coupons
AMES 12:1 Infrared Laser Thermometer for $17.99 – Harbor Freight Coupons
just put some risers/distancers between bottom/top plates and rest of box
that way you'll make slits for air circulation
5mm risers can make a wonder
that way you'll make slits for air circulation
5mm risers can make a wonder
What ZM said, I trust him implicitly. Well, at least when it comes to EE recommendations, he might be an axle murderer for all I know. 😛
If you are going to continue to build get something like this:
AMES 12:1 Infrared Laser Thermometer for $17.99 – Harbor Freight Coupons
Will look into something like that, thank you. I suppose I could add some sort of venting system to the chassis, bottom and at the rear. First, I have to get some sought of name plate or something made for the front, looks a bit plain as is
Hi Ballistic
I also found those digital thermostatic controls on eBay. I was concerned with heat build up in my fairly compact F2J monoblock build and had decided to incorporate some small 12V cooling fans in the back of the cases to be safe.
The ones I got did work. I decided against using them because, even though I had already built and installed a seperate power supply and voltage regulator for my fans, I did not know what effect the switching relay might have on my listening experience if it was cycling on and off.
I had already milled some holes through my top mounted heat sinks and the case bottom. I also added some small screws that elevated the heat sinks (like Zen mentioned) to allow for better breathing.
My amps do not heat up much past 140 degrees F internally or externally. In terms of Papa’s 5 second rule for bare hands on the heatsink that is pretty much right on the money.
Attachments

Will look into something like that, thank you. I suppose I could add some sort of venting system to the chassis, bottom and at the rear. First, I have to get some sought of name plate or something made for the front, looks a bit plain as is
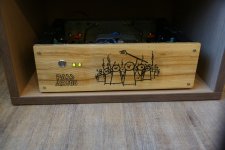
If you know someone with wood burning skills, that could be very cool.

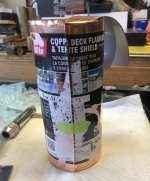
Love your use of the copper in there CN, I saw them finished, but did not know you had done some copper work for EM.
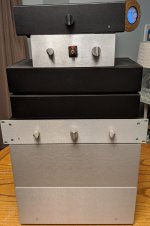

Nice stack of diy amps ..
I have a similar stack, I only have to listen to my wife's comments from time to time ... (why do you need them? When you take them to the garage? I hit my toe against them ... etc) 😀😀
I have a similar stack, I only have to listen to my wife's comments from time to time ... (why do you need them? When you take them to the garage? I hit my toe against them ... etc) 😀😀
@ chromenuts
I never even thought of this, good one man. This is why a forum is such an important part of diy. I might just buy a small 60mm fan at work and let it run permanently, maybe through a 7809 regulator, so that it aint that fast and loud
Maybe I can pull out my old soldering iron and try it myself. On a spare piece of wood first. Light pencil markings first, and then let it burn
I did not know what effect the switching relay might have on my listening experience if it was cycling on and off.
I never even thought of this, good one man. This is why a forum is such an important part of diy. I might just buy a small 60mm fan at work and let it run permanently, maybe through a 7809 regulator, so that it aint that fast and loud
If you know someone with wood burning skills, that could be very cool.
Maybe I can pull out my old soldering iron and try it myself. On a spare piece of wood first. Light pencil markings first, and then let it burn
its from NP micro article 😀 :
AB100 Amplifier - Micro Article by Nelson Pass
Since villagers armed with pitchforks and torches have begun camping
out my front door demanding a Class AB power amplifier, and
Whereas, I am inclined to demonstrate my goodwill in this manner and
do in fact have a 13 year old piece laying around unpublished,
you can try the "iron" method usally used to transfer PCB tracks, just get right a mirror image of the letters, as I "did" 😀 ... then cover everything with varnish.
oh yeah
I think I already said Fugly! for that one

ballisticz4, osscar,
Congratulations on your builds. It's good to see creative use of materials that are near at hand for DIY projects. 🙂
Congratulations on your builds. It's good to see creative use of materials that are near at hand for DIY projects. 🙂
you can try the "iron" method usally used to transfer PCB tracks, just get right a mirror image of the letters, as I "did" 😀 ... then cover everything with varnish.
Absolutely love this one!

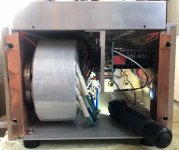
@thompson I like the copper for a couple of reasons. It is much easier to make my cases by using wood cheeks (side panels) and I like the aesthetics.
It’s not that expensive as the copper I use is vinyl backed termite barrier that I can buy rolls of reasonably cheap at Home Depot/Lowe’s.
It’s something I started doing when I built my first phono amp and I was not only concerned with EMI affecting the circuit, but more importantly having the entire case grounded properly with the wood being part of the case.
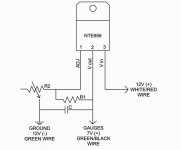
@ballistic I tested several fans and found them all too noisy to live with. The quietest was the small 1.25” X 1.25” 12V fans I got when the local Radio Shack went out of business.
Even then, I couldn’t live with the noise the little fan produced when it ran at the 10 or so volts that my mini 12V power supply was putting out.
I had to build an adjustable voltage regulator with some parts I had on hand. I had an lm317 equivalent and built my adjustable regulator from info I found online.
Once I had it working and everything in the case I adjusted it until it was inaudible from a few feet away with the lid on the amp. I found 6V output to be just enough to create a cooling breeze without excessive noise.
It’s not that expensive as the copper I use is vinyl backed termite barrier that I can buy rolls of reasonably cheap at Home Depot/Lowe’s.
It’s something I started doing when I built my first phono amp and I was not only concerned with EMI affecting the circuit, but more importantly having the entire case grounded properly with the wood being part of the case.
@ballistic I tested several fans and found them all too noisy to live with. The quietest was the small 1.25” X 1.25” 12V fans I got when the local Radio Shack went out of business.
Even then, I couldn’t live with the noise the little fan produced when it ran at the 10 or so volts that my mini 12V power supply was putting out.
I had to build an adjustable voltage regulator with some parts I had on hand. I had an lm317 equivalent and built my adjustable regulator from info I found online.
Once I had it working and everything in the case I adjusted it until it was inaudible from a few feet away with the lid on the amp. I found 6V output to be just enough to create a cooling breeze without excessive noise.
Attachments
- Home
- Amplifiers
- Pass Labs
- Pictures of your diy Pass amplifier