@raduschka - are you talking about the plug or the jack? If the plug, they disassemble so you can solder the wires to the pins. Which plugs are you using? Post photo or part number, please.
If you are talking about the plug, you can also buy assembled 4-pin XLR cables and cut off one end.
If you are talking about the plug, you can also buy assembled 4-pin XLR cables and cut off one end.
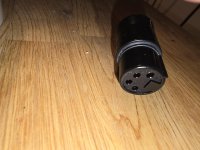
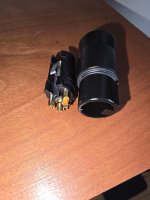
Never a worry. That's why I like photos and part numbers.I guess I am talking about the female end of the umbilical.
The female end of the umbilical does need to be disassembled.
568-NC4FXX-B
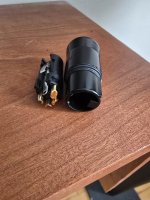
Unscrew the wire retention / strain relief (if it came assembled)
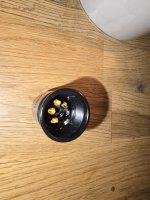
Push here... (photo) to remove the insert.
Solder to the cups on the back...
Slide it back in.
Reassemble...
Edited to add -- make sure to slide the strain relief / wire holder over the wire before soldering, particularly if there is anything attached already to the other end. 🙂
aaah, relief! So that's how it goes. Thanks a ton. I was about to upload pics, why not go ahead anyway
Attachments


Assembly instructions from Neutrik -
https://www.neutrik.com/media/8050/download/xlr-xx-series.pdf?v=1
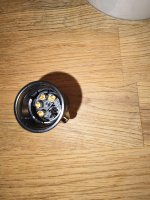
And pay very close attention to the pin numbers when soldering, particularly the jack, as from the solder side they are mirror image.
https://www.neutrik.com/media/8050/download/xlr-xx-series.pdf?v=1
And pay very close attention to the pin numbers when soldering, particularly the jack, as from the solder side they are mirror image.
Last edited:
thanks. I am now struggling to put it back in place, it slides right out, I have to figure out why.
Re: The voltage regulators, the PN# @ItsAllInMyHead posted tripped me up because it’s got an “L” in it, and that usually indicates a small-package, small current version … look up 78L15 and you’ll see what I mean. So I screwed up when seeing that, and the PN# in the guide is still appropriate.
Yes, the L7815CP / L7915CP will work, of course, as the first hundred or so kits were packed with them and nobody has had issues with the regulators. Later and current kits are being packed with the MC part, they are operationally identical.
The inside of the barrel is keyed. It’s mentioned in the linked instructions above.
Yes, the L7815CP / L7915CP will work, of course, as the first hundred or so kits were packed with them and nobody has had issues with the regulators. Later and current kits are being packed with the MC part, they are operationally identical.
thanks. I am now struggling to put it back in place, it slides right out, I have to figure out why.
The inside of the barrel is keyed. It’s mentioned in the linked instructions above.
thanks. I am now struggling to put it back in place, it slides right out, I have to figure out why.
From the 'real' instructions from @6L6.
It only goes in one way... you'll get it. The "guiding key" is the key.
I m embarrassed to keep you busy with such a trivial issue. It goes in all the way alright, up to its place, but then it comes right out if I push it, whereas before the procedure it was solidly in place. It doesn't seem to be the tension in the metal lever attached to the inside bit, I raised that up a bit and still nothing.
good to know, because no matter what I try I cannot get it to stay put. I wonder if it was like that in the first place.
i m starting to think so. The little springboard on the inner piece only serves the strain relief button, it has no retaining purpose.
i m starting to think so. The little springboard on the inner piece only serves the strain relief button, it has no retaining purpose.
Seemed somewhat difficult to source the Amgis or Talemas in Europe atm but this beast looks like it’s gonna do the job right?
Electrically that should work. If you're using the modushop chassis that might be too tall. 15 and 25VA have the same footprint, but 25VA is taller.
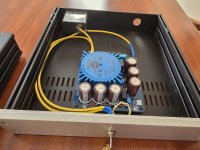

I am not, so I have to diy something, thanksElectrically that should work. If you're using the modushop chassis that might be too tall. 15 and 25VA have the same footprint, but 25VA is taller.
@raduschka
Please make sure the metal standoff at the chassis ground corner is touching bare metal on the chassis. Scrape paint as necessary to ensure this.
Please make sure the metal standoff at the chassis ground corner is touching bare metal on the chassis. Scrape paint as necessary to ensure this.
Does anyone in the UK or within posting distance have a spare pair of UDP3 boards?
Postage from the US seems to be prohibitive...
Thanks!
Postage from the US seems to be prohibitive...
Thanks!
I have my labcat when things go sideways 😁
He did spot a loose ground wire om pearl 3

He did spot a loose ground wire om pearl 3
Now that's a lot of test gear! Sweet!
As for the lab cat, I'd recommend some protective eyewear, just in case! (Right, like a cat would sit through that s***!)

As for the lab cat, I'd recommend some protective eyewear, just in case! (Right, like a cat would sit through that s***!)
- Home
- Amplifiers
- Pass Labs
- Pearl 3 Burning Amp 2023