I have printed off the Thread, all 110pages of .TXT on 55 sides of A4.
Will go through it and probably come back with a few questions before I power up my newly rebuilt PC.
Will go through it and probably come back with a few questions before I power up my newly rebuilt PC.
from Clean Install Windows 7 - Windows 7 Help ForumsIf you do not have a Windows 7 with SP1 installation DVD/USB, then you can download the latest official Windows 7 with SP1 ISO file at the links below.
Microsoft Software Recovery
Microsoft: Windows 7 Direct Download Links
You can use Windows 7 USB-DVD Download Tool to create a bootable DVD or USB flash drive with the ISO to do the clean install with.
Is this a good alternative to using the original Win7 DVD? Which is obviously out of date.
I have a recollection that if your original disc was say W7, or W7 including SP1, then you had to install the original version to get it to activate correctly.
That raises an important point. In Vista I know I could dive straight in and install SP1 and then SP2 directly from Microsofts site. Because SP1 and SP2 (Vista) included all updates that had gone before, it made for a much simpler and quicker install.
That raises an important point. In Vista I know I could dive straight in and install SP1 and then SP2 directly from Microsofts site. Because SP1 and SP2 (Vista) included all updates that had gone before, it made for a much simpler and quicker install.
My original Win7 DVD is pre SP1. I had to download the updates after they became available.
I also had to download the hundreds of subsequent updates.
That made me wonder if I can create a latest version, including all the updates, ready for the clean install, first to the newly rebuilt PC and when that is running do the same for this present PC.
But if I create a new file, how do MS get hold of my DVD code to prove I bought the original disc?
to get it to activate correctly.
Its up to you to enter the code during the initial set up pages when its asked for. However you do not have to enter it at that point. You can manually input it at any time afterwards although pop messages will appear daily until you do.
The updates are a killer on any install, this is why (imo) its so important to do it right first time and to image your drive along the way. Doing that enables you to build a current and up to date W7 install that can be used time and again to build a fresh installation on.
Something I have never tried is 'slipstreaming' an installation (search for W7 slipstream install). The method I chose was Vista, then directly install SP1, then SP2, then remaining updates.
Yeah, slipstream your non-SP1 version of the Win7 setup DVD with SP1 to create a Win7 DVD which integrates SP1.
This shows how to: How to slipstream Windows 7 Service Pack - Tutorial
This shows how to: How to slipstream Windows 7 Service Pack - Tutorial
Last edited:
I need more help.
The new micro atx motherboard is tiny and has no inputs for pre Sata CDP. I will temporarily steal the Sata DVD from this PC.
The nearly new HDD drives are Sata,
But I have some connectors left over and some motherboard sockets/headers still empty.
I have successfully found and connected
Front panel audio header 9pins
PWRBTN 2pins
RESET 2pins
PLED 2pins
HDLED 2pins
Chassis Speaker Header 2pins
CPU fan 4pins
ATX Power 24pins
ATX Power 4pins (under the PSU)
The following sockets/headers are still empty:
PWR_FAN1 What is this?
Chassis Fan There is no fan in the Chassis.
Chassis Intrusion Header. There is no switch for intrusion detection.
TPM Header I am not on a company Network.
USB 4_5
USB 6_7
And the following cables are hanging:
CD audio 3pins
USB 3pin + 1pin from front panel
USB 3pin + 1pin from front panel
Where does audio connect to? Via a Sata cable?
Do the front panel USB connect to the mother board Headers?
Yeah, slipstream your non-SP1 version of the Win7 setup DVD with SP1 to create a Win7 DVD which integrates SP1.
This shows how to: How to slipstream Windows 7 Service Pack - Tutorial
I read this after Mooly posted. It sounds quite complicated.
Is it intended to create a set up file to do a second PC quickly, that is identical to the first PC?
Does the first PC need the long winded set up?
I have two 16GB USB sticks, if that helps.
Last edited:
Not complicated at all. In fact it's easy. At it's very basic, it's intended to create a Win 7 setup DVD which has SP1 integrated within the install process so you do not need to install SP1 separately or rely on Windows update to install SP1.
You can do other things with slipstreaming like integrating Windows updates [other than SP1] within the installation process so that Windows does not need to download the updates via Windows updates AFTER the installation is done, you can decide what Win 7 attributes to install without the user [you!] needing to intervene during the installation process etc. I used to create slipstreamed CD's of Windows in the Win XP days because I used to tweak Windows a lot and invariably messed things up leading to needing to re-install WinXP. Slipstreaming saved me a lot of time post installation.
This should answer your question:
That made me wonder if I can create a latest version, including all the updates, ready for the clean install, first to the newly rebuilt PC and when that is running do the same for this present PC.
I will read it again and your link.
If it begins to sound simpler then I may follow that.
If I do Raid1 and install on those two HDD, do I need to specify Raid1 during the install?
Or do I specify Raid1 in the bios before the Win7 install?
If it begins to sound simpler then I may follow that.
If I do Raid1 and install on those two HDD, do I need to specify Raid1 during the install?
Or do I specify Raid1 in the bios before the Win7 install?
read this thoroughly [some sections may not be applicable to what you need to do so skip those]
How to Set Up RAID on Your PC | PCWorld
How to Set Up RAID on Your PC | PCWorld
@Andrew
I would get a new hard drive and install Win7 on it. Use the old hard drive as a backup.
After you install Win7, copy all your files from the old drive to the c: drive. Once that is done, reformat the old hard drive. Whenever there's anything important, simply copy the files to d: drive for backup. This will save you the trouble of doing RAID.
These two identical HDD barracuda 7200.10 were bought for RAID. But never used because I had installed the OS before telling it I wanted RAID. I was informed that RAID could not be added after install.
The HDD are about 2years old but nothing on them.
The HDD are about 2years old but nothing on them.
That's the same site I started reading before making dinner.read this thoroughly [some sections may not be applicable to what you need to do so skip those]
How to Set Up RAID on Your PC | PCWorld
@Andrew
I would get a new hard drive and install Win7 on it. Use the old hard drive as a backup.
After you install Win7, copy all your files from the old drive to the c: drive. Once that is done, reformat the old hard drive. Whenever there's anything important, simply copy the files to d: drive for backup. This will save you the trouble of doing RAID.
+1 to that.
Andrew, this is how I have my single drive set up. Its a system that works really well in practice.
Attachments
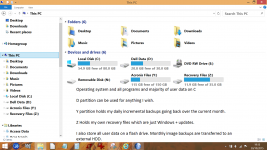
Does that mean I set up 4 partitions.
One at the time of installing Win7 and then add three more using the partition system within Win7?
I thought Win7 went into a partition all on it's own and other apps went into a different partition.
One at the time of installing Win7 and then add three more using the partition system within Win7?
I thought Win7 went into a partition all on it's own and other apps went into a different partition.
Yes, if that kind of set up is what you want. You start by using the install disc (the DVD) to totally wipe the drive in question by deleting all your existing partitions so that all the space becomes 'unallocated'. Then you create your first partition which is where W7 will go. Make it small as I mentioned earlier, say 20gb)
Look at item #8 here. This is what you see when you use the disc to initially wipe and format your drive.
Clean Install Windows 7 - Windows 7 Help Forums
Look at the commands in the red box. All your existing partitions will be shown, you select each in turn and select 'delete'. As you do so the disc space becomes 'unallocated. Delete all and you have a disc with no partitions and just unallocated space. Now you click 'new' and dial in a size for the first partition which is where Windows will live (say 20gb). And thats it. You leave the rest unallocated until you have W7 up and running and fully updated. Only then would I suggest expanding the W7 partition to the final size you want (easy) and then you can add further partitions as you wish. All those later steps are done from within W7.
Does that mean I set up 4 partitions.
One at the time of installing Win7 and then add three more using the partition system within Win7?
I thought Win7 went into a partition all on it's own and other apps went into a different partition.
Win 7 makes that stupid "system partition" ... here is a way to
circumvent that on a fresh install on a new HDD.
Let win7 install create that stupid 100mb hidden system partition -
Method 3 ( extending the 100mb to fill the deleted primary) -
link .... Hack to Remove 100 MB System Reserved Partition When Installing Windows 7 My Digital Life
works well !
Make that primary 20-50Gig.
Install windows.
with windows installed use the diskmgmt.msc
to slice up the remainder of the disk into whatever partitions you want.
20-50 gig is usually enough for any browser caching ,and many 3rd party
tools/viewers. If you choose your 3rd party hardware drivers and
don't let them constantly update (or change them too much) , windows
should stay <10gig in size indefinitely.
Ccleaner set to run at startup should also help to sustain that 10gig
size.
Create user defined folders on secondary partitions for 3rd party softwares
to place your work into.
You can look at a typical "mess" on a non-optimized setup (standard users)
with a good viewer -
Technische Universiteit Eindhoven: Info SequoiaView
(below) is the 5gig W7-64 with the big grey firefox cache (red arrow).
With this tool you will know if any thing is adding "bloat" to your
"lean and mean" OS. You will also see no big grey box on startup ,
the cleaner will delete it automatically.
I've seen an unchanging image on this tool for 4 year usage timespans.
My OS is like a "toaster".
On an optimized OS like this , you can use a HDD disk image on a bootable
USB to restore this perfection in 3-4 minutes. NEVER down for more
than 3-4 minutes.
You could even recover from a hard drive failure in 3-4 minutes , just
write the image on to the new hardware.
Files and important work should be kept in "triple redundant form".
That is .... expanded files for current use , an .ISO of those files on another HDD ,
and optically backed up on either DVD or BD-R.
OS
Attachments

I thought Win7 went into a partition all on it's own and other apps went into a different partition.
W7, all your installed programs, all your user data (music, pdfs and so on) all goes into a single a partition which Windows will label automatically as 'C'.
The Two HDD are unused.Yes, if that kind of set up is what you want. You start by using the install disc (the DVD) to totally wipe the drive in question by deleting all your existing partitions so that all the space becomes 'unallocated'. Then you create your first partition which is where W7 will go. Make it small as I mentioned earlier, say 20gb)
Look at item #8 here. This is what you see when you use the disc to initially wipe and format your drive.
Clean Install Windows 7 - Windows 7 Help Forums
Look at the commands in the red box. All your existing partitions will be shown, you select each in turn and select 'delete'. As you do so the disc space becomes 'unallocated. Delete all and you have a disc with no partitions and just unallocated space. Now you click 'new' and dial in a size for the first partition which is where Windows will live (say 20gb). And thats it. You leave the rest unallocated until you have W7 up and running and fully updated. Only then would I suggest expanding the W7 partition to the final size you want (easy) and then you can add further partitions as you wish. All those later steps are done from within W7.
So I don't have to delete anything. Is that right?
- Status
- Not open for further replies.
- Home
- General Interest
- Everything Else
- PC becomes very slow to respond