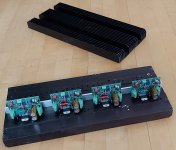
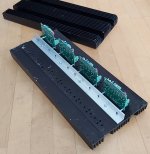
About 5 years ago I purchased 4 Modulus-86, rev 2.01 boards and the parts to build them. The intention was to use them for a set of Linkwitz Pluto's or LXMini's. When I bought the boards I also ordered all the parts from Mouser, except it turns out one key part was missing. For various reasons, including finishing a sailboat project (picture attached, sorry couldn't resist) I never actually got to building them until recently. Now I have 4 completed Modulus-86 boards ready to attach to a heatsink, chassis, power supply etc. So not done yet but much closer. I'll share the details of my workaround for the missing LME49710 which is no longer available.
The heatsinks were something I salvaged from a dumpster of an electronics company next to the one I worked at many years ago. They were too good to pass up as I knew they would come in useful for some sort of project eventually. The LM3886's on my boards don't have insulated tabs so I am just waiting for the insulators before I finish mounting the boards to the heatsinks. I plan to put the Pass analog crossover for the LXMini in the same chassis as the amps. I just built the one I ordered from the DIY Audio store when it first came out and it seems to be excellent.
Steve
Attachments

As I mentioned in my previous post, the LME49710 is no longer available and it must have been out of stock when I ordered the other parts for my Modulus-86 boards several years ago. I did have some LME49720 in the SOIC 8 package. These are dual versions of the LME49710. Tom confirmed that my best option was to use one of the 720 chips connected such that one amp is used for the 710 function and the other is just connected as a buffer with the input connected to a static signal.
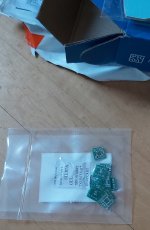
I could have used a blank SOIC to DIP8 adapter, glued the LME49720 upside down to it and soldered a few tiny wires in the correct places to achieve the desired circuit. I have done this lots of times to build test circuits. But there's a better way now. It's also getting harder for me to see to do this kind of work and I didn't feel like doing it four times. A lab tech I was working with would design adapter boards for our lab using EasyEDA and JLPcb, and we would have the boards in a week. I decided to give it a try. It took one evening to figure out the schematic and layout tool. The LME49720 and 0.1in pitch pin headers were in their library. Once I had a drc clean design I clicked on the order boards link and it took me to the JLPCB page. It was $2 for 5 boards, or $5 for 10. I only needed 4 right now but at that price ordering some extra made sense, and shipping was $11.60. So for $16 or so I had something that should be more reliable than my hand wiring the adapter circuits.
One week later the boards arrived from China by FedEx. In the next post I'll explain the steps needed to use them.
Attachments
What about differences between smps300reh and smps240qr , both in 30v?
For a stereo amp I would go with the SMPS300REh. The added heat sink is nice.
For powering a mono amp, the SMPS240QR should be fine.
Tom
Thanks tom for confirmation
I order today all needed parts from audiophonics
Since i'll have some days arround christmas, i shoumd be able to complete the amp by year end
I order today all needed parts from audiophonics
Since i'll have some days arround christmas, i shoumd be able to complete the amp by year end
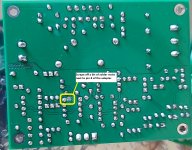
Here are the details of the adaptor I made with EasyEDA and JLPCB.
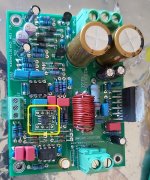
An old IC socket made a convenient holder to align the 0.1 in pin headers while I soldered them in place and then soldered the soic amp to the board. A 0 ohm jumper on the 0603 spaced pads converts the spare amplifier into a unity gain non-inverting buffer connected to pins 1 and 8. Those pins are no connects on the original LME49710. That first picture isn't very good and the solder isn't as messy as it looks. Now I can solder the adaptor into the Modulus-86 board in the location for U3. The final step is to connect the input of the spare amp to ground so it's not floating. I scraped a bit of solder resist off the ground plane next to pin 8, used the end of a resistor lead to make a jumper then trimmed off the excess. The adaptor boards made for a tidy installation and you wouldn't notice that it was there if you weren't looking for it.
I would definitely recommend EasyEDA and JLpcb if you want to make a simple and quick board.
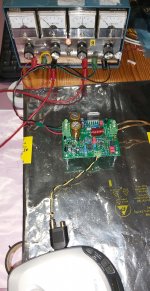
Finally I had a completed Modulus-86 ready to test. I have an old analog lab power supply, and a portable CD player makes a convenient signal source. Once I checked the output voltage with no load, I connected a speaker and hit play (at low volume). It worked! After confirming that one unit worked and the adaptor boards were correct I finished the other three Modulus boards. All four amps measured less than 1mv DC offset and worked perfectly.
I only had one other glitch while building these amps. On one board I had installed one diode backwards. I found it when checking the +/-15V rails before installing the op amps so no harm was done.
My home made coil is a bit uneven looking. I didn't have any 18g magnet wire but I found a coil in an old dc-dc supply with 18g wire. I unwound that and used it to make my output coils so the wire has a few extra little ripples in it.
Overall the Modulus boards and documentation were excellent and straightforward to assemble. I would recommend them to anyone who wants to build one themselves. For me, now that the pre-assembled units are available, if I need any more Modulus-86 I am just going to buy the assembled units from Tom. His support is great too, with quick response to any questions.
Steve
An old IC socket made a convenient holder to align the 0.1 in pin headers while I soldered them in place and then soldered the soic amp to the board. A 0 ohm jumper on the 0603 spaced pads converts the spare amplifier into a unity gain non-inverting buffer connected to pins 1 and 8. Those pins are no connects on the original LME49710. That first picture isn't very good and the solder isn't as messy as it looks. Now I can solder the adaptor into the Modulus-86 board in the location for U3. The final step is to connect the input of the spare amp to ground so it's not floating. I scraped a bit of solder resist off the ground plane next to pin 8, used the end of a resistor lead to make a jumper then trimmed off the excess. The adaptor boards made for a tidy installation and you wouldn't notice that it was there if you weren't looking for it.
I would definitely recommend EasyEDA and JLpcb if you want to make a simple and quick board.
Finally I had a completed Modulus-86 ready to test. I have an old analog lab power supply, and a portable CD player makes a convenient signal source. Once I checked the output voltage with no load, I connected a speaker and hit play (at low volume). It worked! After confirming that one unit worked and the adaptor boards were correct I finished the other three Modulus boards. All four amps measured less than 1mv DC offset and worked perfectly.
I only had one other glitch while building these amps. On one board I had installed one diode backwards. I found it when checking the +/-15V rails before installing the op amps so no harm was done.
My home made coil is a bit uneven looking. I didn't have any 18g magnet wire but I found a coil in an old dc-dc supply with 18g wire. I unwound that and used it to make my output coils so the wire has a few extra little ripples in it.
Overall the Modulus boards and documentation were excellent and straightforward to assemble. I would recommend them to anyone who wants to build one themselves. For me, now that the pre-assembled units are available, if I need any more Modulus-86 I am just going to buy the assembled units from Tom. His support is great too, with quick response to any questions.
Steve
Attachments


That's pretty nifty. I'm glad the build came together nicely for you.
Just a note for someone just popping into this thread: This adapter is only needed on the older revisions of the Modulus-86 boards. TI discontinued the LME49710 opamp that those boards used. The newer versions of the board use the LME49720, which is still in production.
Tom
Just a note for someone just popping into this thread: This adapter is only needed on the older revisions of the Modulus-86 boards. TI discontinued the LME49710 opamp that those boards used. The newer versions of the board use the LME49720, which is still in production.
Tom
Update, all nececessary parts have been orded and received .. actually not 100% .. missing the capacitors 100uf/10V that are out of stock and should be available by 18th January ...but luckily i have some 100uf/16V spares at home ..
I'm still in questions about about the grounding
I see the iec socket with frounding
The smps with grounding (main and Dc)
I see the In DC of mod86 with grounding and also the In where i connect the RCA with grounding
How do i connect those?
I see the iec socket with frounding
The smps with grounding (main and Dc)
I see the In DC of mod86 with grounding and also the In where i connect the RCA with grounding
How do i connect those?
IEC mains ground pin connects to the chassis with a short wire and a solder lug. Preferably use a lock nut and sand off any anodizing on the chassis so you get a good connection. This is for safety.
The SMPS ground connection connects to the safety ground solder lug as well.
The output side of the SMPS connects to the power input of the Modulus-86. Do not connect any of the three output wires to the chassis.
Pin 1 of the XLR input connects to the chassis. There's usually a solder lug for this on the XLR connector. It's conveniently located right next to pin 1.
Then pins 1,2, and 3 of the XLR connector connects to pins 1,2, and 3 of the Modulus-86 input. If your signal source or preamp has only RCA outputs, I recommend using a pseudo-differential cable: Pseudo-Differential Cable: Connect unbalanced source to balanced input – Neurochrome to connect to the Modulus-86.
That's it. All ground management is handled on the Modulus-86 board.
Tom
Thanks Tom, i will be on RCA inputs as my current dac is on RCA output
Summary
IEC : ground to chassi, only the plus and minus goes to the SMPS input.
SMPS main input receive plus and minus from IEC. The grounding input mains to Chassi
SmPS 30v out : plus/minus/grd to input mod86
And thats all
Rca plus and minus to mod86 input plus and minus
Do i get it correctly?
Its in these situations we can remind oyr father telling us, " learn every lessons at school, they could be useful one day
Correct except the connections to the MOD86:
RCA shell connects to Pin 1 of the input connector
RCA centre connects to Pin 2 of the input connector
RCA shell connects to Pin 3 of the input connector
This is shown on Page 39 of the design doc.
Tom
RCA shell connects to Pin 1 of the input connector
RCA centre connects to Pin 2 of the input connector
RCA shell connects to Pin 3 of the input connector
This is shown on Page 39 of the design doc.
Tom
Cool, thanks for last precision
I'm not yet on page 39 with attenrion .. waiting my winter vacation to put all of it nicely
Good day!
I'm not yet on page 39 with attenrion .. waiting my winter vacation to put all of it nicely
Good day!
@Thepinguin - Even though your source is single-ended (RCA), you might consider wiring up your Mod86 for differential (XLR) inputs. Then you can use a simple RCA-to-XLR cable from your source to your amp. And if you ever change your source to differential output, you won't have to touch your Mod86!
Agreed. See Post #5310.
An alternative is to use an RCA-XLR adapter. Neutrik NA2MPMF for example.
Tom
An alternative is to use an RCA-XLR adapter. Neutrik NA2MPMF for example.
Tom
That's another reason I've procrastinated on putting the SHD into service.
Tom, i know you had a hand in this design - do you know whether the USB port remains on when standby mode is enabled (or another creative idea to create a trigger?)?
No idea. I designed the analog sections of the device for MiniDSP. I'm sure they could tell you if you asked, though. Let me know if you aren't getting a response and I'll pull some levers for you.
Tom
Tom
Last edited:
Cool, thanks for last precision
I'm not yet on page 39 with attenrion .. waiting my winter vacation to put all of it nicely
Good day!
ThePinguin:
I'll be curious to find out how this amplifier works on the Sonus Faber Venere 3.0. I too have them and they sound loose and reverberant on all the amps and receivers I own. Not great.
They sound great on my buddy's SimAudio Celeste though. Tight deep bass. Tight sound. I'm waiting for him to upgrade (as he frequently does) so I can buy the Sim amp from him.
Amps that don't make the grade with these speakers are Arcam DIVA 350 Receiver, Hafler DH-220, Hafler DH-200, Marantz SR-7005 Reciever, Outlaw Audio 5000 power amp.
And Tom Christenson I'm in Calgary too! Just looked at your site. I had no idea such a venture existed here. Years ago I did a LM3785 amp inverted gainclone amp. Was lovely. I damaged it and now the chassis and power supply are waiting for something new to be put inside.
Its on the way .. have all parts .. need to complete the build .. will let you know
For sonus venere, these sound great on denon pma, at least in my room ..
They sounded muffy on other amps i had, especially with kt88 tubes ..dunno why?
Its not a matter of power as i don't listen loud
If my plan goes well , by year end , i'm done
For sonus venere, these sound great on denon pma, at least in my room ..
They sounded muffy on other amps i had, especially with kt88 tubes ..dunno why?
Its not a matter of power as i don't listen loud
If my plan goes well , by year end , i'm done
Amps that don't make the grade with these speakers are Arcam DIVA 350 Receiver, Hafler DH-220, Hafler DH-200, Marantz SR-7005 Reciever, Outlaw Audio 5000 power amp.
My amps have been known to unseat many of those. Krell is on the list as well. As is Jeff Rowland's amps, actually. 🙂 I'm not poo-poo'ing anyone here. Just forwarding customer feedback. And in all fairness, the Rowland amp was unseated by the Modulus-286.
And Tom Christenson I'm in Calgary too! Just looked at your site. I had no idea such a venture existed here. Years ago I did a LM3785 amp inverted gainclone amp. Was lovely. I damaged it and now the chassis and power supply are waiting for something new to be put inside.
You can most likely reuse the heat sinks, chassis, and power supply with the Modulus-86. I'm happy to meet up to chat and drop off boards should you decide to go with one of my amps. Under normal circumstances I'd suggest to meet over a beer. But meeting someplace outdoors has its charm too.
Tom
- Home
- Amplifiers
- Chip Amps
- Modulus-86 build thread