Most important thing you should have is a static mat to work on, like one of these guys, they're cheap and they also keep your workbench from getting scratched up and burnt by component legs and hot solder. Make sure you ground the mat properly.
Amazon.com: StarTech.com 24x27.5-Inch Desktop Anti-Static Mat M3013 (Beige): Electronics
If you're sitting at a desk and you're balancing your hands/arms/elbows on the mat most of the time, I wouldn't bother with a wrist strap.
Amazon.com: StarTech.com 24x27.5-Inch Desktop Anti-Static Mat M3013 (Beige): Electronics
If you're sitting at a desk and you're balancing your hands/arms/elbows on the mat most of the time, I wouldn't bother with a wrist strap.
Most important thing you should have is a static mat to work on, like one of these guys, they're cheap and they also keep your workbench from getting scratched up and burnt by component legs and hot solder. Make sure you ground the mat properly.
Amazon.com: StarTech.com 24x27.5-Inch Desktop Anti-Static Mat M3013 (Beige): Electronics
If you're sitting at a desk and you're balancing your hands/arms/elbows on the mat most of the time, I wouldn't bother with a wrist strap.
Great idea, it's cheap too. I usually put a scrap peice of plywood on my desk. For protecting the tabletop this anti static mat looks easier than hauling that peice of wood back n forth from the garage.
Most important thing you should have is a static mat to work on, like one of these guys, they're cheap and they also keep your workbench from getting scratched up and burnt by component legs and hot solder. Make sure you ground the mat properly.
Amazon.com: StarTech.com 24x27.5-Inch Desktop Anti-Static Mat M3013 (Beige): Electronics
I bought StarTech's mat and am not happy with it. It doesn't lie flat when unrolled.
That's the story of every static mat that comes shipped rolled up, the thick ones we use at work are even worse. Put a bunch of stuff on it to keep it flat and leave it for a while, eventually it'll "memorize" being flat.
If I had bothered to read before buying I would have bought one wth a rubber top surface insted of vinyl. More expensive, but I can't afford the real estate to leave my mat unrolled.
As gmarsh said, they all behave like this. I have to work off my kitchen table, though fortunately almost all our eating is in the dining room. Still, when I get out the mat I have to weigh down the edges. You just have to deal with it.
Thanks!Tim Green's series on amp stability is a good starting point if you want to know more about compensation methods.
I don't have much trouble with amp stability per se; however, it can be a lot of trouble to find the most effective locale for compensations. It is paramount to always select the most effective; because, if a less effective spot is employed a permanent hinderance results even if it has worked somewhat well. Not only that, but even if a just right compensation is used, it can't be used hugely because that will make a sonic signature.
So, one starts at the most effective locale, get some use out of it, except not greatly, and then it gets many, many, many cousins to accomplish the remaining needs. It takes many light doses, beginning most effective first, to get the actual job done, without installing a hindrance or sonic signature. Multi-Compensation is quite a sport.
Specifically, that labor is fierce!
That alone, makes the Neurochome products look like a bargain (the work is already done, and there was a lot of it). Especially, I like that Parallel86 product. That one clears my means-to-work checklist, entirely.
There's a bit of competition in the 45W range, with the Mod86, the Circlophone (mind the output device selection!), the MyRef Fremen, the SSA (if enough CCS added), and a few more. Of these, the Mod86 is most doable and achieves expected results more regularly due to the Neurochrome Composite structure. However, the Par86 thoroughly tops the 60~80W range, without a peer. The buffer category is currently occupied by KeanToken's Kuartlotron. Ostripper's Honey Badger occupies the 150W range (and could be rigged for more). Currently missing are obvious leaders in the 15W and 100W categories. They're in the works--many exist, but we may be awaiting doable. It will be interesting to take note of what means-to-work and what compensations are employed (counting it, could take a while). In these things that are so clearly in the lead for quality, multi-feedback loops and multi-compensation are evident. Basically, no fell swoops.
I don't have much trouble with amp stability per se; however, it can be a lot of trouble to find the most effective locale for compensations. It is paramount to always select the most effective; because, if a less effective spot is employed a permanent hinderance results even if it has worked somewhat well.
The most effective compensation takes advantage of the Miller effect, i.e. needs gain. In a typical power amp, there are usually only one or two spots with significant gain: Input stage and VAS. Of the two, the VAS is the better candidate for compensation as it runs at higher current than the input stage, typically. Higher current -> higher slew rate.
In a composite amplifier, the situation is more complex. The MOD86 and PAR86 employ four different types of compensation to ensure stability and stellar performance into various loads (including capacitive loads up to 2.2 uF).
Not only that, but even if a just right compensation is used, it can't be used hugely because that will make a sonic signature.
This statement reminds me of something my academic advisor used to say: "Black art is only black until someone turns on the light". Compensation is a tradeoff between stability and regulation bandwidth. High loop gain and high regulation bandwidth result in high attenuation of undesirably effects (THD, supply feed-through, noise, etc). So overcompensation will result in worse performance than optimal compensation. Compensation is the quintessential multi-dimensional engineering optimization exercise.
That alone, makes the Neurochome products look like a bargain (the work is already done, and there was a lot of it).
Yep. Thanks for recognizing that.
Tom
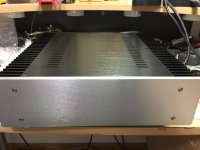
So here's the finished build. I'm happy the way it turned out.
Attachments
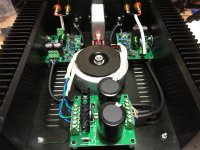

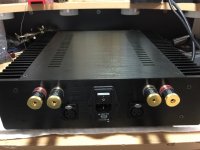
Great, clean work. I like how you chose green enameled wire instead of the ubiquitous red for your zobel.
Best,
Anand.
Best,
Anand.
So here's the finished build. I'm happy the way it turned out.
Looks nice! I'd be happy too. I'm sure it sounds nice. What speakers are you driving with it?
I like it. Thanks for sharing. It always warms my heart to see my circuits completed successfully.
Tom
Tom
Well done 12B! It all looks very neat and well constructed. Are you going to give us your listening impressions? I've just finished redecorating our lounge so maybe it's time I concentrated on my build🙂
I really must pull my finger out and crack on with my quartet. Sadly they won't look that good.
Great, clean work. I like how you chose green enameled wire instead of the ubiquitous red for your zobel.:cheers
I had to order a new spool so I figured I'd make the curtains match the carpet.
Looks nice! I'd be happy too. I'm sure it sounds nice. What speakers are you driving with it?
I've used them on some 89db bookshelves but right now they're on some Magneplanar SMMGs. My long term plan is to get some super efficient speakers which is why I was drawn to the Mod86's very low inherent noise measurement.
I like it. Thanks for sharing. It always warms my heart to see my circuits completed successfully.
Tom
You made very thorough documentation to ensure that any semi-experienced builder can get it done. Just the provided links to already-filled parts list at Mouser takes out a good chunk of onerousness.
Well done 12B! It all looks very neat and well constructed. Are you going to give us your listening impressions? I've just finished redecorating our lounge so maybe it's time I concentrated on my build🙂
So far, it's just good clean amplification. I'd have to hook it up to some more sensitive speakers to get an idea of how clean.
My long term plan is to get some super efficient speakers which is why I was drawn to the Mod86's very low inherent noise measurement
So far, it's just good clean amplification. I'd have to hook it up to some more sensitive speakers to get an idea of how clean.
Congrats again on your build. It shows that you put thought, detail, and care into executing your build. Glad you're enjoying good clean amplification 🙂
The clean circuit drew me to Mod86 as well, my tweets are Eminence ASD:1001, and IIRC they're 104dB.
I'm already looking ahead to my spring project, it might be Fostex FE206En (96dB). I would put them in Woden Design Vulcan. They look like a not "too" complicated to build (but will still challenge me), beautiful speaker, well reputed to sound great. -If you haven't seen Woden Design's Vulcan you should check it out.
Great, clean work. I like how you chose green enameled wire instead of the ubiquitous red for your zobel.
Best,
Anand.
Whoops, I meant Thiele network!
Best,
Anand.
Nice work 12b.
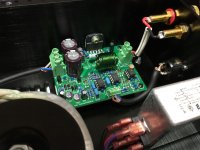
I like the symmetrical layout of your back panel. Not happy with how half my signal and speaker wire crosses over the transformer and power supply, I am considering drilling two more holes in my chassis to create an array of four on each side. The XLR and SpeakOn connectors both have D-shape cutouts and their positions could be swapped and the extra holes covered with dummy plates (Neutrik's DBA-BL). Not a lot of work to significantly clean thing up. Attached is a photo of the present situation.
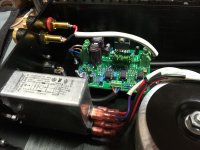
Just one question, don't know if it's important. Have you used the same shielded cable to carry both the signal and power to the board? In Tom's Power86 design doc, he recommends 14 AWG wire to carry power to the Modulus86. The blue ang green secondary wiring on my Antek 3224 is also 14 AWG.
Equally striking are the matching black caps, cables, and ties. Gives the amp a "bad" look.I had to order a new spool so I figured I'd make the curtains match the carpet.
I like the symmetrical layout of your back panel. Not happy with how half my signal and speaker wire crosses over the transformer and power supply, I am considering drilling two more holes in my chassis to create an array of four on each side. The XLR and SpeakOn connectors both have D-shape cutouts and their positions could be swapped and the extra holes covered with dummy plates (Neutrik's DBA-BL). Not a lot of work to significantly clean thing up. Attached is a photo of the present situation.
Just one question, don't know if it's important. Have you used the same shielded cable to carry both the signal and power to the board? In Tom's Power86 design doc, he recommends 14 AWG wire to carry power to the Modulus86. The blue ang green secondary wiring on my Antek 3224 is also 14 AWG.
Attachments
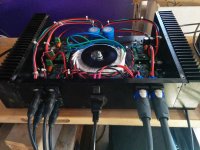
I like the symmetrical layout of your back panel. Not happy with how half my signal and speaker wire crosses over the transformer and power supply, I am considering drilling two more holes in my chassis to create an array of four on each side. The XLR and SpeakOn connectors both have D-shape cutouts and their positions could be swapped and the extra holes covered with dummy plates (Neutrik's DBA-BL). Not a lot of work to significantly clean thing up. Attached is a photo of the present situation.
That's the same layout as I used. I measured the THD and residual hum on all channels. While there were slight differences between channels due to component tolerances, etc. all channels performed to spec. There were no obvious differences or patterns related to the board arrangement in the box that I could tell.
In Tom's Power86 design doc, he recommends 14 AWG wire to carry power to the Modulus86. The blue ang green secondary wiring on my Antek 3224 is also 14 AWG.
I'd go with as heavy wire as you can manage. When I built my 4xMOD86 amp, I couldn't source 14 AWG in the colours I needed, so I went with 16 AWG. My build will have a few mΩ higher supply impedance than had I used 14 AWG. Thanks to the stellar PSRR of the MOD86, the impact of this is negligible - within a gnat fart as Bill would say. 🙂
Tom
Nice work 12b.
Equally striking are the matching black caps, cables, and ties. Gives the amp a "bad" look.
Just one question, don't know if it's important. Have you used the same shielded cable to carry both the signal and power to the board? In Tom's Power86 design doc, he recommends 14 AWG wire to carry power to the Modulus86. The blue ang green secondary wiring on my Antek 3224 is also 14 AWG.
Thanks! I lucked out on the color of caps. That's just what Mouser sent me from Tom's pre-set project list. Yes, I am using the same cable for power and signal. I'm not going to worry about less than a foot of 22 AWG wires in an amp that's probably never going to go over 5 watts a channel in my use case.
- Home
- Amplifiers
- Chip Amps
- Modulus-86 build thread