My strong preference would be gold-plated connectors. Any of the Neutrik variations on the XLR would be good. I'd spend the extra buck or so for the DLX chassis versions and the corresponding XX cable versions for a bit more ruggedness, though likely not an issue in a home audio situation.
The DLX costs basically the same as the DL version, so I can pick whichever is better. I'm more concerned about the "ingenious duplex ground contact", what is this doing? How am I supposed to connect it to the chassis? I connect Pin 1 to chassis and leave that 4th "ingenious duplex ground contact" pin in the air?
Wouldn't that reduce the ingeniousity of it? 🙂
I doubt the "ingenious duplex ground contact" is more than a connection to the connector shell. I'm not seeing anything in the mechanical drawings that would indicate otherwise. I'd tie that to chassis ground right at the connector.
Tom
I doubt the "ingenious duplex ground contact" is more than a connection to the connector shell. I'm not seeing anything in the mechanical drawings that would indicate otherwise. I'd tie that to chassis ground right at the connector.
Tom
With a potentiometer. 😉
ALPS makes a 4-gang version of the RK271. Though, if you're building a mono amp, all you need is the regular 2-gang version. Just wire it as a differential volume control.
Tom
Smarty Pants! 🙂
For a mono amp, like this,
Basically, like a left/right as you would in would in a stereo amp with unbalanced inputs and using a common ground?
Attachments
I would recommend the smallest size box that's large enough to contain the parts and still leaves enough room to connect the wires. 😉
I tend to leave about an inch between boards for wiring. The board sizes are:
- SMPS300REh: 100 x 100 mm
- MOD86: 90 x 70 mm
A mono build would require: 100 + 25 + 70 = 195 mm of internal width, though, you could pretty easily squeeze it into something smaller by moving the boards around.
The way I usually answer these questions is to draw a rectangle of the same size as the internal dimensions of the chassis and move the circuits involved around within that rectangle. You can do this on paper or in a CAD tool. Make sure you leave enough clearance for connectors and switches on the front/rear panels. I typically end up with 40-50 mm of space from the rear panel to the nearest board edge and 20 mm on the front. It all depends on which connectors and switches you choose.
I don't remember the assembled height of the Modulus-86 with any significant precision, but I seem to recall it being about 35-40 mm. Similarly, the SMPS300REh can be as much as 45 mm tall, depending on which caps you get. So that'd be your minimum height.
You also have to ensure that you get enough heat sinking. You'll want something with a thermal resistance around 1.3 K/W or better (lower). This pushes you towards the 2U tall chassis.
Tom
This looks like a super cheap option for one SMPS300REh and one Modulus-86 front to back,
BZ2107A Aluminum Power Amplifier Chassis Amp Case Linear Power Supply Box with heat sink 212MM*70MM*257MM|aluminum amplifier enclosure|amplifier enclosureamplifier supply - AliExpress
Smarty Pants! 🙂
Always! 🙂
Basically, like a left/right as you would in would in a stereo amp with unbalanced inputs and using a common ground?
Yep.
BTW: I've read many accounts recently of people not getting their Alibaba purchases. You can find the same chassis on eBay. You may even be able to find a vendor that offers DHL or FedEx shipping at good rates.
...or shop with ModuShop.
Tom

Hello,
Still thinking about my future build of mod86
I will use a switwing button on/off
In a double mono, using two smps, I wonder how to connect the switch
From IEC socket I go to switch with +, -, ground and then FROM switching button I would go to the two Smps... Does it mean I will double cable +, -, ground?
So 3 cables in and 6 out?
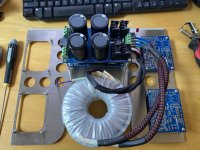
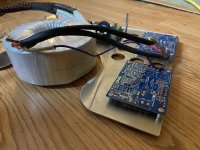
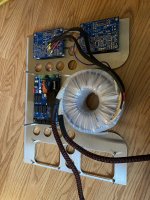
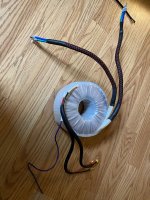
Thought i'd add some photos of my build...nearly complete....
 [/url]20200822_144635 by Simon Camsell, on Flickr[/IMG]
 [/url]20200822_141343 by Simon Camsell, on Flickr[/IMG]
 [/url]20200822_141400 by Simon Camsell, on Flickr[/IMG]
Another Modulus-86 Build
Hi there, thought I would share some pictures of my first amplifier build. Still lots more work to do, but it's coming together thanks to all of you, and help from Tom.
I'm building a set of LXMini speakers and needed a 4 channel amp to power them. Not finding one I liked, and seeing the review of the Modulus amp on AudioScience I decided to go this route.
I'm using 4 x Modulus-86 amps, an Intelligent Soft Start, and Power-686. All powered by an AS-4222 toroidal transformer from Antek.
Connections will be XLR in, and SpeakOn out.
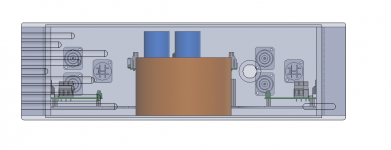
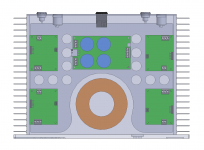
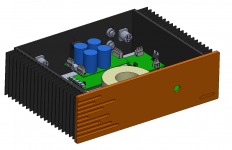
I designed everything in Solidworks to check everything would fit, and ended up going with a 3U Dissapante case (which should arrive on Tuesday).
To make assembly easier I got a shelf to mount everything laser cut from Stainless Steel (shout out to Send-Cut-Send). The nice thing this means is I only need to drill three holes in the base plate and can mount the shelf easily. It also gives me a great ground plane for making everything safe.
Currently working out how I want to route all the wires. They're twisted inside nylon sleeves. All wires end in boot lace ferrules for safety.
Hi there, thought I would share some pictures of my first amplifier build. Still lots more work to do, but it's coming together thanks to all of you, and help from Tom.
I'm building a set of LXMini speakers and needed a 4 channel amp to power them. Not finding one I liked, and seeing the review of the Modulus amp on AudioScience I decided to go this route.
I'm using 4 x Modulus-86 amps, an Intelligent Soft Start, and Power-686. All powered by an AS-4222 toroidal transformer from Antek.
Connections will be XLR in, and SpeakOn out.
I designed everything in Solidworks to check everything would fit, and ended up going with a 3U Dissapante case (which should arrive on Tuesday).
To make assembly easier I got a shelf to mount everything laser cut from Stainless Steel (shout out to Send-Cut-Send). The nice thing this means is I only need to drill three holes in the base plate and can mount the shelf easily. It also gives me a great ground plane for making everything safe.
Currently working out how I want to route all the wires. They're twisted inside nylon sleeves. All wires end in boot lace ferrules for safety.
Attachments
-
 Snag_6d82c65.png14.9 KB · Views: 194
 -
 Snag_6d81c96.png22.2 KB · Views: 214
 -
 Snag_6d80a27.png30.7 KB · Views: 273
 -
 IMG_3143.jpg545.4 KB · Views: 268
 -
 IMG_3142.jpg453.1 KB · Views: 252
 -
 IMG_3141.jpg417.4 KB · Views: 223
 -
 IMG_3140.jpg792.3 KB · Views: 221
 -
 IMG_3139.jpg927.2 KB · Views: 425
 -
 Snag_6d82522.png61.2 KB · Views: 224
Very cool build! What's the protective plastic stuff you have on the edges of that laser cut shelf?
Tom
Tom
@madjalapeno - based on how the preliminary build looks, I have a hunch your final build is going to be nothing short of exquisite. Keep up the good work! I'm definitely looking forward to seeing the final result - like I said, already it's looking great.
Very cool build! What's the protective plastic stuff you have on the edges of that laser cut shelf?
Tom
E
Looks like what electricians call "caterpillar grommet".. Don't know the technical name.
caterpillar grommet - Google Search
Very cool build! What's the protective plastic stuff you have on the edges of that laser cut shelf?
Tom
It's an edge protector - McMaster-Carr
When I get aluminum laser cut there is a burr left. It's not much, but can be sharp, so I use this. The stainless has lovely edges but I put that on around the transformer and along the back edge just to keep things safe. Same with the sleeve for the cables, keeping things safe.
@madjalapeno - based on how the preliminary build looks, I have a hunch your final build is going to be nothing short of exquisite. Keep up the good work! I'm definitely looking forward to seeing the final result - like I said, already it's looking great.
Thank you - there is a high standard here. 🙂
My Modulus-686 build
J2 Clone Chassis
SMPS800RE power supply
J2 Clone Chassis
SMPS800RE power supply
An externally hosted image should be here but it was not working when we last tested it.
speedy6963,
That is a very neat build! Congratulations!
What speakers are you using? Played a lot of music yet? 🙂
That is a very neat build! Congratulations!
What speakers are you using? Played a lot of music yet? 🙂
My Modulus-686 build
J2 Clone Chassis
SMPS800RE power supply
Why are you selling it?
Why are you selling it?
Need the money to fund a new amp build of my own design.
Need the money to fund a new amp build of my own design.
How much were looking for? I have a friend that could use it but no promises. Just had his first child so wife is spending a lot elsewhere.... 😱
- Home
- Amplifiers
- Chip Amps
- Modulus-86 build thread