Yahoo, all the "stacked" pieces are glued, that being the backchambers and exit triangles. So I am done with all the slipping glue joints. I had to make I special jig to glue the triangles in place. Next I will be getting some 2X4s to assist me glueing the sides on. We are getting there.
God Bless
Allen
God Bless
Allen
Attachments

Crossing t's amd dotting the i"s
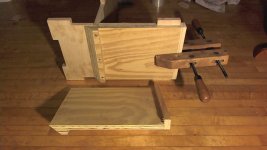
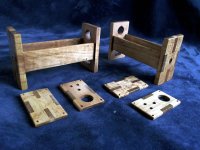
Here are the final preparations before the final gluing:
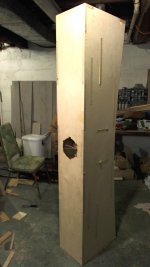
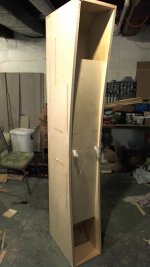
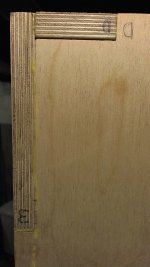
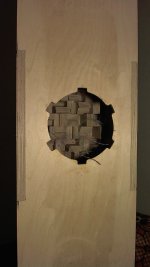
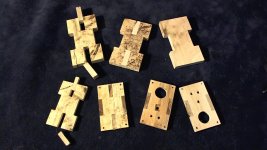
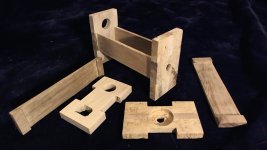
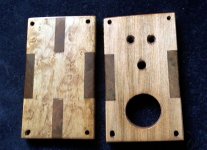
Picture 1 shows the final horn internals before they are permanently hidden with-in the finished cabinets.
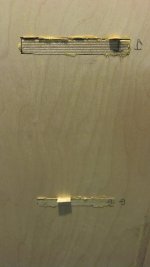
Picture 2 shows the groove I cut for the speaker wire, it would be bad to forget that! I thought about running the wire down the horn throat to exit on the bottom of the cabinet, but did not want to chance it vibrating inside the horn. I stuffed some fluff inside the groove with the wire before gluing.
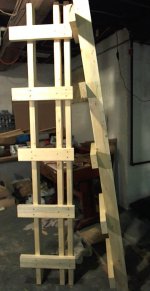
Picture 3 shows the jig I built to get even pressure down the entire length and width of the sides. At this point, I want to minimize any possibility of a clamp shortage!
Everything is wiped down and ready to go... Ready... Aim... Aim... Aim...
Allen
Here are the final preparations before the final gluing:
Picture 1 shows the final horn internals before they are permanently hidden with-in the finished cabinets.
Picture 2 shows the groove I cut for the speaker wire, it would be bad to forget that! I thought about running the wire down the horn throat to exit on the bottom of the cabinet, but did not want to chance it vibrating inside the horn. I stuffed some fluff inside the groove with the wire before gluing.
Picture 3 shows the jig I built to get even pressure down the entire length and width of the sides. At this point, I want to minimize any possibility of a clamp shortage!
Everything is wiped down and ready to go... Ready... Aim... Aim... Aim...
Allen
Attachments
Fire!
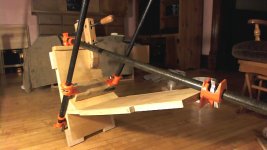
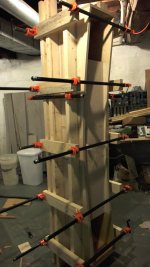
First cabinet getting glued:
I would have to say, this was the most stressful part of this journey to date, becuase you must move fast as there is so much to glue all at once. And being the detailed person I am, this is very nerve-racking for me. In addition to glueing the cabinets, I filled in some of the gaps in the joinery. I would be gluing the second cabinet now, but I do not have a big enough slot of time!
Attachments
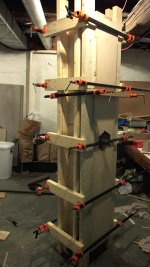
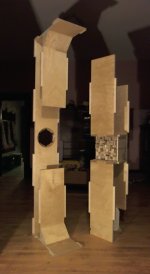
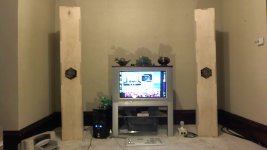
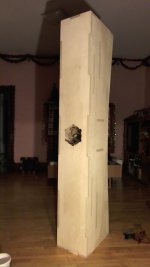
One done, one to go...
It is nice to see one of these at this stage. I would be more excited if I had my amp built... The rest of the components are on the way... It looks like I will have "sound" by Thanksgiving... Not a completed project, as I am sure there will be some final astetic treaks... I am so "in the zone" on this, that I have even set the excitement aside! Crazy!
Thanks for hanging in there!
Allen
PS - be sure that you have done your yoga before lifting these cabinets!
Attachments

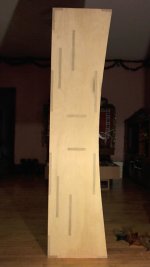
I think you may have made a serious mistake in putting the sides on, as they were they could have made a lot of money as modern art.
I think you may have made a serious mistake in putting the sides on, as they were they could have made a lot of money as modern art.
Thanks Doubtingthomas, that thought crossed my mind too! That is why I am taking the extra time out to fully document this journey. Now, if you are serious, I can "recreate" what I have done for the purpose of modern Art, infact, I would really enjoy it! I would be living my dream! So if you are serious and you "see" a market, let me know! I can see by your tastes in audio art; like Audio Note Conquest and Kit 1 Amps, Quads, and the like; that you do not mess around!
As we are thinking of ways to show off the inside of these cabinets, would plexiglass sides work? Would it be stiff enough for this application? A good question for Scott.
I am now going to "debase" the other cabinet, by glueing it together!
God Bless
Allen
I think plexiglass sides would be superb, I'm no expert but I believe it's plenty stiff enough if the right thickness, I'm sure it's stiffer then ply, but it's expensive.
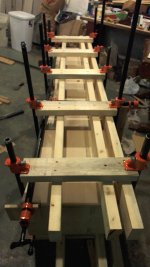
Both cabinets glued
Have reached another big milestone on this adventure. All the gluing is done. Feeling a little excitement now.
Now if I had this exact design, joinery and diffusion assembly to do again, this is what I would do different:
I would cut all the internal pieces first (same joinery style). I would then glue all the internal pieces together (incluing diffusion assembly). By this time I would have the assemblies you see in picture 1 on post #222 without the tung oil. Then I would cut the sides to fit into these completed assemblies. Then everything would be finished with tung oil and finally glued together as above. This process would eliminate some sanding I had to do from seeping tung oil (post #219) and some of the joinery inaccuracies I experienced *post #224, pictures 3 & 4).
I would seriously consider plexiglass sides.
Golly, I have not even heard this system yet, and am already thinking of ways to make another one! Doubtingthomas has really got me thinking on the whole modern art bit. The cabinets as they stand are very ho hum to my eye considering all the art hidden inside. All is not lost, as I have the maple exteriors yet . I am not sure if I have been able to communicate my intentions to you all on what I am doing with that. As for now, I want to get this raw system going first as that will inspire and clarify my vision on this.
Namaste,
Allen
Aim for perfection, was it Rolls or Royce who said there was nobility in the humblest task done properly, or words to that effect. I imagine cutting the mortices must be one of the hardest parts of the job, what are you using?
what are you using?
Mostly Table Saw, Jig Saw, and several different wood files. I was taught to do joinery with these tools at Minneapolis College of Art and Design. They had a morticer there also, which I do not have, that is where the jig saw and files comes in.
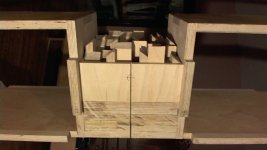
I have filled in the gaps with scrap pieces of birch, will post pictures when I get a chance. I am doing the "Big Clean" on the house for my family traving to see us for Thanksgiving...
Aim for perfection,.. there was nobility in the humblest task done properly,..
Amen
Allen
A neat way to cut a mortice is with a router using a jig, though if you see the work that some people do using only hand tools cutting dovetails and the like you figure maybe that's where it's at in terms of personal satisfaction, very Japanese I think, anyway, well done and keep up the good work.
I reckon there is no substitute for a really sharp chisel also, but I mean razor sharp, finished off on a leather strop so it will shave.
I reckon there is no substitute for a really sharp chisel also, but I mean razor sharp, finished off on a leather strop so it will shave.
A break
Yes, it blows my mind at the astetic "perfection" found in both anceint Chinense and Japanense woodworking and timberframe construction. And here we are today with all our driver screw drills, laser levels, CNC's, precision jigs, and the such, and what do we have to show for it? Will today's art be in the history books of the future? The funny thing about it all, is the only thing that can hold us back is our own imaginations! Well, and maybe finances, but the independently wealthy people I personally know tell me that is all in my head too! Okay, break is over, back to cleaning!
Yes, it blows my mind at the astetic "perfection" found in both anceint Chinense and Japanense woodworking and timberframe construction. And here we are today with all our driver screw drills, laser levels, CNC's, precision jigs, and the such, and what do we have to show for it? Will today's art be in the history books of the future? The funny thing about it all, is the only thing that can hold us back is our own imaginations! Well, and maybe finances, but the independently wealthy people I personally know tell me that is all in my head too! Okay, break is over, back to cleaning!
No Sound Yet!.. Auuugh!
Does it always take this long to make something that is hopefully to be great?
Sound was not the focus of the family happenings I had here for Thanksgiving - Nonetheless, it was an excellent holiday... Looking forward to ChristMas:
Does it always take this long to make something that is hopefully to be great?
Sound was not the focus of the family happenings I had here for Thanksgiving - Nonetheless, it was an excellent holiday... Looking forward to ChristMas:
Attachments

Cabinets Awaiting Amps
Joinery Repairs were a success: I went a little heavy in some areas with the belt sander and removed the first ply on the birch. It does not take much as the plys are so thin. This does not matter to me, but if you are not covering the cabinets with something else, great care will need to be given even with finish sanding. I still plan on covering these, as both the plys and veneer do not have enough "depth" for the sheer presence these Avebury cabinets present to the room. Very solid build...
Joinery Repairs were a success: I went a little heavy in some areas with the belt sander and removed the first ply on the birch. It does not take much as the plys are so thin. This does not matter to me, but if you are not covering the cabinets with something else, great care will need to be given even with finish sanding. I still plan on covering these, as both the plys and veneer do not have enough "depth" for the sheer presence these Avebury cabinets present to the room. Very solid build...
Attachments


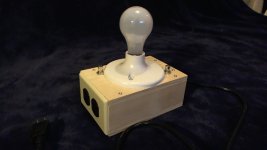
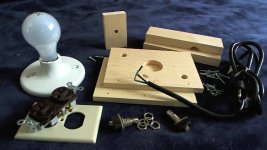
Amp Cases
It is not the assembly of the amps that take the time, it is the design and fabrication of the cases. I decided to go with solid maple here, to warm me up to the maple work on the Aveburys. I have metal heatsink cases for the Amps and heavy gauge metal speaker grills to fabricate the metal ventalated sides for the PSUs. I have made some extra wood panels for the Lightspeed volume control. The hardest part is cutting all the holes where the switches, plugs, and jacks, go. Some of the hardware needed to be "recessed" into the wood to accommidate proper mounting. This is a project in and of itself.
God Bless,
Allen
Attachments
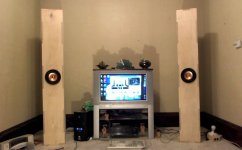
We have Bass!
I have a lot to share with you today... your patience has paid off!
I will start with the begining of the end, share the journey to the end and end with the present begining.
I am pleased to announce that after breaking in the Alpair 12s in for 14 hours unbaffled on the floor hooked up to my working chip amps, I was ready to install one into one completed Avebury "in the raw" cabinets...
First impression - Holy Wow, that is a lot of bass, and this was with classical music. I have to say, I was skeptical that a 6" driver could do that! Excellent engineering Scott!..
But then I heard the midrange... Have you ever had one of them dry oranges, it looks like an orange, smells like an orange, but you eat the slightly shrivelled up insides hoping for that rehydrating juice and it is not there! Oh my, maybe I should have stuck with open baffles!
But I am getting ahead of myself, lets go back to where in left you...
Attachments

- Status
- Not open for further replies.
- Home
- Loudspeakers
- Full Range
- Mikasa, next?