Sorry I screwed up that reply, I'm not a bad carpenter but I struggle with the clerical, the reason I havn't written up my build yet is I'm still figuring out how to put the pictures on.
Lots of income earning work this week. Make hay while the sun is shining. Winter coming soon. Perfect time for the tedious glueing of these diffusers. Glue a row in the morning, glue another on break, and yet another between those two jobs...
...I am compiling an order of parts for my chipamp PSU and also shopping around for more clamps. The "loner" clamps have not come thru so will be spending some $$$.
Press on... there is power in Persistence!
Allen
...I am compiling an order of parts for my chipamp PSU and also shopping around for more clamps. The "loner" clamps have not come thru so will be spending some $$$.
Press on... there is power in Persistence!
Allen
Attachments

I have a feeling you could glue and assemble the whole lot and secure them with rubber bands while they dry.
Damping material
Okay, I need damping material. I was thinking of going with the 1/2 wool. I have heard of people using felt and even steel wool. What are your observations guys? What did you use, doubtingthomas? What about you, Dave, Chris, Gychang, zman01, anyone else??? Also, can you buy this stuff from a fabric crafts store, or does it need to be audio specific? It seems like a lot of the audio specific stuff is foam, which is not favored.
Thanks for your support, guys
I ordered 12 more pipe clamps today. I am hoping to have the insides of the cabinets finished with Tung oil, ready to be glued when the clamps get here next week...
Allen
Okay, I need damping material. I was thinking of going with the 1/2 wool. I have heard of people using felt and even steel wool. What are your observations guys? What did you use, doubtingthomas? What about you, Dave, Chris, Gychang, zman01, anyone else??? Also, can you buy this stuff from a fabric crafts store, or does it need to be audio specific? It seems like a lot of the audio specific stuff is foam, which is not favored.
That would more then likely work, I am not brave enough to try it! I have been taught the old school methods of glueing with clamps, (since I am not using screws). I do not like the idea of anything even having the possibility of slipping out of place. This is probably an irrational fear I have, but wet glue joints do slip a lot when not held "securely" in place. Does a rubber band have enough pressure?I have a feeling you could glue and assemble the whole lot and secure them with rubber bands while they dry.
Thanks for your support, guys
I ordered 12 more pipe clamps today. I am hoping to have the insides of the cabinets finished with Tung oil, ready to be glued when the clamps get here next week...
Allen
Okay, how do these "Smiles" work on this thing? I put them in, but most of the time, they get erased when I submit, what is the secret keystrokes ?!?
?!?
?!?I used old fashioned carpet underlay and wool from a Tannoy Lancaster box. As for foam, recording studios seem to be happy with it.
As for gluing with clamps, it can be a problem when everything isn't perfectly alligned, glue is very slippery when wet, I think the diffuser blocks are worth a try with rubber bands though.
As for the smilies, I wouldn't lose any sleep personally, the less I see the better, that goes for all the IMHO, WAF, LOL abbreviations also, but each to his own.
In Maeshowe i laid in a single piece of UltraTouch 1/2" felt (with the backing pelled off) over the diffusor. And then played with "fluff" in the throats.
davw
davw
I think the diffuser blocks are worth a try with rubber bands though.
I will give this a try on a future project. I got one diffuser completely glued and half the next one... ...I do not want to change the processthis close to the end. A freind of mine see these diffuser blocks and would like me to make him a whole wall of something similiar for his home recording studio! A rubberbanding party sounds like the best way to go on something like that!
that goes for all the IMHO, WAF, LOL abbreviations also
Amen brother, I could not agree more! (Would that be +1!?!)
The artist in me likes the smiles through
And then played with "fluff" in the throats.
What is "fluff"? I have two cats that leave "fluff all over the house, and my duaghter has a stuffed bunny named "fluff" but I am pretty positive that is not what you are using!
I like the recycled denim product though...
Thanks for your replies everyone...
Allen
Amp placement
As I am building my Chip Amps as dual mono with the possiblility of completely separate enclosures, that means I have placement options:
#1 - I can go conventional, as in Amps close to the source components and running lenghts of speaker wire out to the horns (speaker level).
#2 - I can mount an Amp to the back of each cabinet, close to the speaker and run line level signal signal back to the source components. I can take this farther by inclucing a DAC before each amp and run full digital from the source components. All my source components are digital anyway (at least the one's I plan on keeping!)
In an analog sense, I have always assumed that speaker level signal traveled better. But we all know the fallecy of assuming!
If any of you know of any other threads that may be useful for this kind of information, feel free to link us up.
May the force be with you...
Allen
Last edited:
What is "fluff"? I have two cats that leave "fluff all over the house, and my duaghter has a stuffed bunny named "fluff" but I am pretty positive that is not what you are using!
the stuff insdie fluff the rabbitwould probably do, but the daughter might object
I like the recycled denim product though...
I really like it.
dave
I like the recycled denim product though...
Allen
I really like it.
dave
+1. It's very nice to work with and works really well.
The "fluff" inside the bunny should work. If you have Dacron filled pillows, stuffing from that can work too. How many pounds of fluff are you looking at?
How many pounds of fluff are you looking at?
That is what I am figuring out. What I am gathering from Dave is that the 1/2" recycled denim goes infront of the diffusers and the "fluff" goes inside the horn throats. I am not sure what goes on the side walls and and top and bottom walls of the back chamber. Scott's plans suggest starting with something more like the denim product, yet maybe this is fluff also? Obviously there is going to be some trial and error involved to get the sound dialed in to taste.
Nighty Night,
Allen
Doesn't take much fluff in the horn mouths. The way my fill blocks worked, the piece of ultratouch sits just behind the driver and pretty much flush with the throats, sound pases thru and then it has to pass back thru before it can get to the driver cone... more effective than lining the walls.
dave
dave
Rain Day, I am back!
Thanks Dave, would have posted sooner, but I have been studying and ordering parts for the Chip Amp Power Supply. Been getting my butt kicked! I know what I want, but no one single supplier has it all. Parts-express is great, Digi-key just reminds me how "green" I am! I mean, is an X1 rated capacitor Aluminum, Ceramic, Mica, Film, etc... ...they did not have the one I wanted anyway, after looking in all the catagories! Enough on that, just had to have my little grobble... ...all part of the journey.
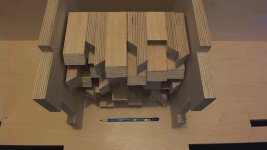
Here is where my diffuser sits in the back chamber. So I will line the top, bottom, and side walls up to the throats with the Denim product, in addition to having the piece behind the driver. The driver sits where I have laid the pencil. You all will note also, that the diffuser does not fit perfectly in the back chamber, which I planned on happening, just was not sure on the exact shortage, so now I can move forward on solving that problem. We are getting there guys.
Enjoy the journey,
Allen
the piece of ultratouch sits just behind the driver and pretty much flush with the throats,
dave
Thanks Dave, would have posted sooner, but I have been studying and ordering parts for the Chip Amp Power Supply. Been getting my butt kicked! I know what I want, but no one single supplier has it all. Parts-express is great, Digi-key just reminds me how "green" I am! I mean, is an X1 rated capacitor Aluminum, Ceramic, Mica, Film, etc... ...they did not have the one I wanted anyway, after looking in all the catagories! Enough on that, just had to have my little grobble...
...all part of the journey.Here is where my diffuser sits in the back chamber. So I will line the top, bottom, and side walls up to the throats with the Denim product, in addition to having the piece behind the driver. The driver sits where I have laid the pencil. You all will note also, that the diffuser does not fit perfectly in the back chamber, which I planned on happening, just was not sure on the exact shortage, so now I can move forward on solving that problem. We are getting there guys.
Enjoy the journey,
Allen
Attachments

Back Chamber Assembly
It feels good to have moved this project forward today. This is the last of the birch plywood cuts for two reasons: #1 all the cuts are done and #2 I have used up all the birch! The scrap pieces left are good for fillers at best. But it is good to know that if you choose to fill all the voids in the cabinet with birch, you indeed can.
So here is the back chamber assembly so far:
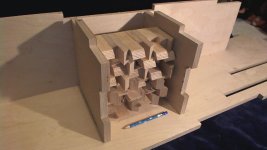
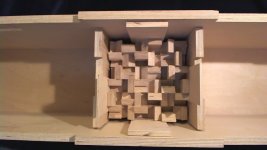
Picture 1 shows how I trail fit fillers to get the correct spacing.
Picture 2 shows the various fillers I created. On the left are the difuser spacers from picture 1. In the middle are the cut downs I used to fill in the void behind the diffuser assembly. And on the right are the cut offs from the fillers, which will be used to fill in misalignments in the joinery.
Picture 3 shows the complete back chamber dry fitted together waiting to be glued.
The next step is to finish the inside of the horn. I have never finished something before gluing it, so this will be a good experiment for me. Don't worry, I will not be finishing the glue joints. I am attempting to avoid any glue residue wrecking havoc on a good finish.
You all have a Great Night,
Allen
It feels good to have moved this project forward today. This is the last of the birch plywood cuts for two reasons: #1 all the cuts are done and #2 I have used up all the birch! The scrap pieces left are good for fillers at best. But it is good to know that if you choose to fill all the voids in the cabinet with birch, you indeed can.
So here is the back chamber assembly so far:
Picture 1 shows how I trail fit fillers to get the correct spacing.
Picture 2 shows the various fillers I created. On the left are the difuser spacers from picture 1. In the middle are the cut downs I used to fill in the void behind the diffuser assembly. And on the right are the cut offs from the fillers, which will be used to fill in misalignments in the joinery.
Picture 3 shows the complete back chamber dry fitted together waiting to be glued.
The next step is to finish the inside of the horn. I have never finished something before gluing it, so this will be a good experiment for me. Don't worry, I will not be finishing the glue joints. I am attempting to avoid any glue residue wrecking havoc on a good finish.
You all have a Great Night,
Allen
Attachments

Inside finishing done
Quick post as I am out of town this weekend. Got the insides of the cabinets finished in tung oil and am looking forward to glueing them when I get back .
Happy travels
Allen
Quick post as I am out of town this weekend. Got the insides of the cabinets finished in tung oil and am looking forward to glueing them when I get back .
Happy travels
Allen
i am back!
I got majorly inspired by the Leadership Convention I went to. A life changing event, so much so, that I feel very sigificant changes occuring in my life. What role these speakers play in all of this is uncertain... ...I am finishing them to find out.
So here is what has transpired in the last three weeks:
I finshed the inside surfaces of the cabinets with tung oil. I did this with the cabinets dry fit together. If I had this to do again, I would mask off each glue joint with blue tape and finish each piece individually. The reason being is the tung oil did "leak" onto the glue joints, so I had to sand it off these areas. Either way is a sizable time commitment. I am glad I did this, becuase it does work as planned. The glue does not stick to the tung oil and is easily removed from the finished panels. (picture 1)
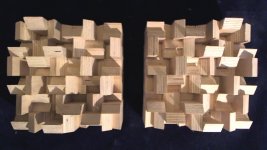
Picture 2 shows what I like to call "The Avebury Kit". All the parts are ready to be assembled. I think if a design like this was made into a kit one could order and assemble themselves, this is one possibility...
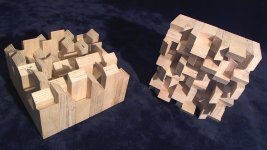
Picture 3 - glue and clamps.
Picture 4 - the joinery jig used to place the clamp pressure where it needs to be.
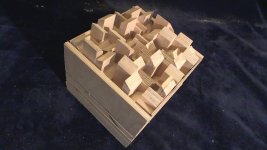
Picture 5 - glued pieces "making a stand".
I still have plenty to do. I have a three day week-end after tomorrow, I am hoping my other business does not suck up all that time. I have family coming up for thanksgiving and would like to have these done! Your prayers are greatly appreciated!
So, would you like to change the world?
Allen
I got majorly inspired by the Leadership Convention I went to. A life changing event, so much so, that I feel very sigificant changes occuring in my life. What role these speakers play in all of this is uncertain... ...I am finishing them to find out.
So here is what has transpired in the last three weeks:
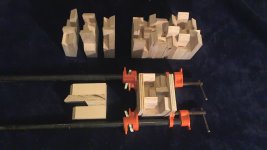
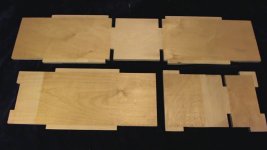
I finshed the inside surfaces of the cabinets with tung oil. I did this with the cabinets dry fit together. If I had this to do again, I would mask off each glue joint with blue tape and finish each piece individually. The reason being is the tung oil did "leak" onto the glue joints, so I had to sand it off these areas. Either way is a sizable time commitment. I am glad I did this, becuase it does work as planned. The glue does not stick to the tung oil and is easily removed from the finished panels. (picture 1)
Picture 2 shows what I like to call "The Avebury Kit". All the parts are ready to be assembled. I think if a design like this was made into a kit one could order and assemble themselves, this is one possibility...
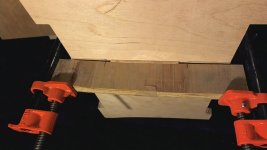
Picture 3 - glue and clamps.
Picture 4 - the joinery jig used to place the clamp pressure where it needs to be.
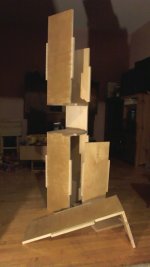
Picture 5 - glued pieces "making a stand".
I still have plenty to do. I have a three day week-end after tomorrow, I am hoping my other business does not suck up all that time. I have family coming up for thanksgiving and would like to have these done! Your prayers are greatly appreciated!
So, would you like to change the world?
Allen
Attachments


- Status
- Not open for further replies.
- Home
- Loudspeakers
- Full Range
- Mikasa, next?