In the meantime, it has become clear that the original housing should not be changed.
I myself have already designed front panels with a cut-out for the 2.6 inch display for the Galaxy series. These can of course be easily adapted to the Slim Line series.
Who would be interested in this modified front panel? Or are there any specifications from you that I should adhere to?
I myself have already designed front panels with a cut-out for the 2.6 inch display for the Galaxy series. These can of course be easily adapted to the Slim Line series.
Who would be interested in this modified front panel? Or are there any specifications from you that I should adhere to?


I would be interested in a modified front panel, as I am using the chassis from the thread. I would not need a hole for the power switch.
Hi Frank
As I mentioned via email, I’m in the middle of moving to a new home and my Iron Pre project (actually, everything) is paused for a while.
I will be purchasing your balanced muses kit when you have it sorted and ready to ship.
I decided to order the full Balanced Iron Pre chassis as Modushop originally offers it.
My intention was to modify the original front plate design of the Balanced Iron Pre chassis with my bench top mill similarly to what you have shown above.
My goal was to place the opening for the display in a manner that would retain the original “Zen Amounts” etching.
Since I don’t have the actual display in my hands I don’t know if it is possible to eliminate all the pot mounting holes that are pre-drilled with a proper size opening for the display.
My back up plan was to machine a frame for the display and mount it on the surface of the original face plate covering the pot holes and possibly the “Zen Amounts” etching if absolutely necessary.
In looking at your example and contemplating the aesthetics and possibilities of a new face plate design I would say that I would pursue a circular opening for the actual display area that shows your volume and related graphics with a rectangular recess on the back to allow proper mounting of the display PCB.
Of course maintaining the “Zen Amounts” etching would be desirable too.
If a faceplate version like this came to fruition before I attempt the work myself,and Modushop offeres it for sale, I would probably save myself the work and just order it from them.
@frankwilkerIf a faceplate version like this came to fruition before I attempt the work myself,and Modushop offeres it for sale
To hopefully clear up any ambiguity... not that it's my particular role... I'll do my best...
To the very best of my knowledge, there will be no other approved front panel designs offered by Modushop using any of the Iron Pre Artwork. This comes from a direct conversation with the designer regarding what is approved and not approved from an artwork and placement POV (call it overall design).
As previously advocated, stated, recommended, politely nudged, cajoled towards, aaaaaaaaaand hinted at... contact Gianluca directly. They are responsible for the design integrity, and if needed, they will work with the designer for any additional approvals if you wish to alter the design.
If anyone is thinking about changing their chassis once they have it in their hands... awesome. However, I would not hold my breath awaiting a new design from Modushop which has been approved by the designer.
Last edited:
Then I must also provide a little clarification:
All my ideas and statements were posted after contacting Gianluca.
Firstly, Gianluca does not have the possibility to change the design. He doesn't have the corresponding file. And secondly, he is not allowed to do so, as the designer reserves the right to do so.
So we can't use the logo for a new design either. Unless the designer authorises this. I don't even know the designer myself, otherwise we could ask him for permission.
The visible area of the display is 53 x 39.5mm. My cut-out size on the front panel shown above is 51 x 38mm (2 x 1.5inch). This will probably not cover the two holes.
To summarise, I can say that a new front panel is not a problem. However, the logo will not be included.
Noted. Then, some of the events are a little confusing to me, but it can be cleared up easily.Then I must also provide a little clarification:
All my ideas and statements were posted after contacting Gianluca.
There is confusion here that, again, is best cleared up between you and Modushop. There is a big difference between not having the files and not having the possibility to change the design vs. they won't give you the files for good reasons, and they don't have permission to alter the design (yet) because they don't really know exactly what you want. If Modushop is anticipating an approved file from the designer, then that could be a part of the gap in understanding. That's not likely to happen.Firstly, Gianluca does not have the possibility to change the design. He doesn't have the corresponding file.
That is correct. However, they can ask the designer for approval for changes or permission for a small run of whatever you want. I do not know if they want to do it. That is none of my business. I can understand both decisions, and I don't need further details.And secondly, he is not allowed to do so, as the designer reserves the right to do so.
This does not need to be too challenging. It seems there is some confusion that might mistakenly be thought of as disagreement.So we can't use the logo for a new design either. Unless the designer authorises this. I don't even know the designer myself, otherwise we could ask him for permission.
What I would suggest is the same...
Do not ask for a file type that (to the best of my knowledge) neither the designer nor the company creating the chassis used for the design or the production of the chassis. Why? It could be perceived that you would like to use Front Panel Designer software to quite easily modify the chassis and then have the chassis or front panels created by another company that is directly affiliated with the software. Your intentions, however innocent, might be misinterpreted.
I would use the files that have been provided to you. They were provided in the spirit of making your life easier and to help make this happen, if it can happen. No, they are not in the format you requested, but I hope you understand and accept the reasons.
I'm very excited for your Muses solution. I won't likely be using the Iron Pre chassis for it. If you get your idea for the chassis approved, then you'll have done a great service to others that want the best of both worlds with your Muses solution integrated seamlessly into a gorgeous chassis.
I can say with absolute certainty that I respect you and everyone involved. I've made every attempt to understand and balance everyone's wishes while also not further bothering busy people. So, if minor details are out of place, my apologies in advance, but I hope I captured the overall picture accurately.
Summary of my previous and current recommendation with some added thought -
- Make a sketch or sketches. Those sketches can be in a format / file type you and Modushop agree upon that shows clearly what you want. I have provided you with files that should make this fairly simple.
- Send it to Modushop. They'll review and maybe say something like:
- No we don't want to do that.
- We want to do that, but you'll need to tweak it some way or another before we take it to the designer for approval
- Looks good. We'll consult with the designer to see if they approve
If you've already done all that, and the answer was no; then the matter is closed. If not, I truly hope you'll give it one more try, and that it all comes to fruition.
I know this is an exaggeration in the form an analogy. This is like you going to a panel manufacturer for Ferrari and asking them if they will cut some holes in new places for you b/c you have a new display tech for their screens. You want a beautiful solution for your customers b/c you are a nice guy, and also it will help your sales. However, the panel manufacturer would need to change the design and move the prancing horse around 'just a little'. They will never do that. They would never even approach Ferrari with the idea. After-market companies will happily cut holes and install your screen at their customers request, and some customers may not care if the prancing horse is gone completely.
In this case, you have people that like your tech and people that will help you. No one as yet has told me that they won't try, and I think I've got a reasonable pulse on the matter. However, I am not Omnianything. I'm just a guy trying to help. 🙂 However, I must admit that it's becoming more work than I expected.
If anyone tells me a direct "NO!", I promise I will say so. Until then, I'll help any way that I can.
That's the last that I will discuss of the matter in the forum. I'd appreciate the same. There is a lot of subtly to this, and it takes me too much effort to create any attempt toward fairness without it being way too long. I also know that I type a lot, and I wish I were fluent in German. I think some of this is lost in translation.
Cheers!
Hi together, the balanced version works now also fine.
The sets that have already been ordered will be on their way before the weekend.
I won't be able to update the documentation on the website before the weekend.
The sets that have already been ordered will be on their way before the weekend.
I won't be able to update the documentation on the website before the weekend.
I finalised the designs for new front panels today and sent them to Gianluca. He will merge my requirements with the design of the original and present an appropriate solution 🙂
I think he will be able to offer the new front panels in the next few days.
I think he will be able to offer the new front panels in the next few days.
I have noticed an error in operation with the Muses chip:
Due to the starting sequence 1. microcontroller 2. Muses chip 3. display 4. external relay (transformer Iron Pre and other devices), the Muses chip only receives its supply voltage when it has already received the initialisation of the chip.
Unfortunately, this then goes nowhere.
In subsequent operation, this means that the digital signals for volume control are interpreted incorrectly and half of the signal is missing.
As a remedy, I will now only start the Muses chip when it has definitely received the operating voltage of the digital part. Ultimately, it won't make much difference in operation.
Only the balanced version is actually affected, as the same data is used when initialising the Muses chip (SE version) as when setting the volume. A single chip therefore always interprets the data correctly.
Got my Muses kit from Frank and coaxed it into my Iron Pre.
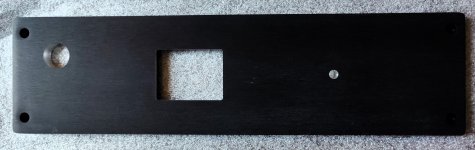
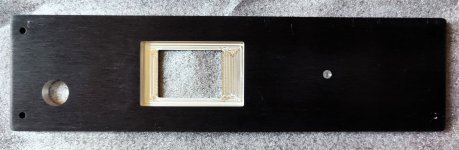
I made a new quick and dirty front panel for the Gianluca box out of plywood and backed it with a 0.7 mm alu "inner panel". I then made tapped holes in the FP to mount both the main board and the display.
I ran into a couple of minor issues, both of my own doing.
I had not realized that the graphics of the display is not centered in the center of the PCB, so the placement of the first hole in the frontpanel for the display was not quite right. Luckily I had made it a bit too small also, about 38 mm dia, so was able to rescue that by making a bit larger hole with 46 mm dia in a better position, (probably a tiny bit too large, I recon 44 but be about perfect).
The other issue was that with the front panel mounting of the main board , the cable to the muses board was not long enouh in my installation. Was easy enough to just cut this cable and splice in about 5cm of extra wire. I did not have this kind of connector in my stash, otherwise I would coock up a new wire with shielded ethernet wire I guess. I took the opportunity also to put on some shrink and full shielding of this cable as it carries a bit of digital signals realtively close to the audio circuits.
I am petty happy with the result of the mounting of the kit and the temporary front. Will likely get a Gianluca frontpanel, when it becomes available or perhaps make a more fancy wooden front with alu backing as now. Perhaps some live edge stuff with "epoxy river" as the window to the display.. We'll see...
Soundwise I am very happy with it. it's a clear improvment on the pot I used while waiting for this control and volume solution. I can surely detect greater clarity in the music, a bit like the famous blanket or curtain removed from the speakers. I also believe soundstaging , especially depth improved with the muses chips.
Control via the rotary and push functions are great, love to have a balance function as my hearing is a litte attenuated on my left ear, so great to be able to compensate a litte. I have not yet programmed my remote as I can use the excercise to get out of my coach.. But I have seen it react to some signals from my remote already so should not be a problem to get that set up. Will probably happen later today.
First attempt with off center opening for the display. Second attempt with better alignment of larger opening.


Some of the internals before getting all cables routed and tieded up.


I made a new quick and dirty front panel for the Gianluca box out of plywood and backed it with a 0.7 mm alu "inner panel". I then made tapped holes in the FP to mount both the main board and the display.
I ran into a couple of minor issues, both of my own doing.
I had not realized that the graphics of the display is not centered in the center of the PCB, so the placement of the first hole in the frontpanel for the display was not quite right. Luckily I had made it a bit too small also, about 38 mm dia, so was able to rescue that by making a bit larger hole with 46 mm dia in a better position, (probably a tiny bit too large, I recon 44 but be about perfect).
The other issue was that with the front panel mounting of the main board , the cable to the muses board was not long enouh in my installation. Was easy enough to just cut this cable and splice in about 5cm of extra wire. I did not have this kind of connector in my stash, otherwise I would coock up a new wire with shielded ethernet wire I guess. I took the opportunity also to put on some shrink and full shielding of this cable as it carries a bit of digital signals realtively close to the audio circuits.
I am petty happy with the result of the mounting of the kit and the temporary front. Will likely get a Gianluca frontpanel, when it becomes available or perhaps make a more fancy wooden front with alu backing as now. Perhaps some live edge stuff with "epoxy river" as the window to the display.. We'll see...
Soundwise I am very happy with it. it's a clear improvment on the pot I used while waiting for this control and volume solution. I can surely detect greater clarity in the music, a bit like the famous blanket or curtain removed from the speakers. I also believe soundstaging , especially depth improved with the muses chips.
Control via the rotary and push functions are great, love to have a balance function as my hearing is a litte attenuated on my left ear, so great to be able to compensate a litte. I have not yet programmed my remote as I can use the excercise to get out of my coach.. But I have seen it react to some signals from my remote already so should not be a problem to get that set up. Will probably happen later today.
First attempt with off center opening for the display. Second attempt with better alignment of larger opening.
Some of the internals before getting all cables routed and tieded up.
Attachments

Here are the exact dimensions of the display. You can see that the visible area of the display is shifted.
This must be taken into account when creating a front panel. I myself always use a connected display when testing the cut-out.
I will update the website in the next few days and point this out again.
This must be taken into account when creating a front panel. I myself always use a connected display when testing the cut-out.
I will update the website in the next few days and point this out again.
Attachments

The problems for the balanced Version are solved.
All paid sets are on the way or will be shipped today.
All paid sets are on the way or will be shipped today.
- Home
- Amplifiers
- Pass Labs
- Logic Solutions for Iron Pre Kits