l am embarrassed
Kp, no reason to be.
You can redo the soldering where necessary . Lightly brush the joints with soldering flux and then retouch the solder with the tip of your hot iron. Clean the tip after each touch.
George
George,
when l lift up the soldering iron, there is always a trail of pointed solder that l cannot eliminate.
How do you get a smooth surface ?
when l lift up the soldering iron, there is always a trail of pointed solder that l cannot eliminate.
How do you get a smooth surface ?
Orientation of OPA 2209.
I seek confirmation that the pin assignment follows the similar logic as 74 A HC 86D.
The line on the OPA2209 is near to the white marking of the pcb .
I seek confirmation that the pin assignment follows the similar logic as 74 A HC 86D.
The line on the OPA2209 is near to the white marking of the pcb .
Hi George,
Thanks for your kind reply 🙂
In fact, reading your reply, I use exactly the same tools and process exactly the same way, including the humble toothpick LOL (great minds...)
So how come... OH, now I see the (only) difference... "Not less than half an hour for cleaning this small board"... YEP, that must be it, instead of me being "10 min should do the job" GLOL
So, I "just" need to be more patient and I know now where the benchmark is
Thanks for all this
Claude
Quote: when l lift up the soldering iron, there is always a trail of pointed solder that l cannot eliminate.
Hmm, that sounds like to few flux to me, basicaly either what you use...or "too long on it" with the soldering iron so flux evaporates. Too long could mean either not hot enough and insisting, or fine temp but too long on it. All IMHO... SMD soldering, I just have a reasonable temp but that is hot enough that a small touch with the iron is suffisant to solder. I mean a few tenth of a sec or so 'never measured it though...
I was lucky not to experiment a lot with failures so possibly more experienced people here will advice best on your prob
Keep the good faith, the more you train, the better you will get, no reason not to... to get started again after many years I used a chinese 2$ smd training board, in fact two of them, just to get the touch and they had smalller and smaller resistors I would never have thought I could solder myself... and SMD is in fact more straightforward then it seems
Have fun
Claude
Thanks for posting your impressions George... nice to read this little board does a nice job, don't hesitate to post more of them when the time is right.
And, LOL, nice to read that you are indeed human, managing a durability test in reverse polarity 🙂)
Have a nice night
Claude
And, LOL, nice to read that you are indeed human, managing a durability test in reverse polarity 🙂)
Have a nice night
Claude
Claude
Thanks for the guidance. What is the recommended solder temperature ?
I set it to 250 deg C.
Thanks for the guidance. What is the recommended solder temperature ?
I set it to 250 deg C.
The pin assignment that I posted in thread 123 for OPA2209 is correct ?
White line on the OPA 2209 is near to the white dot on the pcb?
White line on the OPA 2209 is near to the white dot on the pcb?
Hi again,
No clue on OPA2209 as I haven't built this kit, but if you look at its spec sheet my understanding is this chip has a small dot where pin 1 is located. If so align that one with the white dot on the PCB. Please follow dots or bevels, not text or markings such as lines as these may vary in production over time, although rather unusual.
Re iron temp, the problem is that most non expensive irons do not display the true temp... at least I know my soldering station is rather based on power consumption and not a temp sensor / feedback of some kind. Further, heat transfer depends a lot on the size of your tip. I use a very small soldering tip for SMD and my soldering station reads usualy in the 320°C region for this kind of work, which would be too much though with a bigger tip (say 20°C less for the next size) and again who knows what reading I would see on a trully regulated professional soldering station with real temp feedback. Having said all that, and although most non expensive soldering stations don't display absolute temps with accuracy at the iron tip, 250°C would be way to low ON MY soldering station... but that's me and my other iron, very old and small, used for quick off house bits as not a station, doesn't even allow temp regulation so I simply adapt myself (it is in fact a bit hot for SMD stuff, it didn't exist back then, but still Ok for a few parts as long as you can see and grab them 🙂
Orientation of OPA 2209.
I seek confirmation that the pin assignment follows the similar logic as 74 A HC 86D.
The line on the OPA2209 is near to the white marking of the pcb .
The package you're showing above isn't the one used on Kubelik, its a smaller one maybe MSOP8 or similar.
SOIC8 OPA2209 has a bevel just like the other chips you've already soldered. The white line on the markings goes to the top and the text reads in the same direction as the 74HC86 and TDA1387.
On soldering, I reckon 250oC is probably too cool. My iron manufacturer recommends 345oC.
SOIC8 OPA2209 has a bevel just like the other chips you've already soldered. The white line on the markings goes to the top and the text reads in the same direction as the 74HC86 and TDA1387.
On soldering, I reckon 250oC is probably too cool. My iron manufacturer recommends 345oC.
Last edited:
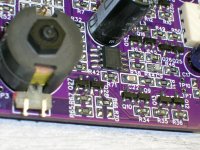
Re OPA 2209 orientation, pls see attached photo. Bevel and white line on the IC to face the white dot on the PCB.
Re kp question about soldering temperature setting. Quoting from Q&A from ANTEX site https://www.antex.co.uk/technical/faqs/ :
I place the clean tip to contact the junction of the SMD and the PCB pad for 1-2 seconds and then I momentarily touch the 0.5mm solder wire on the heated joint, then I remove the tip and wipe it clean.
George
Re kp question about soldering temperature setting. Quoting from Q&A from ANTEX site https://www.antex.co.uk/technical/faqs/ :
What I like with the simple non temperature adjustable ANTEX soldering irons I use is that they are thermally balanced. They are designed for a set core temp (370 to 400 d C depending on the Wattage) and the thermal mass of the bit keeps the temperature of the tip stable. I have three (18W, 25W, 40W) with various replacement bits. In this project I have used the 25W with a D 0.5mm conical bit.My solder melts at 188C, if I set my soldering station to this temperature it will not melt it.
The right tip temperature for an application depends upon many factors, just because the solder is specified to melt at 188C it is not correct to assume that this is the right tip temperature.
To find the correct temperature increase the setting on the station until the solder melts instantly on the tip. Now try making a joint at this temperature. If the joint takes too long to make or is of an unacceptable quality increase the temperature by 20C and try again. Continue this until the optimum time and temperature is found and lock the station to it.
----------------------------------
Why might a soldering iron fail to make joints correctly, or consistently?
This is usually caused by insufficient heat being transferred from the heater, through the bit into the soldered joint. Heat flow can be maximised by using a bit with the largest tip dimensions convenient for the task and the largest possible mass. Only when this has proved unsuccessful should a higher wattage of iron be considered.
I place the clean tip to contact the junction of the SMD and the PCB pad for 1-2 seconds and then I momentarily touch the 0.5mm solder wire on the heated joint, then I remove the tip and wipe it clean.
George
Attachments
Last edited:
I used to be very wary of smd soldering but I've learned a technique that works for me and gives good results that are fairly neat too.
I use a thermally stable solder paste rather than solder wire;
https://www.digikey.co.uk/en/products/detail/chip-quik-inc/TS391SNL/7802215
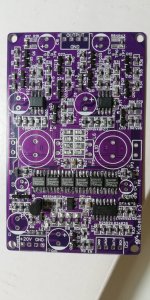
using a very fine nozzle on the syringe, I place a tiny blob of solder paste on each pad. I then use tweezers to place the part on the pads and then apply a little pressure to hold the component in place - I use a kitchen matchstick that I have tapered. I then touch each pad in turn with my soldering iron to reflow the solder paste - I use a fine chisel point tip and ensure that it contacts both the component and pad - I use a temperature controlled iron set to 340C - it only takes a moment of contact to reflow each joint.
The PCB below is about 25mm (1inch) square - not perfect but not bad for my old eyes and hands.

I use a thermally stable solder paste rather than solder wire;
https://www.digikey.co.uk/en/products/detail/chip-quik-inc/TS391SNL/7802215
using a very fine nozzle on the syringe, I place a tiny blob of solder paste on each pad. I then use tweezers to place the part on the pads and then apply a little pressure to hold the component in place - I use a kitchen matchstick that I have tapered. I then touch each pad in turn with my soldering iron to reflow the solder paste - I use a fine chisel point tip and ensure that it contacts both the component and pad - I use a temperature controlled iron set to 340C - it only takes a moment of contact to reflow each joint.
The PCB below is about 25mm (1inch) square - not perfect but not bad for my old eyes and hands.
Nice. I guess they are less of a trouble compared to the old school solder wire method.
I have bought a few syringes of those long ago but I haven't tested them yet.
Are they good for High End audio? 😛
George
I have bought a few syringes of those long ago but I haven't tested them yet.
Are they good for High End audio? 😛
George
This are the TP measurements
TP 1 10.07v
TP2 2.499v
TP3. 2.904v
TP4.
TP5
TP6 10.08v
TP7. 10.08v
TP8. 4.479v
TP 9. 10.08v
TP10. 10.08v
Are these values acceptable?
l notice TP 8 value is a bit outside spec
Richard, please advise
TP 1 10.07v
TP2 2.499v
TP3. 2.904v
TP4.
TP5
TP6 10.08v
TP7. 10.08v
TP8. 4.479v
TP 9. 10.08v
TP10. 10.08v
Are these values acceptable?
l notice TP 8 value is a bit outside spec
Richard, please advise
At least on some places it could possibly benefit from a light touch up with the iron, to make it more even... at higher temp.
Not saying it won't work as it is...
Not saying it won't work as it is...
Hi George
You built the PhiDac aswell if I remember well... how does that one sound in comparison to Phi DecaDac or any other DAC to your ears?
Thanks for sharing all this
Claude
You built the PhiDac aswell if I remember well... how does that one sound in comparison to Phi DecaDac or any other DAC to your ears?
Thanks for sharing all this
Claude
This are the TP measurements
TP 1 10.07v
TP2 2.499v
TP3. 2.904v
TP4.
TP5
TP6 10.08v
TP7. 10.08v
TP8. 4.479v
TP 9. 10.08v
TP10. 10.08v
Are these values acceptable?
l notice TP 8 value is a bit outside spec
They look fine to me, TP8 target voltage is 4.5V so your measured voltage is 0.5% low which is within the spec of the resistors used to set it (1%).
Using solder paste instead of wire you free up a hand to do the clamping of the components. Not all solder paste is the same though, the one I linked to doesn't need special storage or 'go off' like some that are available and it's pretty easy to apply the 'blobs' to the pads. I don't understand the question about 'good for High End audio' - the stuff is designed to solder smd parts to PCBs, which is what we're doing.Nice. I guess they are less of a trouble compared to the old school solder wire method.
I have bought a few syringes of those long ago but I haven't tested them yet.
Are they good for High End audio? 😛
George
- Home
- Vendor's Bazaar
- Kubelik NOS DAC kits