Updates anyone, Pics, reviews? Moondog, have you bought the drivers and jumped on the bandwagon?
I have recieved my speakers and will get the panels cut as soon as I have confirmed dimensions, as well as crossover parts.
Then its all go from there.
Whats a reasonably cheap finish for MDF, that looks decent. If it had a grain, I would just stain and lacquer, not sure how good that would look on MDF.
I had to pick between buying a house or new speakers to build, the wife ( SWMBO ) won.
I would love to join in on this build though, perhaps Ralph will still have some in 3 months time.
You could try gluing good quality ply to the MDF faces and then polish and seal, but for years I have been using plain old house paint as I care more for the sound than the looks.
What-ever you use don't forget to seal the inside of the box as well.
Enclosure cheap finish
Iron on veneer is not to expensive and not to difficult to apply. Stay away from the harder timber species (Jarrah, Blackwood) as they crack easily when applying the heat. Rock Maple, Pine and Tassie Oak are probably the easiest to work with in the Consolidated Edges range.
The other option is to get veneered MDF, mitred for top, sides and bottom and use a painted baffle. You can also use iron on veneer on those surfaces on top of the MDF plus then paint the baffle.
Attachments

Last edited:
Guys,
Looking at Speakerbug, what is the difference between the 15AWG and 18AWG inductors, and what is the difference between the air core and P-core inductors.
Are the 15AWG inductors better? Would I be better off getting the 0.56mH inductor and modifying it back to 0.5 instead of getting the 0.5mH 18AWG one?
Thanks guys
Generally people say that air-core sound better, and if the inductor is in the signal path then use the lowest DCR you can get, AWG numbers run from high to low so large number is small wire and therefore higher DCR, get the larger wire and unwind if you have to.
I don't think that the difference between 0.5mH and 0.56mH would be much.
I have no experience with Permite cores, but using a core allows for the same inductance with lower DCR
I don't think that the difference between 0.5mH and 0.56mH would be much.
I have no experience with Permite cores, but using a core allows for the same inductance with lower DCR
Guys,
Looking at Speakerbug, what is the difference between the 15AWG and 18AWG inductors, and what is the difference between the air core and P-core inductors.
Are the 15AWG inductors better? Would I be better off getting the 0.56mH inductor and modifying it back to 0.5 instead of getting the 0.5mH 18AWG one?
Thanks guys
The use of the 0.5mH inductor only needs 18AWG (1mm wire) as it runs across the tweeter as part of the 2nd order filter. The important inductor is the 0.6mH and a low DCR is beneficial here (not critical) as it is in series with the woofer.
The DCR of the inductor usually ties in with the speaker crossover design and a lot of times it is specified. If not, then a 18AWG (1mm wire will suffice). Usually I use a low DCR value but there are times where a higher DCR is useful to meet a target slope, SPL or matching other drivers in the speaker.
The Jantzen P-Core inductors are very good as can supply very low DCR for high value inductors. I use a 5.6mH 15AWG P-Core in my main speakers for the woofer and provided a much lower DCR than the 2mm wire Mundorf that I had available (0R25 vs 0R47). Not to mention a substantial cost difference ($27 vs $99).
I'll stick my neck out and recommend any of the Janzten inductors that Stephen sells at Speakerbug as I've had very good results with them.... excellent bang for buck.
Hi guys,
getting to the business end now.
I see most people glue their cabinets together and just screw on the front baffle, is their any benefit to this as opposed to gluing everything other than access to the inside of the box? If access is the only reason, would it make any difference at all if I was to Glue the baffle and keep the rear panel removable?
Cheers
It's a good question.
I can't give you a definite answer tho, so long as the box is airtight and well braced when you have finished I would guess that either method is fine. If you are going to make the back removable you could use some 32 * 19 hardwood on edge, set back into the box, use "T-Nuts" and you can then remove and replace the back panel very easily to play with varying densities of stuffing
I can't give you a definite answer tho, so long as the box is airtight and well braced when you have finished I would guess that either method is fine. If you are going to make the back removable you could use some 32 * 19 hardwood on edge, set back into the box, use "T-Nuts" and you can then remove and replace the back panel very easily to play with varying densities of stuffing
dammit, I've just spent 2hrs reading this thread instead of studying. Yes, I do want to make some speakers in the summer holidays but unfortunately they (the holidays) haven't arrived yet.
Though probably more than I was initially wanting to spend, I'm very much drawn to these speakers. I think it's due to the relatively simple, high quality design, easily sourced drivers for Australia but most of all, the wealth of information in this thread.
I am in a very similar situation to mattcalf, just beginning to get interested in diy HiFi and finding the wealth of information somewhat overwhelming. This however is one of the best threads I've had the pleasure of reading. No knowledge is assumed, which works very well for me 😀
So, depending on how my recent job interview turns out, I may be tempted to choose this project as my first. I'm in Newcastle so I'd say a Newcastle design would be the way to go 😀 At least there should be nearby assistance when I mess something up 🙂
But again, well done on such a damn good and informative thread!
I'm in Newcastle so I'd say a Newcastle design would be the way to go 😀 At least there should be nearby assistance when I mess something up 🙂
ZirconiumZephyr
Andy G is also in Newcastle. Here's a link to some of his creations.
Argos Loudspeakers
When you get close to making a move, come for a tour around rabbitz world and I'll show you some possibilities with DIY audio.
Last edited:
wow, those designs are rather .... interesting.
Thank you very much for the tour offer, may have to take you up on that some time. Reading through much of the designs on this forum, I had pretty much resigned myself to taking the word of others that the designs will sound good. Not having any background with decent speakers, I have no idea what I end up building will sound like, just better than what I'm used to.
What suburb are you in just out of interest? If you don't mind me asking. Feel free to PM if you don't want to advertise 😀
Valentine on the shores of Lake Macquarie.
There's a lot of great designs by Troels and Tony Gee. Also great for learning and info.
http://www.troelsgravesen.dk/Diy_Loudspeaker_Projects.htm
http://www.humblehomemadehifi.com/
There's a lot of great designs by Troels and Tony Gee. Also great for learning and info.
http://www.troelsgravesen.dk/Diy_Loudspeaker_Projects.htm
http://www.humblehomemadehifi.com/
Last edited:
Ha, I'm in Eleebana, pretty much the same suburb really 😀 I'm always amazed when I meet someone from nearby online.
Thanks for those links, definitely like the look of some of the Tony Glee speakers.
Thanks for those links, definitely like the look of some of the Tony Glee speakers.
enclosuers
would anyone here in aussie be interested in buying enclosures that i am currently getting done using cnc process through a furinture shop here in the west
they are under development at this time tower format mtmw
cheers speedie
would anyone here in aussie be interested in buying enclosures that i am currently getting done using cnc process through a furinture shop here in the west
they are under development at this time tower format mtmw
cheers speedie

Damn, the more time I spend on this forum, the more expensive my ideas get. Spurred on by getting closer to being offered a part time job, I started looking at the Madisound RB Reference kit http://www.madisound.com/catalog/product_info.php?products_id=8644
It just looks so tempting considering the drivers cost $340 each here. Pity about the exorbitant shipping costs (bit odd though seeing as the fastest "best" shipping option is also the cheapest at US$100)
To balance that out though, I've been looking at the FR option with the CHR-70, nice little driver indeed, and easy to get in aus from darcheraudio 🙂 Pity it's only 4ohms impedance which doesn't really go well with my gainclone (LM3875 with 25V trafo). I'll have a look for some info but what is to stop me adding a series resistor to bring the resistance up, presumably this would correlate with impedance right?? My electronics knowledge leaves a little to be desired.
Don't add series resistance to a woofer or full range driver, you are robbing the speaker of SPL
Forgive the ignorance, but what would be the best way to run a 4ohm driver from an amplifier with a higher rail voltage without damaging the chips? Just keeping the volume down low?
The Madisound RBR is exceptional value.
Lower volumes will be fine for 4R with 25V tranny. For more SPL into 4R, put a 18V transformer in it. Lose a little power but gain current. For 35V rails (25V tranny) you get roughly 57W into 8R and 50W into 4R. For 25V rails (18V tranny) you get roughly 29W into 8R and 47W into 4R and is what I used when I built chipamps. The higher rails are fine but the problem is the chip gets hotter into lower impedances and can't dissipate the heat into the heatsink as the package becomes a bottle neck.
I've tried the CHR-70 which is not a bad little driver but best suited for a very small room on not very high SPLs and when it lets go, very nasty. The CSS FR125SR is a much better overall option and a well balanced FR driver. Once again the SPL is not huge but much more available than the CHR70. Fine for up to medium sized rooms.
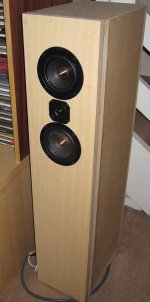
I have a friend in Melbourne who is nuts on this CSS driver and prefers it to a Scan Speak Revelator based speaker I designed for him (much to my disgust ;^)). He did have a problem with power handling at high volumes but I did a design for him that solved the problem, got the SPL up to about 90dB, helped the top end and provided better extension. Was a simple MTM design with a Audax AW010E1 tweeter and 2 crossover parts. He loves it and that's all that matters.
The pic is the test box for this speaker.
Lower volumes will be fine for 4R with 25V tranny. For more SPL into 4R, put a 18V transformer in it. Lose a little power but gain current. For 35V rails (25V tranny) you get roughly 57W into 8R and 50W into 4R. For 25V rails (18V tranny) you get roughly 29W into 8R and 47W into 4R and is what I used when I built chipamps. The higher rails are fine but the problem is the chip gets hotter into lower impedances and can't dissipate the heat into the heatsink as the package becomes a bottle neck.
I've tried the CHR-70 which is not a bad little driver but best suited for a very small room on not very high SPLs and when it lets go, very nasty. The CSS FR125SR is a much better overall option and a well balanced FR driver. Once again the SPL is not huge but much more available than the CHR70. Fine for up to medium sized rooms.
I have a friend in Melbourne who is nuts on this CSS driver and prefers it to a Scan Speak Revelator based speaker I designed for him (much to my disgust ;^)). He did have a problem with power handling at high volumes but I did a design for him that solved the problem, got the SPL up to about 90dB, helped the top end and provided better extension. Was a simple MTM design with a Audax AW010E1 tweeter and 2 crossover parts. He loves it and that's all that matters.
The pic is the test box for this speaker.
Attachments
- Status
- Not open for further replies.
- Home
- Loudspeakers
- Multi-Way
- Kit in Australia