What error?
The dimensions in the plan linked in the OP are correct.
The "A" side parts are 45" tall, the "B" back part is 43.5".
The top and bottom and interior parts are 25" wide, the sides overlap them, resulting in a 26.5" wide cabinet.
The dimensions in the plan linked in the OP are correct.
The "A" side parts are 45" tall, the "B" back part is 43.5".
The top and bottom and interior parts are 25" wide, the sides overlap them, resulting in a 26.5" wide cabinet.
The problem is that if you put the bottom and top on the sides you end up with an 1.5" taller cabinet and then internal measurements don't match up.
The pic of the cabinet side cut away view shows the sides being 43.5". After cutting the sides to 43.5" tall all of the internal measurements work out exactly perfect now.
The pic of the cabinet side cut away view shows the sides being 43.5". After cutting the sides to 43.5" tall all of the internal measurements work out exactly perfect now.
Last edited:

Singtall,The problem is that if you put the bottom and top on the sides you end up with an 1.5" taller cabinet and then internal measurements don't match up.
After cutting the sides to 43.5" tall all of the internal measurements work out exactly perfect now.
If you cut the sides to 43.5" rather than 45", you will have to make the top and bottom pieces oversize to make up for the shortage.
The the sides of the cabinet are 45" tall, screwed to the top, bottom, back and front from the sides, as in the plans.
Have fun,
Good luck!
Art
Attachments
did you see the plan pic I posted on post 1363? It's not showing it the way you explained it. clearly C board sits on top of the A board. Maybe the plan was modified at some point? I would think that it would make sense to put the top board physically on top of all of the boards for strength reasons. either way it can work. I just wanted to make everyone aware of what I was seeing in the plans just in case anyone else ran into problems like I did.
Thought the photo in #1365 showing the side part "A" screwed into the top and bottom parts "C" would help you to understand the cabinet design.1)did you see the plan pic I posted on post 1363?
2)clearly C board sits on top of the A board.
3)Maybe the plan was modified at some point?
4)I would think that it would make sense to put the top board physically on top of all of the boards for strength reasons.
1) Yes.
2) Not in the plan you posted, which shows part "A" to be 45", the full height of the cabinet.
3) There have been some corrections made to the plans, but the "A" side dimensions have always been 45" x 22.5", and top and bottom parts "C" have always been 25" x 22.5".
4)If you change the plans by reducing the side panel height by 1.5", you will then have to increase the width of the top and bottom panels from 25" to 26.5". Your change won't make the cabinet any stronger, but will make it more difficult to build.
My brain got stuck on stupid. My apologies. My wife looked at the plan and set me straight. Lol. Thanks for your patience. Even though I may be able to salvage the cabinet I'm working on, it may be a pain to build. I'm gonna start on the other one and see what scraps I have left to fix the first one. Worse case I'm buying more wood.
Singtall,
If you cut the sides to 43.5" rather than 45", you will have to make the top and bottom pieces oversize to make up for the shortage.
The the sides of the cabinet are 45" tall, screwed to the top, bottom, back and front from the sides, as in the plans.
Have fun,
Good luck!
Art
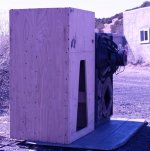
The cabinet in the photo behind the Keystone looks like an interesting experiment - what's going on there?
Cheers
Martin
My brain got stuck on stupid. My apologies. My wife looked at the plan and set me straight. Lol. Thanks for your patience. Even though I may be able to salvage the cabinet I'm working on, it may be a pain to build. I'm gonna start on the other one and see what scraps I have left to fix the first one. Worse case I'm buying more wood.
Singtall
step back from the build - take a few deep breaths.
I understand your excitement but don't rush the build. As they say it's not just about the destination, it's about the journey!! - stop and smell the roses along the way.
There's a great thread on construction and finishing cabinets that you should read. I'd recommend you read that before continuing on the build.
Once completed it's difficult, if not impossible, to go back into the cabinet to find a leak - fix a panel vibration - fix the T nut misalignment - position of handles and style etc etc.
For my next build I've probably added an extra 10kgs of weight per box, but that's a story for another time ...
Cheers
Martin
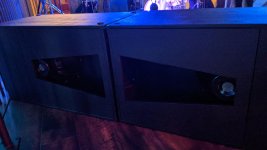
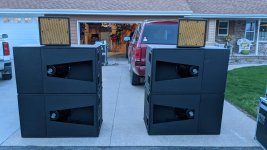
I just finished up my build on these. My buddy had all the tools, so we built in his garage. Funny story - he accidentally shaved off 5/8" on the first cut for the sides.. hah. So we took that off of the large part of the horn near the exit. They still perform so so so well. These are incredible.
I'm running a show right now for a pop rock band at a local club and it's ridiculous how much output these have. I was previously running five Yamaha DXS15 subs with the center canceling bass towards stage and I honestly think One replaces the four that were pointed forward before. These are incredibly directional and I no longer have to set up a reverse sub. We built four, but I'm only using two tonight with a QSC PLD 4.5 bridged A+B and C+D. I'm hardly hitting the meter and they're rocking for about a hundred people.
The depth, clarity, and overall tonal quality is outstanding. Using B&C 18sw115 8-ohm drivers and we ended up using 3/4" Marine Grade Plywood because Baltic Birch had a 5-week wait time. I highly recommend this wood if you're not able to get Baltic Birch.
Nice work on the cabinets, how many plies in the marine grade plywood you used?I
The depth, clarity, and overall tonal quality is outstanding. Using B&C 18sw115 8-ohm drivers and we ended up using 3/4" Marine Grade Plywood because Baltic Birch had a 5-week wait time. I highly recommend this wood if you're not able to get Baltic Birch.
Martin,The cabinet in the photo behind the Keystone looks like an interesting experiment - what's going on there?
That photo was taken while testing to determine how the Keystone sub compared to a bass reflex, also linked in post #1:
Tapped Horn Vs. Bass Reflex Case Study
Short story: One Keystone sub using the BC18SW115-4 has the equivalent output of two bass reflex cabinets with the same Fb, the pair using more occupied volume, weight, materials, two drivers and twice the power.
The test box was a solidly braced 1" MDF cabinet that originally housed a JBL 15", 10", 4" diaphragm high mid, and slot tweeter, weighed over 200 pounds with drivers.
Glad I never had to lift that thing when it was loaded !
Art
Nice work @swiegert 2011! How do you like the location of the handles on your keystones? I've been wanting to put some on mine but can't decide where to put them.
Nice work on the cabinets, how many plies in the marine grade plywood you used?
3/4 inch. We used two sheets per cab and had plenty of leftovers for "uh-oh" moments and some shelves for my trailer.
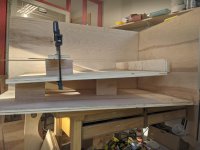
After some mishaps I ended up having a couple boards to use for top and bottom to complete the mess up cabinet. I was able to glue up a couple pieces and it's looking better now. Had to get my wife out there to double check everything and help me hold it in place while putting screws in. I'm getting plenty of squeeze out on the adhesive so I feel pretty good about not having issues once it's all together. I was going to install the speaker board but I'm going to wait until Tuesday when the speaker comes in to make sure the hole is cut perfect. Thanks again for the tips guys.
Attachments
The depth, clarity, and overall tonal quality is outstanding. Using B&C 18sw115 8-ohm drivers and we ended up using 3/4" Marine Grade Plywood because Baltic Birch had a 5-week wait time. I highly recommend this wood if you're not able to get Baltic Birch.
Which top cabinets are you running with the subs? I was thinking about building the syntripps but I'm having second thoughts since my building skills are a bit lacking.
Nice work @swiegert 2011! How do you like the location of the handles on your keystones? I've been wanting to put some on mine but can't decide where to put them.
Thanks @samdboneff. I think the handles are in the perfect location. Off the top of my head, I think they were 3 3/4" from the edge for the top of the handle and 9" from the edge for the bottom of the handle and then 3 1/4" from the side. That 3" measurement may be opposite. Whatever looks right 🙂 The handles are the plastic ones from parts-express. Whichever handles you choose will determine the size of your hole obviously.
I don't think so he handles affected the overall horn's function much. There are four and each pair was placed on the largest part of the horn mouth - so the part where it finally wraps around before exiting the keystone. Since these will almost always be used as a pair horn-to-horn laying down, the handles on the side that's the top of the keystone pretty much don't make a difference. The side where they keystone mouth is the largest already has the bass exiting, so that's not a big deal either with the extra plywood missing.
I should say that the handle locations are also not any closer to the edge because we put speaker feet on at 3 1/2 inches from each edge. Each cabinet has feet on the bottom - as in the Keystone mouth skinny side bottom. But then they are built in pairs so they can stack. So on two of them we have feet on the same side of the cabinet and then a small hole that matches up for the feet to sit in. The positions of these are the exact opposite on the other pair so that they can stack like the photos above where the keystone mouths meet when they're laying down.
Please ignore the feet mismatch in the live photo from last night. Those were matched cabinets because I grabbed a pair from the trailer instead of one from each pair. So my one cabinet sat on rubber feet and the other one was upsidedown! You can see the feet sticking up haha. Hope that helps. Handles are great and I was able to lift them on my own length-wise last night when stacking in the trailer. Wheels are on the side opposite of the keystone as well. Use T-nuts for everything and drive a bolt in with a washer to suck the t-nuts in before you get too crazy with the design. Once the box is assembled on all four sides, it is Very difficult to get the t-nuts back in for the speaker feet especially if they're not sucked right.
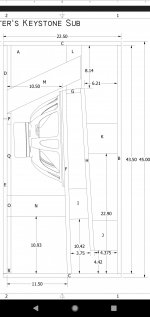
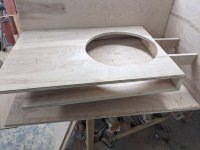
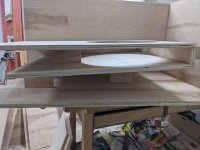
After allowing some dry time I laid the speaker board in it's place just to have a look and it appears I measured something wrong when I laid out the side board measurements. The board is a little further back into the box than I projected. From inside the back of that board to the front of the next one the measurement is right, so go figure. Pics posted just in case someone spots an error.
Attachments
- Home
- Loudspeakers
- Subwoofers
- Keystone Sub Using 18, 15, & 12 Inch Speakers