Bigger is better? 🙂
Hi salzburgsoundsystem,
If you are willing to live with the increased size a 24(D)x48(H)x30(W) inch box (how thick is your 1/2" material really?) would give you a substantial increase in internal net volume. You are looking at 513.7 L net versus 377.6 L net for the furybox (30(D)x40(H)x22.5(W) w/ 3/4" material).
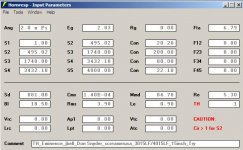
You would be able to improve on the frequency response with the larger volume, and you probably can simplify the folding. I'll attach a Hornresp Input page. Play around with the cross-sectional areas one at a time, and take a look at the SPL AND Impulse Response charts, note the changes. The same box should work for both the 4015LF and the 3015LF. You'll see how forgiving the larger box really is.
Regards,
Hi salzburgsoundsystem,
If you are willing to live with the increased size a 24(D)x48(H)x30(W) inch box (how thick is your 1/2" material really?) would give you a substantial increase in internal net volume. You are looking at 513.7 L net versus 377.6 L net for the furybox (30(D)x40(H)x22.5(W) w/ 3/4" material).
You would be able to improve on the frequency response with the larger volume, and you probably can simplify the folding. I'll attach a Hornresp Input page. Play around with the cross-sectional areas one at a time, and take a look at the SPL AND Impulse Response charts, note the changes. The same box should work for both the 4015LF and the 3015LF. You'll see how forgiving the larger box really is.
Regards,
Attachments
Last edited:
Hi,
Here are just some scribbles on how you could fold a simple TH with your 24"x48" side panels.
Regards,
Here are just some scribbles on how you could fold a simple TH with your 24"x48" side panels.
Regards,
Attachments
Last edited:
Chambered
And in case you haven't simulated a chamber in Hornresp before (that ought to keep Ya busy 🙂):
Regards,
And in case you haven't simulated a chamber in Hornresp before (that ought to keep Ya busy 🙂):
Regards,
Attachments
Last edited:
You guys are
crazy, very generous, and clearly as obsessed as I with Audio, especially speaker building!
Thanks! Ben
crazy, very generous, and clearly as obsessed as I with Audio, especially speaker building!
Thanks! Ben
oliver...
funny you should post that, it looks almost like my 24x24x48 that I had just mocked up for my current gymnasium install !!
funny you should post that, it looks almost like my 24x24x48 that I had just mocked up for my current gymnasium install !!
ben:
As I found out, this tapped horn thing isn't hard to get 80%, or even 90% of the way there... getting that last 10% takes time and effort, and some trial/error. The first dozen inches or so of the path I think has a ton to do with it. Once there, the rest is simple.
Yes you could build olivers cabinet as is, or you could mess around with hornresp some and see if you can better it. I personally like the angled sides close to the compression opening that scott (screamersusa) did. I think that does a lot to effectively couple the driver to the rest of the horn, instead of just dumping into a 24" or 30" wide path. (however, I notice that oliver started the path exactly at the compression opening with an angle... hmmm.. may have to try that.)
If you are so inclined to 'test' 3/8" foam door and window weatherstripping and screws allows you to get to an air tight cabinet, without glue... and allows you to test. Just be sure and wood fill your old holes on subsequent cabinet tests. (or use PL, like I do)
I wanted to do a 24x24x48 for 2 reasons. First it's extremely efficient in terms of wood cutting and overall cabinet size. Second, I found some really good 3/4" plywood for cheap at home depot. (7 equal thickness cabinet ply for $23)
Where I do installs on a regular basis, a fast, easy, cheap cabinet is exactly what I need.
Ben, For you, where you already have t48 panels cut, you could try a th out with minimal effort/waste. Just don't use PL glue till you are sure you have what you want.
Missing part of drawing.
Hi,
Somehow the part of the drawing that was "just dumping into the path" was chopped off. Must have been later than I thought 🙂. I agree with jbell's observation that the coupling from driver to horn throat, and that general area, will take some trial and error engineering. For what it is worth I also like screamers solution, or an even more direct coupling of the driver to the throat (e.g.: starting the path right at the throat). With a little effort the bottom board can be made removable to give access to that area, which would make experimenting easier. And definitely "mess around with Hornresp some" this is just a suggested folding for your 24x48 side panels. I would also suggest to build one box without bracing, and one with just to see the difference. And post measurements. 🙂
Regards,
Attachments
Bracing!
Sorry, but there is no way I am building without bracing, even for the sake of scientific endeavour. That lesson was learnt years ago. Bracing reduces vibration, improves structural integrity and increases spl.
I am convinced we can agree on the need for bracing.
😀
In other areas, as already proven, I am indeed a beginner.
I like the angled bit in the throat too
It seems to be a splendid and simple fix.
I had been wondering about a V-shape, like screamer, but extending to the rear wall.
Or a combination of both? So many options. So much wood to hack to pieces before we get a satisfactory result!
Ben
It seems to be a splendid and simple fix.
I had been wondering about a V-shape, like screamer, but extending to the rear wall.
Or a combination of both? So many options. So much wood to hack to pieces before we get a satisfactory result!
Ben
Oliver?
Oliver,
is there any way to force your nifty drawing program to include dimensions/ measurements.
I measured and redrew your diagram on paper and couldn't quite get the 90 degrees you have on a couple of the angles, especially around the top of the box.
Any idea what I am doing wrong?
Oliver,
is there any way to force your nifty drawing program to include dimensions/ measurements.
I measured and redrew your diagram on paper and couldn't quite get the 90 degrees you have on a couple of the angles, especially around the top of the box.
Any idea what I am doing wrong?
So much wood to hack
Hi Ben,
That's why Hornresp and AkAbak are such godsends, without them none of this would be happening.
I'm also a great believer in bracing, especially when we are talking about large panels in tapped horns, all the reports sofar indicate the need for extra support. We should keep in mind though, that reportedly screamer hit on a lucky resonant behaviour in his fury box that improved the response measurably.
As to measurements, it would be great to get 10m open field measurements as used by Danley, that is the right way to measure bass enclosures.
Well, have to go to work for a little. Happy wood hacking. 🙂
Regards,
P.S.: Yes, I can get the dimensions for you after I'm back from work.
Testing
In a month or 2, when Summer is here, I can do some testing in a field. Until then, I will do the best I can indoors.
Thanks for helping me out, especially when working.
Sorry to hear you are working on a Sunday!
Ben
In a month or 2, when Summer is here, I can do some testing in a field. Until then, I will do the best I can indoors.
Thanks for helping me out, especially when working.
Sorry to hear you are working on a Sunday!
Ben
Jeff?
now I've read so many post I know a couple of names here... even found the friendly pro who sent me over to this forum 🙂
Jeff,
I see you use much less rounding of corners / use of reflectors than screamer. Oliver's design for 30 x 24 x 48 lies somewhere in between.
Less reflectors or smoothed corners = reduced labour and cost
Were you able to leave your corners at 90 degrees because they are simply cut off on e.g. screamer's build to make space for wheels and handles?
Would his design work if the corners were left on, e.g. for an install where handles are not needed?
As an install, you did not need these... or would your design also improve in some way through messing with the corners with the addition of reflectors? Not sure what would improve if you already have such high sensitivity and linear reproduction, but hey.
This is just for the sake of knowledge and curiousity.
Regards, Ben
Edit. I see internally rounded off corners are known as 'reflectors'!
Last edited:
Dimensions-Post #151
Hi Ben,
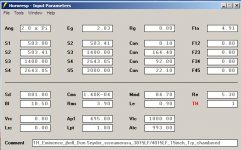
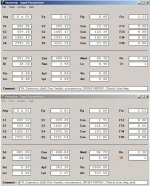
I went through the drawing again, and found no major errors in the angles, etc.. Anyway, I drew the box up in two versions: one w/ the driver wide open into the horn path, and the other with a small driver throat chamber and a coupling port from that chamber into the shortened horn path (shortened L12). The second has a better impulse response in Hornresp. What that means is anybody's guess; screamerusa is quite happy with the sound coming from his furyboxes and the Hornresp impulse response for these is not very good. I'll attach two pdfs with the drawings and a jpg with both Hornresp Input screens. I hope this will help. From the past results others had with these drivers (3015/4015) you should be on the right path.
The 1/2" plywood will require good wood working practices, and lots of bracing to result in a sealed horn path free of leaks. This is very important in tapped horns. Take a look at the AVS thread on Danley's DTS-10 (Danley DTS-10 "Super Spud" DIY kit - AVS Forum) it shows the attention to bracing and sealing the guys at DSL bring to bear. Also, take note of the limited use of damping material.
As to corner reflectors: it seems that they should be used sparingly, and mainly for structural reasons; screamerusa's experiments provide interesting food for thought, and it will take experimenting to optimize the placement and size of corner reflectors. The only thing that is certain about reflectors is that they reduce the internal volume, and that is generally not a good thing.
I hope you will get to build these, and have the opportunity to provide the community with some measurement feedback.
Regards,
Hi Ben,
I went through the drawing again, and found no major errors in the angles, etc.. Anyway, I drew the box up in two versions: one w/ the driver wide open into the horn path, and the other with a small driver throat chamber and a coupling port from that chamber into the shortened horn path (shortened L12). The second has a better impulse response in Hornresp. What that means is anybody's guess; screamerusa is quite happy with the sound coming from his furyboxes and the Hornresp impulse response for these is not very good. I'll attach two pdfs with the drawings and a jpg with both Hornresp Input screens. I hope this will help. From the past results others had with these drivers (3015/4015) you should be on the right path.
The 1/2" plywood will require good wood working practices, and lots of bracing to result in a sealed horn path free of leaks. This is very important in tapped horns. Take a look at the AVS thread on Danley's DTS-10 (Danley DTS-10 "Super Spud" DIY kit - AVS Forum) it shows the attention to bracing and sealing the guys at DSL bring to bear. Also, take note of the limited use of damping material.
As to corner reflectors: it seems that they should be used sparingly, and mainly for structural reasons; screamerusa's experiments provide interesting food for thought, and it will take experimenting to optimize the placement and size of corner reflectors. The only thing that is certain about reflectors is that they reduce the internal volume, and that is generally not a good thing.
I hope you will get to build these, and have the opportunity to provide the community with some measurement feedback.
Regards,
Attachments
Sorry Jim, not sure where iI saw you referred to as Jeff!
mea culpa - mixed up some member names.
mea culpa - mixed up some member names.
Wow, Oliver. Those are some great drawings.
I totally agree. You guys couldn't make it any easier for someone hoping to try building a TH!
What kind of sensitivity can we expect from the 24x30x48 TH?
On another note - have you seen the Tuba 60. I thought it was a joke, certainly did a double take. And the Tuba 36 is no longer advertised! Looks like someone is aiming to beat the JBELL TH 😉
The drivers and size make it a little to expensive and madly heavy / unwieldy for me, I think tapped horns are going to keep me happy for a while yet!
The drivers and size make it a little to expensive and madly heavy / unwieldy for me, I think tapped horns are going to keep me happy for a while yet!
ben:
As I found out, this tapped horn thing isn't hard to get 80%, or even 90% of the way there... getting that last 10% takes time and effort, and some trial/error. The first dozen inches or so of the path I think has a ton to do with it. Once there, the rest is simple.
Just curious, but have you ever tried folding similar to what I've used for my POC #1? I've seen one reference to similar folding in the Dickason's LDC (under the "Transmission Lines" chapter). I'm about to embark on POC #2 using a larger driver, and I'm just wondering if there's any inherent issues with that type of folding that I need to be aware of.
More about POC #1 at The Subwoofer DIY Page v1.1 - Projects : A "Proof of Concept" tapped pipe - introduction. It's a tapped-pipe, but can be converted to a "horn" by simply moving around the internal dividers.
- Home
- Loudspeakers
- Subwoofers
- jbell's set of four tapped horns