Poplar (in the growing Hardwood Series) is specifically designed for wall placement. Note: some have dimensions suitable for sloped sides to furtehr enhabce integration with the wall.
You do have to pay attention to the alignment. The one you have shown will have WAY too much gain placed against a wall — it likely even has issues just putting it a room. You will need a much “droopier” alignment.
dave
For instance, Dave redirected me toward this model from the Hardwood Series when I asked whether it was possible to have a wide baffle MLTL. But I'm having trouble understanding how this is a MLTL. Is the driver sitting in somewhat the middle of line, that is folded on itself in an inverted U-shaped, the holed brace being the wall that's making the fold?
Looks like Reflex with slot port.
Ports that share 3 walls have high correction
factor.
So they can fit in smaller cabinets or cabinets
with less depth. High correction factor
and poor efficiency makes the length shorter
Placing a port way at the bottom of the enclosure.
Would include likely additional correction factor.
Because the distance from driver and wall boundaries
make the port appear even longer.
Just trying make things easier.
Normal QB3 and SB4 in a corner
is going to be the most bass a 4mm
linear driver will do.
Sensitivity is close to 91 dB
Should be fun to listen too.
If tighter deeper bass is wanted
and you actually wanna fill the room
with pressure. Just normal 12" sub
will do that.
I really have a thing for 8" fullrange
drivers too and classic Altecs.
Clarity at the top end is more a thing.
Eventually leads to a 2 way with a tweeter
to clean up the top end.
Bass is what it is.
For this driver 100 liters 35 Hz
No need to endlessly stare at sim graphs.
Last edited:

FWIW: a traditional Vb = Vas, Fb = Fs vented.
I have decided to go with this classic BR alignment generously posted by @Scottmoose.
I'm just having trouble sourcing the correct material for lining the box here in Europe, I cannot seem to find any kind of 'bonded acoustic fiberglass', and nothing even close to 25mm thickness on any of the online shop I have access to.
Hardwood Series when I asked whether it was possible to have a wide baffle MLTL. But I'm having trouble understanding how this is a MLTL.
One dimension is significntly larger than the other 2, the (restricted) terminus is at the end (doesn’t have to be), driver is offset to minimize the first unwamted harmonic.
dave
acoustic fiberglass is for houses.
Would come from a building materials supplier.
Not much hair structure and made of
itchy fiberglass.
For acoustic absorption in a enclosure
you want hair like structure either cotton, wool
or polyester.
Reflex cabinet is lined, or if a very tall tower.
You can add extra folded layers in the bottom
in the " uh oh" area as I call it.
Otherwise polyester batten is found from a
fabric supplier. It is in a batten sheet sold for quilts.
So easy to adhere and line a reflex.
Otherwise loose fill for sealed is same stuff.
Polyester. Loose fill common for pillows or stuffed
animals. Same place fabric supplier.
You can use real cotton or wool sheets.
More expensive of course.
local fabric store or something online
will have batten sheets for quilts.
makes lining the cab easy.
Fold it over and stuff the bottom if needed.
Highest pressure and longest parallel walls
end up being the top and bottom is where extra
density can benefit. Otherwise for basic midrange reflections
which is all it is useful for. Line the cabinet, all done.
Have you looked next door to Germany https://www.lautsprechershop.de/hifi/daemmen_en.htm
Several of this mats are avaible where you can buy stuff for your car from break pads to speaker installation and panel damping. I am sure that you have such stores in Belgium.
Several of this mats are avaible where you can buy stuff for your car from break pads to speaker installation and panel damping. I am sure that you have such stores in Belgium.
I normally default to what's available in the North Americas even though I'm British since the US / Canada seem to be the largest demographic here. OC-703 bonded / rigid acoustic fibreglass board or its direct 703 equivalents (3lbs/ft^3 nominal rating) is widely available there, cheap, designed for acoustic panels & HVAC ducting and one of the most effective materials for this purpose. It's also very easy to work with; disposable gloves when handling are a good idea, but they're a good idea when working with varnishes, wood-stains etc. too, so it's hardly alone on that front, and once in place, it doesn't go anywhere. Harder to get in Europe / elsewhere (alas), as is the nearest 'natural' equivalent: SAE-F10 soft-wool felt, which does more or less the same job, albeit usually at a higher price. I'm not a fan of nominally equivalent rockwools myself, but for this box you can up thickness to ~30mm - 35mm BAF / polyester lagging e.g. Monacor MDM-2; sadly they've discontinued the slightly superior MDM-3. Ultratouch recycled denim in about 30mm should also be fine, if you can find it at a sensible price.I'm just having trouble sourcing the correct material for lining the box here in Europe, I cannot seem to find any kind of 'bonded acoustic fiberglass', and nothing even close to 25mm thickness on any of the online shop I have access to.
Last edited:
Thanks for your answers regarding damping. I have access to sheets of Monacor MDM-2, that's what I'll be using!
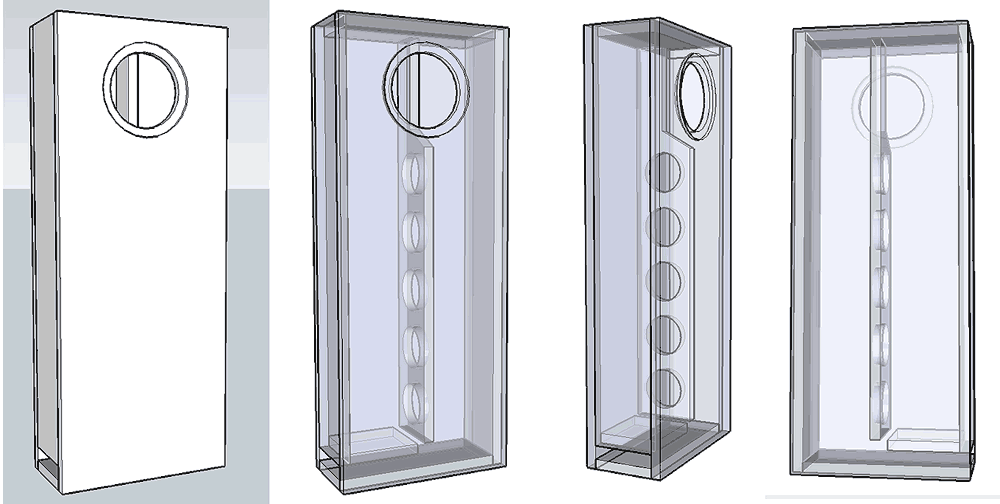
On another note. I have stared at HornResp and re-read xki's 'Accidental MLTL' thread which gave me some further insights into designing MLTL. Using WinISD, I designed a vented, 90L, 35Hz tuned box. It's 90 x 40 with a depth of 25 cm. I've then modelled it in HornResp, placing the driver at about 1/3 of the height of the baffle, and only stuffed the first 2/3 of the box. The port diameter and length was given to me by WinISD. I'm getting some very clean results once I run the calcs, but I'm wondering, did I design an MLTL, or is it just a regular vented box?
Here are some quick plans I drew up in Fusion 360. I added bracings at 1/3 and 2/3 of the height, both for bracing the driver and also for making 'compartments' for the different stuffing density.
Alright, I've ordered everything I need to start building the cabinet out of XPS. I have reworked your plan @Scottmoose to account for the 20mm thickness of my XPS sheets vs. the assumed 18mm. I took great care to design around the internal volume of the plan you posted.
Since it's XPS and I don't it to tear under the weight of the driver, I had to be crafty in order to retain the inner chamfer of the front baffle needed for airflow and dealing with reflexions. I have designed a 3D printed adapter piece to which the driver will be screwed using threaded inserts. The adapter will then be glued to the double-thickness baffle. It has a 45 degrees chamfer, exactly like on the plans. It's going to be a loooong print, but worth it. The bass reflex tube will also be 3D printed to specs.


I have reworked the bracings, and went for a single vertical punched braces that's going to be flush against the driver. I also gave the reflex tube some breathing room. Did I do a good job, or is it going to pose some issues?


I am beyond excited to start building my new toys. If the XPS cabinet proves itself, I have already devised a way to use a resin to harden it to essentially wood-level hardness. It would allow for painting or veneering while staying very light, and then I wouldn't need to get one done in wood, which is prohibitively expensive out here. I'm very grateful to @xrk971 for showing it's possible to build great performing speakers on the cheap. I would have abandonned the idea to DIY my own speakers otherwise.
Since it's XPS and I don't it to tear under the weight of the driver, I had to be crafty in order to retain the inner chamfer of the front baffle needed for airflow and dealing with reflexions. I have designed a 3D printed adapter piece to which the driver will be screwed using threaded inserts. The adapter will then be glued to the double-thickness baffle. It has a 45 degrees chamfer, exactly like on the plans. It's going to be a loooong print, but worth it. The bass reflex tube will also be 3D printed to specs.
I have reworked the bracings, and went for a single vertical punched braces that's going to be flush against the driver. I also gave the reflex tube some breathing room. Did I do a good job, or is it going to pose some issues?
I am beyond excited to start building my new toys. If the XPS cabinet proves itself, I have already devised a way to use a resin to harden it to essentially wood-level hardness. It would allow for painting or veneering while staying very light, and then I wouldn't need to get one done in wood, which is prohibitively expensive out here. I'm very grateful to @xrk971 for showing it's possible to build great performing speakers on the cheap. I would have abandonned the idea to DIY my own speakers otherwise.
Last edited:
So, is it alright if the driver isn't braced? Or should I just move it slightly while still aiming at bracing the driver?
I'd brace the driver if possible. Just avoid outright equidistance & if you can get sufficient to avoid the vent, so much the better.
Scott read my mind. He is 8 hours ahead of me.
The baffle is the weakest panel in the box. Particularily where the driver hole is. By using an edge to egde brace including the vibrating driver you create an (enclosed) I-Beam structure as well as dissipate the vibrational energy of the moving cone across the structure, mass, and material damping of baffle, top, back, bottom, and brace instead of just that weak baffle.
Moving the brace off centre means you have to worry less about the even order harmonic of the potential panel resonance.
dave
Last edited:
A little update on the build. I got started yesterday morning thinking this would be done by the end of the day. I had, as every newcomer to DIY I guess, grossly underestimated the time it would take. To be fair, my usually extremely fast drying PVA glue takes close to 6 hours to dry here. Probably due to the fact that I'm trying to stick two non-porous surfaces together. Once dried, it's nice and solid.
XPS is quick and easy to work with. I used a hot wire mounted to a table to make the cuts, and while some additional training will help, I got pretty clean results. Some minor mistakes here and there. I caulked every possible nooks and crannies three times. Should be airtight.
I am severely under equipped in the clamp region, so I had to resort to good old heavy books.
As you can see, I also went heavy on the bracings, realizing that I should just do a lot of them to prevent cabinet flexing as much as possible.
I'll add at least 5 additional ones, bracing the baffle to the back of the speaker, and one to brace the driver.
I cannot wait to hear those, although it'll be mono for the time being. If I manage to get a better glue, the second cab should only take a day.
XPS? I'd put a 2 mm lead sheet onto the surface. Or even two sheets, with inner decouplng layer( I don't Remember the acronym), better
About the quality of the bracing, I can't comment...but It seems that the masses involved make an agglomerate of dubious utility. The big brace divides the volume making a smaller sub enclosire
About the quality of the bracing
A better picture would be appreciated.
dave
XPS? I'd put a 2 mm lead sheet onto the surface. Or even two sheets, with inner decouplng layer( I don't Remember the acronym), better
Why would I need to use lead?
Sorry I don't have more picture, I only took the one. I'll try to give a description.
The vertical brace going from bottom to top is not connected to the front or back. It is about half of the cabinet's depth, and there are four big holes through it. So it does not divide the volume on the box into a smaller enclosure.
I have horizontal braces going through the holes of the vertical one, bracing the sides together. Then, on each side, there's one brace connecting the side to the central vertical brace.
Finally, four bracings connected the baffle to the rear of the cabinet, and one last brace to hold the driver in place. I have added foam clamped between the driver and the brace.
I glued and sealed everything and am now waiting for it to dry before doing initial measurements.
I'm thinking I may unscrew the driver to use thicker foam between the brace and the magnet. Yesterday, I was trying the driver open baffle, just mounted on a panel, and I rested it on my windowsill. It completely messed up the sound, most frequencies being transferred to the (old) windowsill and the metal grate below it. I'm afraid that by not using a sufficiently thick foam, I may be sending a lot of vibration directly to the XPS.
- Home
- Loudspeakers
- Full Range
- Help with cabinet design for SB20FRPC30-8