Sure does, two channels even. I think Caddocks help add a smoothness and clear sparkly top end with the PRP's, all else being equal.
Of course my outputs are Toshiba's biased at 750mv.
Hi Tea-Bag,
In your blog on the F5 you used 0.22R source resistors for the Toshiba's. I'm guessing that's not what you used here (.75V/.22 = 3.4A Bias)
 or is it?
Hi Tea-Bag,
In your blog on the F5 you used 0.22R source resistors for the Toshiba's. I'm guessing that's not what you used here (.75V/.22 = 3.4A Bias)
Right. I will change the blog around a bit on that. Thanks for the reminder.
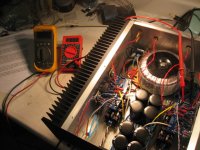
Running .5R caddocks so 1.5amps. The Fets are about 60c. I may go higher later.
How does changing the jfet source resistors (R1 & R2) change the sound? Both technically and audibly?
Ron
Ron
How does changing the jfet source resistors (R1 & R2) change the sound? Both technically and audibly?
Ron
Hi Ron,
The source resistor for the jFet will affect its drain current (Idss). The higher the source resistor the lower the Idss (see Borbely JFet paper pg28 fig 4B)
Boards arrived!
Dear Christian,
your boards are beautiful!
You are beautiful! 😎
"Even the orchestra (EU custom!) is beautiful!" (from Cabaret)
Cheers,
Dear Christian,
your boards are beautiful!
You are beautiful! 😎
"Even the orchestra (EU custom!) is beautiful!" (from Cabaret)
Cheers,
Hi Christian, finished my F5 over the weekend using your boards.
The boards are excellent quality and using your stuffing guide it worked first time no hassles.
thank you for your effort in putting all this information together.
Pass really has designed an excellent sounding amp with the F5.
-Dan
The boards are excellent quality and using your stuffing guide it worked first time no hassles.
thank you for your effort in putting all this information together.
Pass really has designed an excellent sounding amp with the F5.
-Dan
Another F5 is Born!!!
Christian,
After a series of failures (self induced) I have a thriving healthy newborn F5.
No Smoking on this Flight. What a smooth flight it is. Wonderful full bass with true to life highs and no background noise at all. (even with my terrible cable management at this rental house) SWEET.
The boards are so nice looking it's a shame to cover them up with a grill cover.
Easy to work with once you understand the F5.
Word to the wise; GO SLOW with the adjustments of P1 & P2 on each board.
If you have a Variac (I do) start at 20% and adjust to zero DC offset check voltage on R11 &R12 (lower is better) then turn up the Variac to 40%. Ect.
Caution: be sure that the legs of the thremsistor don't ground out on the chassis or bolt of the Mosfets. Smoking is bad for their health.
Thank you Christian, thank you Steve Eddy.
I couldn't be happier with the F5 and it plays my 89Db sensitivity Seas Thor speakers just fine!
Ron
Christian,
After a series of failures (self induced) I have a thriving healthy newborn F5.
No Smoking on this Flight. What a smooth flight it is. Wonderful full bass with true to life highs and no background noise at all. (even with my terrible cable management at this rental house)
SWEET.The boards are so nice looking it's a shame to cover them up with a grill cover.
Easy to work with once you understand the F5.
Word to the wise; GO SLOW with the adjustments of P1 & P2 on each board.
If you have a Variac (I do) start at 20% and adjust to zero DC offset check voltage on R11 &R12 (lower is better) then turn up the Variac to 40%. Ect.
Caution: be sure that the legs of the thremsistor don't ground out on the chassis or bolt of the Mosfets. Smoking is bad for their health.
Thank you Christian, thank you Steve Eddy.
I couldn't be happier with the F5 and it plays my 89Db sensitivity Seas Thor speakers just fine!
Ron
Attachments
Christian,
After a series of failures (self induced) I have a thriving healthy newborn F5.
No Smoking on this Flight. What a smooth flight it is. Wonderful full bass with true to life highs and no background noise at all. (even with my terrible cable management at this rental house)
The boards are so nice looking it's a shame to cover them up with a grill cover.
Easy to work with once you understand the F5.
Word to the wise; GO SLOW with the adjustments of P1 & P2 on each board.
If you have a Variac (I do) start at 20% and adjust to zero DC offset check voltage on R11 &R12 (lower is better) then turn up the Variac to 40%. Ect.
Caution: be sure that the legs of the thremsistor don't ground out on the chassis or bolt of the Mosfets. Smoking is bad for their health.
Thank you Christian, thank you Steve Eddy.
I couldn't be happier with the F5 and it plays my 89Db sensitivity Seas Thor speakers just fine!
Ron
Ron,
where you get that chassis? 🙂
-joe
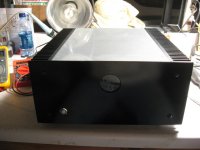
I made it myself and powder coated it in my garage. No paint on it anywhere!
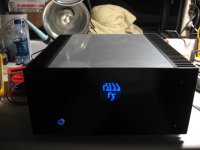
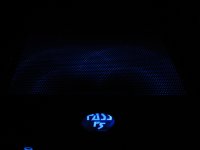
My Wifee likes the blue lights at night...........me too.😎
Ron
My Wifee likes the blue lights at night...........me too.😎
Ron
I made it myself and powder coated it in my garage. No paint on it anywhere!
Ron
Where did you source the top cover from?
Congrats on your build, looks great!
I made it myself and powder coated it in my garage. No paint on it anywhere!
My Wifee likes the blue lights at night...........me too.😎
Ron
I would pay to get you to make me a pair of those 🙂
-joe
Where did you source the top cover from?
Congrats on your build, looks great!
Ichiban,
The top and bottom are of the same material, 1/16" perforated sheet aluminum with 1/16" holes. The top is Powder coated in "Mirror Chrome" and looks better than the pictures show.
It was sourced from a local supply shop called "Blue Collar Supply", most large cities have a surplus metal supply house somewhere. They had 2 foot X 4 foot sheets for ~$50 as I recall. I cut them on my table saw with a 60 tooth carbide 10" blade. Sanded the edges smooth then cleaned them with acetone, sealed them with Zinc Phosphate, cooked them for 20 minutes, then PC them.
If you want some of the Perf. aluminum shoot me a PM with the size you want and next time I'm down there (~25 miles away) I'll pick some up.
Jtktam,
LOL, thanks, I'll take that as a compliment.
I think it came out pretty good. Sound is way past awesome!
Ron
Attachments

Last edited:
Metal Work
Renron -- pretty cool.
How'd you do the logo?
Steve
Renron -- pretty cool.
How'd you do the logo?
Steve
Ichiban,
The top and bottom are of the same material, 1/16" perforated sheet aluminum with 1/16" holes. The top is Powder coated in "Mirror Chrome" and looks better than the pictures show.
It was sourced from a local supply shop called "Blue Collar Supply", most large cities have a surplus metal supply house somewhere. They had 2 foot X 4 foot sheets for ~$50 as I recall. I cut them on my table saw with a 60 tooth carbide 10" blade. Sanded the edges smooth then cleaned them with acetone, sealed them with Zinc Phosphate, cooked them for 20 minutes, then PC them.
If you want some of the Perf. aluminum shoot me a PM with the size you want and next time I'm down there (~25 miles away) I'll pick some up.
Jtktam,
LOL, thanks, I'll take that as a compliment.
I think it came out pretty good. Sound is way past awesome!
Ron
OOOOh, AAAAh, shiny thing LOL
That Logo is one of the things that sets mine apart from the other nice looking builds others have done here on DiyAudio.
I made the logo similar to the one Papa uses but side lit it with LEDs.
I used Photo-shop to produce the logo and size it, reversed it (backward) printed it out, then layed it over a sheet of Plexiglas. (Perspex for our friends across the pond) Used a Dremel engraving tool that makes lots of small hammer marks and outlined the logo then filled it in. I cut 4 notches in the end (side) and installed 4 Flat faced LEDs. Then I covered the back (engraved side) with a piece of black ABS plastic so it looks black when the lights are off. Took the power right off of Cvillers boards, series resistor of course.
Thanks for all the nice comments.
Ron
Last edited:
- Status
- Not open for further replies.
- Home
- Group Buys
- Gb: F5 Pcb