Not to mention the humidity levels that are crazy high in Southeast Asia!
So hard to keep molds away from anything made of wood.
Nice old school style boxes.
Enjoy!
wood worm is up there next to humidity. we lay in bed at night an listen to the critters munching away at the wooden headboard behind our heads! one morning I will wake in the middle of a pile of saw dust
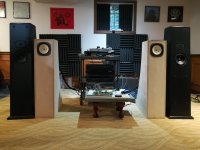
Karlsonator 6 with Dayton Audio ps180 drivers.


These boxes are LOUD. They throw a soundstage out and up.
They also do great job taming the ragged highs of the wizzered drivers. I don’t know why that happens but I like it a lot.
Thanks to all the experts here willing to share their designs.
These boxes are LOUD. They throw a soundstage out and up.
They also do great job taming the ragged highs of the wizzered drivers. I don’t know why that happens but I like it a lot.
Thanks to all the experts here willing to share their designs.
wood worm is up there next to humidity. we lay in bed at night an listen to the critters munching away at the wooden headboard behind our heads! one morning I will wake in the middle of a pile of saw dust
that's termites, but if you treat the wood with solignum then varnish with polyurethane or any other varnish no problem, termites do not likes chemicals 🙄
Karlsonator 6 with Dayton Audio ps180 drivers. View attachment 758868View attachment 758869
These boxes are LOUD. They throw a soundstage out and up.
They also do great job taming the ragged highs of the wizzered drivers. I don’t know why that happens but I like it a lot.
Thanks to all the experts here willing to share their designs.
Congrats very nice speakers, what is the principles of Karisonator enclosure?
Karlsonator 6 with Dayton Audio ps180 drivers.
View attachment 758868View attachment 758869
These boxes are LOUD. They throw a soundstage out and up.
They also do great job taming the ragged highs of the wizzered drivers. I don’t know why that happens but I like it a lot.
Thanks to all the experts here willing to share their designs.
robmusk,
Nice set of speakers you got there, and thanks for sharing your impressions.
Congrats very nice speakers, what is the principles of Karisonator enclosure?
There are several threads that describe the Karlsonator principle. This one is a good place to start:
advantages of karlsonator
I first tried these drivers on an open baffle crossed to a woofer, where they sounded terrible. Like needles head on and buried under a blanket everywhere else. The k-slot works wonders to disperse the treble.
There are lots of threads on other sites with disparaging comments about the negative effects of the slot on the response. So they might not be HiFi, but I don't care since they sound so engaging. I've made a few boxes and baffles for full range drivers before but these are the first I felt I needed to comment on. Music fairly leaps out of them.
Very interested in your take on that driver in the FHXL. What amp? Corner loading them?
dave
Amp is a Denon POA-2800 plenty of power too much for these. Not corner loaded, I just was in a hurry to try them out they wound up next to my main speakers. The side walls not in the picture, are bout 5 foot away from the speaker, and its about 5 foot to the back wall. They are very shouty, I am currently reading about baffle step correction.
Do you think placement in the room will help with this much?
Any advice appreciated.
Thank you Dave
So far this has been a very fun build(winter project), planning to veneer them.
That driver, that horn, you really want to have the mouth near corners to get sufficient bass gain.
The drivers are also designed for highish output impedance amps, which i strongly suspect yours is not. You can see what working to fix that does by either using a series resistance or real skinny speaker wire.
dave
The drivers are also designed for highish output impedance amps, which i strongly suspect yours is not. You can see what working to fix that does by either using a series resistance or real skinny speaker wire.
dave
corner loading
Dave,
They will end up near the side wall in the corners in a different room when finished. That was my intended location when starting these.
I have heavy gauge wires connected now(Cat 5 DIY), what resistance would you suggest something near 8 ohms?
Regards,
Ted
Dave,
They will end up near the side wall in the corners in a different room when finished. That was my intended location when starting these.
I have heavy gauge wires connected now(Cat 5 DIY), what resistance would you suggest something near 8 ohms?
Regards,
Ted
Member
Joined 2009
Paid Member
i just ordered a pair out of curiosity.(Ferrite version) let's see if they really are the upgraded version of the original.
any updates ?
Not to mention the humidity levels that are crazy high in Southeast Asia!
So hard to keep molds away from anything made of wood.
Yeah, just finished wiping down some wood furniture, cabinets with hydrogen peroxide, misting it on bookshelves full of books, knickknacks, etc., basically everything that collects dust since I don't have central heat/AC to keep humidity low.
You got me curious since Hotlanta is Mold City and a bit surprised it's pretty much as bad as Taiwan, though numbers wise neither of us can compete with the Philippines, but wonder if it feels much different; I mean once you're coated with smog/pollen/dust laden sweat, dizzy, etc., how much worse can it be?
GM
Im now building a pair of floortanders for them. Modelled with winisd. Cab came out pretty huge. But i managed to shrink it down a little for what i think is the compromise. Will post update in 2-3 weeks time. As im busy with Real world Responsibilities🙂🙂🙂:any updates ?
any updates ?
next week im also picking up an original pair of p610 fb for 125usd. seems like these p610s are gravitating to me. ahaha
An externally hosted image should be here but it was not working when we last tested it.
An externally hosted image should be here but it was not working when we last tested it.
An externally hosted image should be here but it was not working when we last tested it.
Member
Joined 2009
Paid Member
next week im also picking up an original pair of p610 fb for 125usd. seems like these p610s are gravitating to me. ahaha
I see you have too many, I can help you with that 😀
I'll let you know😀
I see you have too many, I can help you with that 😀
here's an update for the p610 clone build. simulated wood grain finish.
the steps to this finish is as follow
1)sanding and filling the readily visible imperfections
2)applying epoxy primer
3)filling and sanding
4)another coat of epoxy primer
5) sanding to remove bumps
6) applying pink color quick dry enamel
7) staining with diy mixture of color tint and pain thinner
last step(havent done this yet) is of course to put a top coat. which in my case is satin finish poly.
An externally hosted image should be here but it was not working when we last tested it.
An externally hosted image should be here but it was not working when we last tested it.
An externally hosted image should be here but it was not working when we last tested it.
- Home
- Loudspeakers
- Full Range
- Full Range Speaker Photo Gallery