
While I have your ears, compared to the DNAs, whose bass is precise and controlled, the bass of the FHXL seems a little “loose”. Would more stuffing and where help this? I went with no stuffing downstream to get the volume and impact of the bass where I liked it but I’m thinking I may need to compromise.
Last edited:
FourEars,
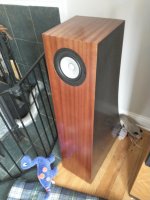
I echo the sentiments of others - very nice build and great selection of the contrasting veneers.
Do I spot an "Anthology" next to the FH-XL?
I echo the sentiments of others - very nice build and great selection of the contrasting veneers.
Do I spot an "Anthology" next to the FH-XL?
Good eye. I’ve spent way too much time and money on this “hobby”. The Anthologies are a speaker that I cannot fault, they do everything flawlessly but I find them kinda boring. My wife loves them for their “presence”.
Hi FourEars,
I do also have the FHXL and have used the 10M and now the MAOP10. In my experience, give some distance from the front wall. And for the stuffing, I only placed a small amount behind the driver just to have the right balance for the mids and highs frequency. Just keep it well teased.
And for the stuffing below, I have place also a small amount and very well teased and spread at the bottom of the driver just to eliminate the reflections for the bass and keep it tight and detailed. YMMV though.
I do like the finish combination and makes it look elegant
JoeyGS
While I have your ears, compared to the DNAs, whose bass is precise and controlled, the bass of the FHXL seems a little “loose”. Would more stuffing and where help this? I went with no stuffing downstream to get the volume and impact of the bass where I liked it but I’m thinking I may need to compromise.
...I think the DNAs will reach lower, into subsonics.
You think correctly, FHXL is a different alignment to the DNA: it's a higher-gain alignment, tuned to a somewhat higher frequency. The latter is tuned lower, at the price of reduced gain (basic acoustics 101: for a given cubic capacity, the lower you tune, the less gain [output] you'll have. That's over-simplified, but it's a good approximate guideline).
I don’t have much listening time yet with the Frugels but the bass in a song or two seemed to be “confused”. I believe it to be a reflection issue and will play with positioning before I badmouth the speaker. I’m running 40 grams of well teased poly upstream and currently nothing downstream.
It's unlikely to be a reflection with the damping you have in place as there's nothing to cause it. However, as noted, FHXL is designed as a higher gain alignment to give people some flexibility in placement & tuning via the damping. I would add another 10g of well-teased dacron just below the drive unit & see how that works out. Unfortunately, there's no substitute for empirically experimenting with this as every room & system differ.
I used veneer that I had left over, curly maple and walnut, the walnut was too short to just run vertical so I cut strips and put them together at an angle. Frugal. Or cheap, but I like the outcome.
It's beautiful work.
As an aside, I found the plans for these “in the wild” but still donated my $10 if anybody cares. Just a heads up that they are loose.
Could you drop me, or Dave an email and let us know where, so we can try to stamp that out? I'd also like to say many thanks indeed for your honesty in still making the contribution to the forum, despite obtaining the plans from elsewhere.
Speaking broadly now, as a general reminder (not directed at any individual) FHXL was created as our contribution to this forum, which has given us all so much, via the minimal donation fee. To hear that somebody has posted the restricted-access plans for FHXL against clearly stated requirements is to put it mildly, annoying. Not that it matters, neither Dave nor I make a penny out of the frugel-horns, and speaking as somebody who has spent years living on less than half the UK's national minimum wage, and has been screwed over by two successive 'employers' (the last of whom still owes me almost £5,700, which I'll never see), learning that somebody has posted the plans so others can avoid the minimal donation to this forum is not pleasing.
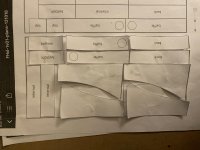
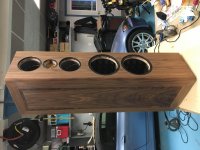
If anyone is curious about my single sheet cut plans, I’ve attached a pic of what I did. Actually when I cut, I flipped a pair of the sides top to bottom. If you are trying to expose one side of the plywood then all sides by the picture are left panels. By flipping the bottom pair top to bottom you end up with lefts and rights. The only thing missing are the two tops. I had enough scrap wood to make them. Alternately, precut “hobby” panels are available at most big box stores for much cheaper than a full sheet. This method requires a couple of small compromises. The grain of the sides “leans” back the five degrees instead of vertical and the grain of the internal baffle runs horizontal. Should not be an issue with quality ply and may actually be stronger in the direction that matters. I ripped everything but the sides a little large and after the parts were cut to a manageable size, I then ripped all parts to the same width without moving the fence. One of the things that I did on this build was to make two templates out of Masonite. One as a routing pattern for the sides and an internal assembly pattern. This allowed me to cut the sides out of the sheet with a jigsaw and trim to the pattern with a router. The pattern for the sides is about 3mm large on the top, bottom and front. The internal template holds the top and bottom parallel and locates the internal and front and back. Makes for an easy glue up and insures a match between cabinets. Only have to line up to the curved back when gluing. I also deviated from the plans a bit in that I lengthened the front and shortened the bottom so the front overlaps the bottom. This allows top and bottom to be held to the template and the front is trimmed to the bottom after glue up. Edge routing trims the front, top and bottom of the sides. This method prevents having to try to hold five different edges perfectly aligned and allows small placement errors to go unnoticed. Also when the second side goes on, it gets trimmed to whatever one ends up with after the rest dries. You only have to line up the rear curve to the top and bottom.
Attachments
….the bass of the FHXL seems a little “loose”.
I was expected that when i saw you put no damping in the front, and the damping inthe point is a little shy.
dave
Pass DIY Addict
Joined 2000
Paid Member
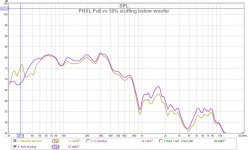
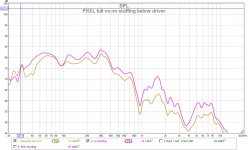
These are measurements from my FHXL with various levels of stuffing "below" the driver. Mic position was at the mouth of the horn on the back of the speaker.
Stuffing makes a clear difference...
Stuffing makes a clear difference...
Attachments
Nice work FourEars! FYI it's considered rude to post much nicer looking speakers right after someone else 😉
Can you share any pics of the veneer going on? Would love to see how you got the edges to line up so nicely.
Can you share any pics of the veneer going on? Would love to see how you got the edges to line up so nicely.
I did put the recommended amount in the point, 60g. Fluffed by painstakingly pulling small groups of fibers free from the ball and adding it to the pile. I experimented with the stuffing in the front before gluing the side on and it appeared that I liked the sound best with no stuffing. From much reading during the finishing process I found out that the slightest leak will defeat the function of this design so it may have been leaking when it was just clamped together. I will try to add 20g to the front. I built in a 1/4” mesh screen at the half way point 18” from bottom to hold the stuffing. I experimented with quilt batting after reading one post about how good it worked and it seemed to suck the life right out of these speakers. Don’t get me wrong, the current sound is not objectionable at all, just a comparison. I found myself grinning like a fool while playing “Flight of the Cosmic Hippo”. Where I seem to have an issue is when the bass is “busy” in a song and I think some of what I hear is the echo from the wall behind the speaker out of phase with the front. What do you think about a soft panel behind rather than a hard plaster wall? Again some stuffing up front would dampen the higher frequencies that CAN reflect out of phase so that might be the answer. Going behind the speaker I can’t hear any highs coming from the port, but if the bass is “busy”, ie. a lot of different sounds and bass instruments at the same time, could some of the sounds combine and “act” like a higher frequency? I guess I need to stop thinking and start experimenting!
@Eric. Thanks for posting the graphs. That pretty much confirms what I hear. If there was some way to keep the 40hz bump and get rid of the 1khz bump we’d be golden.
Nice work FourEars! FYI it's considered rude to post much nicer looking speakers right after someone else 😉
Can you share any pics of the veneer going on? Would love to see how you got the edges to line up so nicely.
From what I see you have no reason to be envious. Yours are gorgeous also! I actually bought some wood dye and was going to experiment with dye on the curly maple. I got hung up on the bleaching part because the maple was not backed and it was very fragile. I don’t have any pics of veneering these but I used my wife’s rotary cutter and poly mat (like a razor sharp pizza cutter) and a metal straight edge to get straight cuts. I used the iron on method, started with the walnut and just ironed the joint of the maple on the front down first, keeping the joint tight as I did. After a nice joint was made I started working the rest down. The heat from the iron will allow the veneer to compress and expand as needed to lay flat from there. I discovered this working with burl which will not lay flat no matter what you do. Final secret: when sanding everything flat, use a razor blade to scrape up and save the lightest color sawdust. Blow out any cracks or gaps, fill them with blonde shellac and work your sawdust into the cracks.
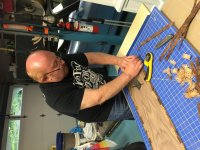
Here’s a couple of pics when doing the Anthology’s. I used a water soluble adhesive tape on these to hold things together until ironed down. You can see the cutter and mat there.
Attachments
Thank you but yours are in another league! Something to aspire to. I have much more appreciation for veneering, it really is a craft. I'm excited for my next build to try again. I did have to use the sawdust trick as I had to piece the tops together from three scrap pieces.
I was considering the Anthologies for my next build, as well as a couple others, but just so many choices and of course hard when you can't hear them.
Seriously great work, thank you for sharing!
I was considering the Anthologies for my next build, as well as a couple others, but just so many choices and of course hard when you can't hear them.
Seriously great work, thank you for sharing!
@iaRIVR The Anthology’s are a wonderful speaker but I have much more fun experimenting with the “fringe”, open baffles, horns, distributed mode, whatever. What I have found is that ALL speakers are a compromise and one of the biggest lessons after listening to full range was just how badly a crossover fouls up sound. The Anthology’s take some serious power to drive them and sound dead on a flea amp. I have not gotten into active crossovers yet but that may actually be the answer to a lot of problems. One of my more favorite speakers to listen to is a pair of open baffles that I have a grand total of $200 in. Four GRS 15” and Blaupunkt car speakers with my own series crossover. You will have $1400 minimum before finishing the Anthology’s. I think my next project will be a variation of the DINAS but using Alpair 7.3s instead of a mid/tweet. I built a countertop speaker for my daughter using that woofer (w5-1138) and while it may not have been concert quality it put a smile on my face. I’m listening to Rick Wakemans “While my Guitar Gently Weeps” now on the Frugels and it would be hard to beat that sound. I guess I’m saying that having many speakers might be the answer. 😉
@iaRIVR. Can you post any details of your speaker grills? I too installed magnets under the veneer, something I even did on the anthology’s although I can’t fathom a grill for those.
@FourEars thanks for your thoughts on the Anthologies, costs definitely add up. I have a pair of KEF Reference 3.2s as my "big" speakers, of course I am very enticed by the idea of selling them and building something "better" for a similar cost, but financially I really could only afford to go all-in on one expensive build. One I really like is the A7m+A12pw ML-TL from planet10:
Planet-10 A7m + A12pw ML-TL Build
Efficient, full bottom-end, still get some of that alpair full-range goodness.
The grills are really simple, just 1/8" fiber-type board with the corners rounded over. These were temporary after my *&#% cat creased one of the cones jumping up on them, but they will work until I can make a nicer pair.
Attachments


- Home
- Loudspeakers
- Full Range
- Frugel-Horn XL for Alpair 10.3/10p, Fostex FF165wk, more