What is the highest value that can be used for C4 (5pF)?
I have a WIMA 68pF available.
Can a cap be made by twisting covered wire?
How reliable would a DIY cap such as this be?
I don't think my cap meter will measure it.
Thanks.
I have a WIMA 68pF available.
Can a cap be made by twisting covered wire?
How reliable would a DIY cap such as this be?
I don't think my cap meter will measure it.
Thanks.
68pF would be way too high.
Twisted wires would work, and are reliable. I don't know how they're measured, though.
Twisted wires would work, and are reliable. I don't know how they're measured, though.
Twisted wires are measured by looking at the amp's output on a scope.
Papa describes the procedure in some of his Zen articles.
Papa describes the procedure in some of his Zen articles.
Yes, ZV4, page 3:
http://www.firstwatt.com/pdf/art_zv4.pdf
"Digikey doesn’t have 5 pF caps anymore, but I have listed 10 pF
parts in the parts list. You can buy 2 and put them in series to form
a 5 pF capacitor. Alternatively, you can twist two fine insulated
wires (like those used in wire-wrap construction) together at a
length of about 1.5 inches and get about 5 pF. This technique
has the advantage that you can start out too long and trim it with a
pair of scissors while watching the square wave of the amplifier."
Thanks everyone. I remember the post/article, but couldn't remember where I saw it.
It's what gave me the idea. I have wire-wrap wire, so I'll try it.
It's what gave me the idea. I have wire-wrap wire, so I'll try it.
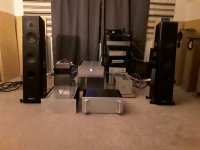
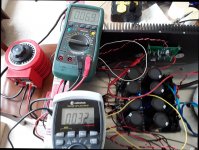
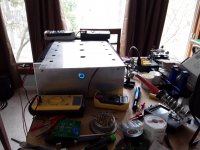
Finished it less than a hour ago.
Still processing it.
It's the one with the blue button on the front.
I'll take more pictures when I put it back on the bench.
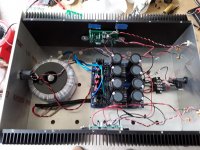
The matched quad p-ch jfets were 11.4 idss and the ccs jfet is 10.4 idss.
Is that a big problem?
When setting the offset, I had to make micro adjustments as the offset would jump in large increments. The trimmer is 10k. Used four semi-south R100.
Listening to it now and beginning to see what all the fuss is about. 😉
Still processing it.
It's the one with the blue button on the front.
I'll take more pictures when I put it back on the bench.
The matched quad p-ch jfets were 11.4 idss and the ccs jfet is 10.4 idss.
Is that a big problem?
When setting the offset, I had to make micro adjustments as the offset would jump in large increments. The trimmer is 10k. Used four semi-south R100.
Listening to it now and beginning to see what all the fuss is about. 😉
Attachments
In Patrick's public schematic post 1274 or post 1393 for v2.
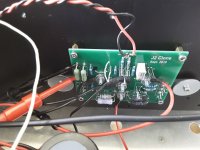
Minor silkscreen change for R33.
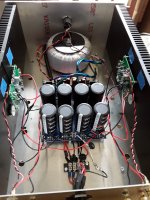
Pot is below ccs jfet.
Minor silkscreen change for R33.
Pot is below ccs jfet.
Last edited:
Not following.
Remove the trimmer for 50R to 100R resistor based on the idss of the p-ch jfets?
Remove the trimmer for 50R to 100R resistor based on the idss of the p-ch jfets?
It seems the pot vdi_nenna means is in the CCS part and not in the drain of the pos acting J-Fets.
Other way to adjust the offset.
Other way to adjust the offset.
That's correct. The pot is below the CCS n-ch jfet which is on top of the p-ch differential pair.
I found and test measured 50 ohm trimmers.
Thanks!
I found and test measured 50 ohm trimmers.
Thanks!
It's working. 🙂
First, Patrick thanks for putting this together and for Mr Pass for letting it happen.
Also, I very much like the screw connections. Negates the need to find odd connectors and it's a solid connection.
Really happy to finally getting to hear a J2. Sim, clone, exact copy or not, doesnt matter, it is a special amp.
Thank you Zen Mod for the trimmer value, setups like a champ! 😀
The offset was dropping as the amp warmed up. Nice!
Thank you,
Vince
Attachments

- Home
- Amplifiers
- Pass Labs
- FirstWatt J2