Hi Zman, here is what I've done:
1) The front panels are removable.
2) I used a combination of glue and nails for most connections. Places where I wanted removable I used screws. (Like the front.)
3) I used single layer 19mm (3/4") for everything except the front where I doubled up. (The black part is doubled.)
Hope this helps! good luck.
Thanks Platplaas for your quick reply.
On question 3, by number of layers I mean how many thin layers has the manufacturer glued together in making the 3/4" board? If you have a bit of ply lying around, probably you can look at the cross section and be able to tell.
On question 3, by number of layers I mean how many thin layers has the manufacturer glued together in making the 3/4" board? If you have a bit of ply lying around, probably you can look at the cross section and be able to tell.
Hmmm... the ply sold in most places here have 6-7 layers - as I suspected not the best stuff... I am now looking for marine grade ply.
Zman, 11 layers like Platplaas has used, or the 13 layers sold as "Multiplex" here in Europe are OK. Stay away from the cheap 7 layer stuff - that´s nice for pouring concrete but has nasty resonances and trying to make it look nice will drive you to  .
.
Particle board is much better than it´s reputation, but *again* - the cosmetics.
You save a few $ buying it and spend twice as much on filler, sandpaper and all the you need to drown your sorrow.
Cement bound particle board...yes, really good. But it eats sawblades for breakfast and with boxes the size of BIBs you´ll need a forklift in your workshop.
Damping - depends. What you ought to do (and it´s cheap): glue some ~10mm felt on the inside of the speaker basket struts. It raises the price of the driver by a few pennies and cleans the midrange by a hundred pounds.
Pit
.Particle board is much better than it´s reputation, but *again* - the cosmetics.
You save a few $ buying it and spend twice as much on filler, sandpaper and all the
you need to drown your sorrow.Cement bound particle board...yes, really good. But it eats sawblades for breakfast and with boxes the size of BIBs you´ll need a forklift in your workshop.
Damping - depends. What you ought to do (and it´s cheap): glue some ~10mm felt on the inside of the speaker basket struts. It raises the price of the driver by a few pennies and cleans the midrange by a hundred pounds.
Pit
Platplaas and Pit Hinder,
Located some "Marine Grade Ply" and have bought two 8' x 4' boards. Looks like not many people here know about this product, so had to do the searching myself. The wood is "Garjan" - a type of redish brown colored hard wood, which is popular in this part of the world (Bangladesh, India, also South East Asia). The boards I have are made in India. I also counted 11 or 12 layers around the edges.
Hope this is the genuine article and I can build some good cabinets.
The hardwood is not pretty, so if I want to make the cabinets attractive, will have to veneer them. Already found some nice teak veneer for the job 🙂 but that's later.
I am still waiting for my drivers...
-Zia
Platplaas,
I am attaching a diagram of my planned BIB. These are 2D images and one is a side view, the other a front on view. I have tried to draw to scale.
My questions are on the building technique:
1. Please note that I have drawn 2 layers for cabinet front panel and back. How to fix the 2 layers to make one double thickness layer? You used nails and gue or after making the cabinet screwed these on?
2. Your front panel is removable - it has screws. Have you put some cleats at the front of the cabinet for this? I have drawn the cleats in green - looks ok or I need to change? If you have used any other method, would appreciate you sharing.
-Zia
Attachments

Zia,
gluing two layers together can drive you to drink or drugs. They get very slippery and as soon as you apply pressure they drift away.
Not a problem though.
Use very thin nails (one mm or less), hammer two of them into one board.
Then nip them off and just leave 1mm standing out. They will keep things fixed when you apply the pressure.
And use strips of 5cm x 5cm hardwood. One clamp on each end of the strip and you have pressure on the whole length instead of only on two points.
Pit
Fastening Methods
Hi Zia,
1) I first screwed one front panel to the cabinet, then I screwed the second panel into the first panel.
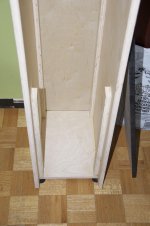
2) I used narrow strips of wood inside the cabinet. The strips are glued and nailed to the side panels. The strips help align the front / back panels and give you something to screw into. The attached picture will maybe make this more clear!
Hi Zia,
1) I first screwed one front panel to the cabinet, then I screwed the second panel into the first panel.
2) I used narrow strips of wood inside the cabinet. The strips are glued and nailed to the side panels. The strips help align the front / back panels and give you something to screw into. The attached picture will maybe make this more clear!
Attachments
Platplas, thanks for the pic - I was intending to the same - only my strip of wood (green line) was much longer. Guess I can use shorter strips on the inside like you have done here.
Pit, thanks for the advise on gluing 🙂 After gluing, probably I will put screws near 4 corners also to keep it tight.
Pit, thanks for the advise on gluing 🙂 After gluing, probably I will put screws near 4 corners also to keep it tight.
I used full-length long pieces where I could, but where I ran out of wood I used the shorter pieces instead 🙂
Doubling the front of your boxes always is a good idea. At the back, where nobody looks, you can do something even more efficient. Cut your wood into ~2" wide strips and glue them on not flat but edge on. Not symmetrically but at odd angles and distances.
Pit,
For doubling up front and back, same high grade 11 layer ply, or anything lying around (low density particle board, 7 layer decorative ply...?
Zman, think big, buy cheap! The more different the materials the more decay in transition. Think money transfer - you change rupees into dollars, the bank swallows half of your money. Glue a soft inner board on the back of the nice hard outside (use LOTS of glue, damping board soaks it up) and not much midrange smut escapes outside. That´s where DIY beats factory bought - we do the things although they stay hidden.
Pit,
Get the idea now 😀.
Talked to my cab-maker today. Our plan is to:
1. Cut the pieces of the marine ply according to plan
2. Drill holes for screws in required places (these guys don't use clamps - screws will have to the tightening!)
3. Glue the pices together to make the cab
4. Insert screws and tighten up - leave 'em to dry
5. Fix second layer of ply boards for front on back with help of glue and screw (using "soft" ply boards for this and front one will be a veneered one=less work in finishing)
6. Color, varnish to make them look nice... not sure if I'm going to veneer the sides though - might go for a darker stain for those
Ah... then the actual work of install the drivers, running in, and firing up the music. 🙂
-Zia
Make sure that one of the panels (I found the front most practical) can be removed to facilitate experimenting with stuffing.
In order to be removable, the front and back panels on my cabinets are not glued, but the side panels are glued. For panels that are not glued I used a compressible rubber gasket to stop sound escaping through cracks. (The glue ordinarily closes-up the gaps.)
Good luck!!
In order to be removable, the front and back panels on my cabinets are not glued, but the side panels are glued. For panels that are not glued I used a compressible rubber gasket to stop sound escaping through cracks. (The glue ordinarily closes-up the gaps.)
Good luck!!
Last edited:
Platplass,
Thanks for the reminder - need to adjust the stuffing...
If both your front and back panels are removable, your side panels are glued to what - the bottom only? 🙂
"Compressible rubber gasket" sounds like a mighty technical term 🙂 U mean you used strips of thin rubber as a gasket?
-Zia
Thanks for the reminder - need to adjust the stuffing...
If both your front and back panels are removable, your side panels are glued to what - the bottom only? 🙂
"Compressible rubber gasket" sounds like a mighty technical term 🙂 U mean you used strips of thin rubber as a gasket?
-Zia
The side panels are fastened to the bottom panel and the internal baffle. These are all glued and nailed. Holds together OK - but definitely stronger once the front and back are screwed on!
And yes to your interpretation of a compressible rubber gasket 🙂
And yes to your interpretation of a compressible rubber gasket 🙂
Oh... I forgot about the internal baffle altogether... also was overlooking the possibility of having to use stuffing on the back side of the internal baffle... guess that can be done from the top also? I am planning to keep the front side removable and back side glued.
- Status
- Not open for further replies.
- Home
- Loudspeakers
- Full Range
- First timer - desperately confused with the options...