I can't find BB here, even in the lumber shops. It's all China Birch. It is tighter and better than the plywood sold in the big box stores.
I think that's also the case here, it's probably straight up birch. I may just go straight up MDF so that I can seal it with sanding sealer varnish and then either faux paint it with gel stain which I've done many times and looks better than it has a right to or I'll use some of my hoard of raw wood veneer on the visible surfaces and paint the back with a flat back paint. Lots of options.
Yes, the lumber shops in my local area in middle tennessee are focused on catering to dimensional and engineered lumber to support the booming construction industry, I made a quick scan and it appears that they don't have a massive selection of specialized lumbers or at least the 3 in my immediate area didn't. It iss what it is I have so many audio projects and it's the sound and labor that I will enjoy the most. The end result won't be furniture grade.
Yes, the lumber shops in my local area in middle tennessee are focused on catering to dimensional and engineered lumber to support the booming construction industry, I made a quick scan and it appears that they don't have a massive selection of specialized lumbers or at least the 3 in my immediate area didn't. It iss what it is I have so many audio projects and it's the sound and labor that I will enjoy the most. The end result won't be furniture grade.
Okay...here come some dumb questions. I've been through about half of this forum's posts and am still looking for the answers so that my questions don't waste the time of Pano or John. Here is the long and short of it:
1. Yesterday bought the components for the 17" x 29" larger stand mount version (but not the ultra version, I believe that is reserved for the floor standing variant) that employees the 15" GRS woofer. Because of COVID and things being sold out I ended up sourcing the tweeters from Madisound (sold out everywhere else), the woofers at Parts Express, and all of the crossover parts direct from Erse dropping the prices of the coils SIGNIFICANTLY. I ended up at $220 for all of the parts for both speakers despite having to pay shipping at three different companies. Even in this wore case scenario these are amazingly reasonable in cost.
2. I ended getting the air core coils in 14 gauge because it was so cheap. Was this a smart move or did I just throw something off my decreasing the resistance on the coil slightly?
3. From what I read the 15" stand mount variant uses the same xover components as the stand mount 12" peerless Manzanita.
4. Here's where my questions begin:
Question A: When I see that the things should be 4.25" wide does this include the baffle that they are glued to or are we assuming that with a .75" thick baffle if you measure from baffle to back of wing it's a total of 5"
Question B: The 17" width is the baffle and the wings should be glued on from the back, not to the sides of the baffle making them 17.75" wide?
Question C: If you do want the wings glued on the side you'd make the baffle narrower then 17" and then whatever the thickness of the wing wood is should equal out to 17" is this accurate?
Question D: Is there any recommendation for the thickness of the wood of the wings?
If I find definitive answers to questions A-D I'll fill them in as I comb through.
These should be dead simple to build, no cutsheet needed. I see that in post #2 it appears that I put the wings on the outside of the drawing. Can't remember how I or John actually built the first ones, it was 13 years ago! Either will work fine. In fact the original had one straight and one tapered wing. It was changed to both wings straight for simplicity.
Yes you should use the 1/4" sub-baffle in a cut out for the tweeter to allow it to breath.
I think I'm just being OCD and I need to loosen up and wing it building it within the general constraints.
Yup, in post #2 which I read today you did put the wings on the outside. As long as the overall dimensions are 17 x 29 and the wings don't get much over 4" off the baffle it sounds like I'm operating within the guardrails.
You are. The design is very forgiving. It's an easy design, but as you'll probably keep them for some time, might as well make them look nice, right?
Yup. I am guessing that all the parts won't arrive for another week and a half (it's the one negative of a direct order from erse, it stays in a status of shipping for three or four days before a tracking number is even created and it actually arrives at the shipper, I think they are used to making bulk orders rather than being agile in fulfilling small orders from the general public. As a result I've got a little time to mull over the two possible paths:
1. Getting an actual stainable wood which has some material availability vs cost implications. I know that 8 x 4 3/4" sheets of birch ply are in stock all over at the three Lowes stores within range. Home Depot locally does not carry birch. The rest of the boards are tougher to find and may have to be another wood time that I can contrast with a two-tone stain or color schema configuration that will make the fact that I have birch and pine in teh equation visually palatable.
2. I can just work with MDF for the baffle and veneer it and use wood for the wings and go two tone with either gel stain or veneer for the baffle. There are some really nice things you can do with general finishes oil gel stain on almost any surface.
Mr. original desinger checking in...
The lumber used to build the stand mounted Manzanita is not all that important. You can build it out of layered cardboard and get good results.
That said, it is good to see many want their build to work as well as it can and are willing to use the proper materials.
Assuming the lowest possible material cost and ease of material availibility, here is what I would use. Be clear, these choices are not absolutes, just bang for the buck recommendations.
And, to to be clear again, this material list can apply to the stand mounted Manzanita or the larger floor mounted Ultra.
Baffle board (plate). 3/4" thick off the shelf any where MDF. Easy to cut, and or route. If you want to use nice Baltic Birch ply for the baffle plate, that is ok to.
Wings. Solid, low cost wood, be it pine or oak or what ever your personal flavor is. Personally, I fabricate the baffle board (16" or so diameter) then slap the wings on the side. Keep it as simple as you can. Want to mix up wood materials to minimize resonances. Structural integrety is important.
Again, simple.
Wings need to have a total depth of 5" minimum, but do not exceed 9". Glue and screw. Just make sure there are no voids. Clamps are a good thing.
Base can be what ever you have that is available. Ply, MDf, and or solid wood. Again, glue and screw. Must be ridged and rattle free.
You can use the GRS 15 or Peerless 12 and be close on the standard crossover. The nice thing about the simple design is it is quite forgivening and flexable.
Hahahaha John you've created a project that yielded far better results than anticipated and the low cost of the drivers that are so carefully integrated make it so that I don't feel this can be approached as a throwaway project. Although I love sound quality we're on quarantine and I'm virtual IT worker so the opportunity for me to work on wood and do finishing work yields something tangible and physical. Even if it doesn't turn out perfect because I'm not a master woodworker it will look cool to me and make me happy.
Okay....this is a great recommendation. I really was somewhat leaning to MDF because it would be more workable and less strain on my jigsaw and would also probably be easiest to finish enough to get something else to adhere to it like a paint or veneer or oil stain. A lot of versatile options. Plus no creaks, uniform material, etc. I'm not decided on it but I wanted a good sanity check.
Okay, slapping the wings on the side lets me get a nice potential two tone effect from an aesthetic standpoint. I like that and it's what you guys did in post #2. I'm thinking that I should get the baffle board to maybe 16 and a quarter inches roughly and then the 3/4 inch width of the wing material I laterally screw in should get me to 17 on the nose or close enough for government work. Cool. That really helps. Mix up wood materials...so maybe pine for the wings and then the base instead of getting a pine board I can get another dead MDF board.
5" depth minimum is good info - having read the hell out of this thread at times I heard to keep it under 4", etc. and some other things that confused me. What you have come down to know is the current source of truth, so at least 5" is the rule. That means likely no ripping of boards and just using a straight up 1" x 6" x 27" pine board is the answer for each wing - with no cuts. Just glue/screw/clamp laterally and I'll be liberal with the glue in the crease so that there are no gaps and then I'll sand off the excess after the fact.
Base probably will be thick MDF that I'll seal and paint. Maybe I'll be fancy and use a nice rustoleum hammered finish on the base. In fact...I'm getting visions of just sealing the pine, wings, and base and doing some sort of warmer metallic paint on them using maybe copper/aged brass rustoleum. Then the actual baffle I can veneer or find something that contrasts like a faux wood. The small baffle that I will use over the cuts for the vifa could also be painted with the secondary constrasting color. So many cool possibilities.
Thanks for the guardrails and broad recommendations, I feel much more comfortable with getting this within spec and I feel more enabled to know where I can take liberties without degrading the design.
I'll post photos down the road when I have something worth looking at.
Here's the effect I'm talking about when I first piloted it. Polk Monitor 5jr, low enough value for me to really experiment with. Removed all the vinyl veneer, sealed the mdf, sanded it, primed it. Spray painted it with a carmel colored base coat of rattle can paint. Covered that with gel stain. Ran a broom from top to bottom with small movements to simulate wood grain. Where the broom traversed it uncovered the caramel colored base coat. On the baffle I put a layer of rustoleum hammered metallic paint. I'm not saying it's perfect but you can see the faux painting and wood grain over the bare MDF that I sealed with some flat poly, it doesn't look terrible to simulate wood grain. But if I have enough spare veneer I am more likely to veneer these. I just wanted to articulate the two tone look and faux painting from a previous project in a photo.
Attachments

I’m planning to build the Manzanita as well.
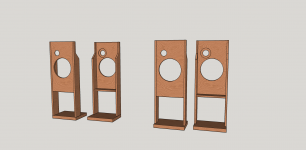
Here are two views of a design that extends the wings down into legs so that a separate base is not needed. The only difference between the two designs is how far the bottom piece extends to the front. It’s just a matter of which is aesthetically preferred.
Note that that the bottom piece is 1.5” thick in order to add more weight to the base. Also, I plan to use oak rather than pine for the wings and the bottom piece. Again, in order to add more weight down low.
Also note that the wings are reduced in depth from the top down to the center of the Vifa driver. That is something I noticed that John has done on some other similar designs. Don’t know how important it is. So John, if you would care to comment it would be appreciated.
Attachments
Last edited:
Are you referring to the stand mounted version with the 15" woofer?
AFAIK the ultra is a floor stander so no.
https://www.diyaudio.com/forums/mul...n-inexpensive-ob-project-161.html#post5221647
John, the cuts were a little off at Lowes, the way things stand mine will extend out about 17.75 width on the baffle finished. Is it worth ripping both of my pieces down by 3/4 inch to get them at 17 on the money? If 17.75 will impact sound I'm fine with getting my jigsaw and cutting it down by 3/4".
Thank you brother, I won't sweat it then. I have all physical materials, cost was about 65 bucks give or take.
Q: With the GRS version the tweeter's center should be 5" from the left side of the baffle.
With a left wing being built from a 1 x 6 (3/4" actual value) should I actually be putting the tweeter cutout center at 4.25" onto the actual baffle to account for the 3/4 of baffle that will be created by the 1 x 6 wing?
With a left wing being built from a 1 x 6 (3/4" actual value) should I actually be putting the tweeter cutout center at 4.25" onto the actual baffle to account for the 3/4 of baffle that will be created by the 1 x 6 wing?
I think I know the answer..."quit being anal retentive the design will be fine with a 3/4 inch variance". I can't help myself. Working on this daily. So much fun.
Ha ha, yes. Of course I hope your panels and wings fit with better than a 3/4" tolerance. 😀
Happy New Year!
Happy New Year!
Yeah I know guys, I just can't help myself sometimes. Coated the MDF and wings in sanding sealer last night. Will route out the holes on the back to 5.5" for the vifa's and at 14" on the front baffle for the woofer. The challenge will be creating the 1/4 inch plywood piece at 6" diameter with the smaller hole at 3" to back mount it. Using a jigsaw really creates ugly rough edges and even with a jig the internal 3" hole is a challenge.
How about a rectangular front plate with a 3" hole in it? Does a square present diffraction challenges?
How about a rectangular front plate with a 3" hole in it? Does a square present diffraction challenges?
- Home
- Loudspeakers
- Multi-Way
- Fast, fun, Inexpensive OB project