Member
Joined 2009
Paid Member
FE127E
OK, some initial impressions after completing the 2nd round of modge-podge.
The sound of the pre-treated drivers is different. It's not a huge difference but it's there.
I notice the change more when I switch back to the untreated drivers. The untreated drivers sound a little irritating at the high end, as they did when I first got them. So I conclude that the treatment has done something to tame the high end a little. This is good news.
The strange thing that I can't explain is that it also seems as if imaging has improved. But this isn't supposed to happen until you do the full eNable. But alas it does seem that the imaging is better after the pretreatment.
Re: FE127E
That is consistent. The 1st coat of puzzlekoat bonded the surface paper fibres together so that they are much harder to get vibrating. This lowers the cone self-noise, revealing subtle details that were buried before, thus better imaging -- just a hint of what is yet to come.
dave
Bigun said:The strange thing that I can't explain is that it also seems as if imaging has improved. But this isn't supposed to happen until you do the full eNable. But alas it does seem that the imaging is better after the pretreatment.
That is consistent. The 1st coat of puzzlekoat bonded the surface paper fibres together so that they are much harder to get vibrating. This lowers the cone self-noise, revealing subtle details that were buried before, thus better imaging -- just a hint of what is yet to come.
dave
Member
Joined 2009
Paid Member
Thanks Dave, that's good news.
So...I'll treat the last two speakers with the damar and modge-podge next and then I'll be ready for the enable 🙂
So...I'll treat the last two speakers with the damar and modge-podge next and then I'll be ready for the enable 🙂
loninappleton
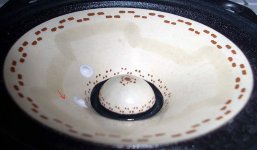
You need to download and go off and print the 126 page of treatment rings to get the "Front side middle ring" or stealth ring for both the 126 and 127 cones. There is an inner ring, one that bridges the cone to dust cap joint. Then, just a few tenths of an inch up from that ring set is another, but it is only shown on the 126 treatment guide.
It is this more or less mid cone ring that describes the lower arc of Dave's trifoil pattern.
So down load this page I have attached and cut out the mid cone ring to use for your pattern lower edge.
Bud
Attachments
[from above]
Just got back from the copy shop but more trips will follow.
Yes, I had copied the other one and will look at your picasa pics again.
I'm still at the gathering materials and templates stage.
Kinkos indeed does have a reduction or sometimes called a proportion scale and they were helpful in knowing how to use it at the counter so I just told them what I wanted and they obliged.
If you are using Dave's generic pattern, that would come in handy for drivers other than the 1/1 for Fostex 127/126's.
Thanks Dave,
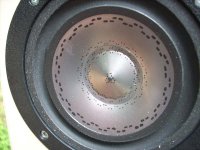
That is a good pic with plenty of detail. Making this a part of the
discussion rather than having to jump around helps.
That is a good pic with plenty of detail. Making this a part of the
discussion rather than having to jump around helps.
FX120 pretreatment
I've seen a couple of pictures of EnABLed FX120s and I don't see any evidence of a Damask Trifoil as part of the pretreatment. Could Dave, or somebody else, confirm the FX120 pretreatment consists only of two (three?) coats of Mod Podge?
I've seen a couple of pictures of EnABLed FX120s and I don't see any evidence of a Damask Trifoil as part of the pretreatment. Could Dave, or somebody else, confirm the FX120 pretreatment consists only of two (three?) coats of Mod Podge?
Re: FX120 pretreatment
dhenryp,
I'm sure there will be other replies. The Damar pattern is only applied to the FE127e to my knowledge.
dhenryp said:I've seen a couple of pictures of EnABLed FX120s and I don't see any evidence of a Damask Trifoil as part of the pretreatment. Could Dave, or somebody else, confirm the FX120 pretreatment consists only of two (three?) coats of Mod Podge?
dhenryp,
I'm sure there will be other replies. The Damar pattern is only applied to the FE127e to my knowledge.
Re: Re: FX120 pretreatment
Don
The 126's also have the "tri-foil" treatment.loninappleton said:
dhenryp,
I'm sure there will be other replies. The Damar pattern is only applied to the FE127e to my knowledge.
Don
Diary,
I am still making the templates to do the Damar. Have cut the second template from an old gooped up 50 cent speaker from my collection.
Also practiced with one template. Damar wants to run so the Dave tip on making small dots at the corners of where the pattern is to be marked works a little better. A fine brush did not give a smooth stroke and so I had to fill in what looked like the right width. Not good. A Q-tip without much liquid still might work better. Going to a little wider brush showed a lot of spread so I'm still on the fence about the whole thing.
Eventually there should be a good method of work coming out of this.
Thanks to all who participate.
diary,
I am going to have spots before my eyes big time before this is over.
I found some more 50 centers I have with gooey jobs of unthinned puzzlecoat/ModPodge.
On this one I used a fine nib-- number 4 if I can makeout the number at all.
This job I did free hand and by eye painting on the finest rows I could.
I think I came up short. Matching with the pattern shows they have to be even smaller. Well maybe but I don't know if even the viscosity of the paint allows for good pen draw at so fine a technique.
The good news is the pattern at least looks right on the outer ring.
I finished my two templates for the trifoil pattern (127e and 126e only) and did some practice on paper and cardboard with brush. Touch up seems to be inevitable using the fine width brush. At least this pattern looks right-- something I was not getting with freehand practice.
If using old speaker cones like this, the two wire connections to the cone have to be trimmed. I did that. Then I noticed that Dave has them punched out-- maybe to be used as register pins.
In my tool collection I have a leather punch used to fix my belts.
That leather punch worked to remove the connectors for the cone wires. If there is a newspaper carrier in your house, a paper punch may work for this.
I have made a reduction of the generic pattern pdf and it is a good size for my test speakers.
I'm getting down to the fine nibs since the test speaker is only 3.5 inches. From looking at the pics (ones at the picasa site from Budp) the pattern is used to guide the placement of the dot row closest to the edge of the pattern sheet and then the outer row is completed in the spaces above and between (?) I recall seeing info in the how to page about materials but not this finer how to procedure.
Also securing the pattern to the cone temporarily presents a problem. I could make a little handle out of tape at the center of the pattern to lift it off.
My pen technique is still pretty bad.
For a driver that size i use A5, anything smaller i'll use the 56 but it becomes more than a single stoke to make the block.
When doing a pattern ring, i lay down the ring closest to a fixed reference on the driver -- ie nearest the surround, the flat part of a whizzer, or nearest the dust cap, and then use the 1st ring as a guide to the secound ring. On an under-whizzer ring i will use the edge ring on the whizzer as the guide.
dave
loninappleton said:Also securing the pattern to the cone temporarily presents a problem. I could make a little handle out of tape at the center of the pattern to lift it off.
This 1st ring almost always requires the driver to be sitting on its magnet.
I put a hole in the middle of the template to be able to lift it off. With small templates, i hold the pattern in place with a finder, flip the driver upside down and let gravity do its thing after letting go of the template.
I had more than one clean-up job early on as the removal of the template smeared some still wet spots.
One thing i'll do when i'm doing more than 1 driver is to do a ring, leave the template in place, work a ring on another driver or 2, and then go back and grab the template after the spots have had a chance to dry a bit.
On larger drivers in particular it is also easy to smear spots on the far side of the cone from where you are working with your hand.
dave
I'm still less than absolutely clear on the method but that should come with more users of the system.
On the template I'd try putting a couple dabs of rubber cement on the underside just to keep it in place. The rubber cement would be well cured before using the template so as not have any goop that won't come off.
So long as I take my time at this, I think there is some progress.
On the template I'd try putting a couple dabs of rubber cement on the underside just to keep it in place. The rubber cement would be well cured before using the template so as not have any goop that won't come off.
So long as I take my time at this, I think there is some progress.
loninappleton.
The rubber cement is a good idea, if you are forced to not cut a hole in the template to clear the center dome of the driver. Sounds like you have one of those flat hat voice coil cover drivers and figuring out how to treat the inner ring, right next to the voice coil is a problem.
You are correct in thinking that the pattern use is to apply the lower row on the cone adjacent to the upper row of the pattern, and then filling in the upper row on the cone by eye. You could get more precise than this and I am sure some folks will want to, but for actual listening I have not found any benefit to being absolutely precise.
It appears that just having the surface disruption, one that does not completely block the passage of energy across the location of the pattern, is what is helpful. Having said that. I must point out that I have tried a few hundred different patterns, and as many different block shapes, and this one we use is the most audibly helpful, by a rather large degree. I find it amusing that so long as the pattern blocks are arrayed in the fashion I show, the level of perfection of the individual blocks seems to be open to some fairly large errors, without any audible impact on the effectiveness of the pattern application.
Bud
Budp,
Ok, since I'm still using the cheapo Pioneers and have a good supply, today might be a good day to make the new boxes for testing. The one I didn't mess up too badly had, by my count, 56 total
plus some dabs on the inner ring and on the dustcap. Next time through I have to use a finer nib for these little guys. But I'd like to make an audible comparison between one of these treated ones and a plain vanilla Pioneer. Quite frankly I don't know if at 62 my hearing even good enough to detect differences.
- Status
- Not open for further replies.
- Home
- Loudspeakers
- Full Range
- EnABL How-To for Fostex FE127e and other speakers