Please excuse, but...
This pic shows the 127 driver having a remarkable flat response between about 150Hz ans 1.5kHz (+/- 1.5dB) then it takes off at an approx linear 5dB/Oct up to about13kHz, then suddenly drops off about 15dBoff.
Is this normal for this driver, or is it the way the measurements are done (mike? baffle size?, reflections?, etc), or the amp's response, or ....?
Doesn't seem reasonable the way it's shown here.
jameshillj said:This pic shows the 127 driver having a remarkable flat response between about 150Hz ans 1.5kHz (+/- 1.5dB) then it takes off at an approx linear 5dB/Oct up to about13kHz, then suddenly drops off about 15dBoff.
Denis' graph is of an FE126... and i'm still not sure that something isn't quite right. Be nice to see what happens off axis with Denis' kit.
Here is an on axis FR of an FE127eN taken by Mark Fenlon in the anechoic chamber he has access to.
dave
Attachments

Even assuming some differences in measuring methods, the change in the performance it startling - so this is actually what the EnABLing does - nothing suble about the transformation, either.
Thanks Dave.
Thanks Dave.
This is what EnABL and Planet 10 processes together, do to a Fostex 127 driver. The 126 is a different kettle of fish and while the peaks are contained, that driver is just a lot more explosive than I am willing to listen to. Very much like a Lowther DX4 and A45 drivers before or after treatment. Meanwhile, the Lowther PM6A, 16 ohm silver voice coil, is a wonderful driver treated and not at all bad, but for a bit of shrieking, before treatment.
The loss of the peaks in the 127 are from application of songsc's discovery of how to use the patterns to eliminate the nasty peak on the Jordan JX92s drivers. His comments are ones I pay very close attention to, but he teaches in the oriental way, you have to think about the subject before you begin to see where he is pointing you.
I did not know you had these plots Dave, dlr would have had many things to heap upon you had you shown them to him!
Bud
The Horn Shoppe folks were discussing the relative merits of treated and untreated 126 drivers and the comment was made that an EnABL'd 126 was very similar in character of response and loss of shriekiness, to a well aged, untreated driver.
I wonder, looking at the factory vs EnABL plots for the 127, how much age the factory driver had when tested, and if this "aging" is an actual change in the driver response due to materials fatigue? I had always assumed it was just the normal adjustment made by our threat correlator and conscious mind, to what was assumed to be "normal" performance, after a period of time.
The HS folks did remark upon the much lower threshold for downward dynamics found on the EnABL'd drivers as not being available from a well broken in driver, but that in overall presentation, they were very similar. And this without the Planet 10 improvements.
Nice comparison by the way, thanks Dave.
Bud
planet10 said:
Denis' graph is of an FE126... and i'm still not sure that something isn't quite right. Be nice to see what happens off axis with Denis' kit.
dave
Here it is.
Attachments

the bird beak nib
I am being a wuss boy at doing this because the materials I have are so limited.
The upside down pen-- the one with the bird beak-- how much 'breaking in' does that need?
I am trying to get my mood right to make some more blobs and shaky lines.
And yes I've seen the Testor's acrylic paint in a rainbow of colors. If it's water soluble, would a drop of distilled water or some such make it a good replacement for the FloQuil? Hardly an issue yet.
More confidence with the pen is needed. Whether a lot of paint or a little it seems to go from blob to scratchy and barely visible.
I could enjoy doing this if experience teaches anything. Right now I still wonder.
BudP said:You are doing just fine. After some time you will notice that one half of the pen tip protrudes slightly farther than the other. How you manipulate the beginning of the pressure on the brass portion will help to determine how much wider than the actual pen tip the stripe will be. You will find that a tip that is about 2/3's the width of the outside blocks, on your pattern guide, will be just about right.
As for stealth, you may find a hobby shop with polly S paints nearby. If not, the Testors flat colored, acrylic paint will also work, but it does not flow as well as the Poly S.
Just keep practicing with that upside down pen tip orientation and in a bit you will begin to understand the process. Wavering lines are not an issue here, nor is a small amount of block pattern overlap from ring to ring. Blobs and snaky lines is how we all started out.
Bud
I am being a wuss boy at doing this because the materials I have are so limited.
The upside down pen-- the one with the bird beak-- how much 'breaking in' does that need?
I am trying to get my mood right to make some more blobs and shaky lines.
And yes I've seen the Testor's acrylic paint in a rainbow of colors. If it's water soluble, would a drop of distilled water or some such make it a good replacement for the FloQuil? Hardly an issue yet.
More confidence with the pen is needed. Whether a lot of paint or a little it seems to go from blob to scratchy and barely visible.
I could enjoy doing this if experience teaches anything. Right now I still wonder.
Member
Joined 2009
Paid Member
Sorry boys, I've been very slow in getting on with it.
Today I got the modge podge and damar.
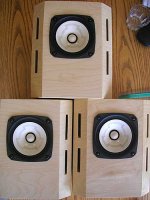
Attached are the first 3 (evenually there will be 5) done with the damar tri-foil pattern. Yes, freehand. Yes, it shows 🙂
If I understand correctly, I wait 24hrs before doing the modge podge. Then I can do an A-B with the 2 untreated drivers.
Am I on the right track ????
Today I got the modge podge and damar.
Attached are the first 3 (evenually there will be 5) done with the damar tri-foil pattern. Yes, freehand. Yes, it shows 🙂
If I understand correctly, I wait 24hrs before doing the modge podge. Then I can do an A-B with the 2 untreated drivers.
Am I on the right track ????
Attachments
Bigun said:Am I on the right track ?
Yes. Looks like you are doing pretty good.
dave
Hi Lon,
If the pen is not responding smoothly, then pass the tip through an open flame for about 2 seconds, then wash in soap and water and allow to dry. Make sure all paint if washed off first.
When you dip the tip into the paint the first time, go a little deeper than you intend to dip afterward. This will tend to keep the usable paint wet and flowing freely.
Wipe the sides of the tip against the bottle internal lip before using, after each dip.
Expect to use one dip per set of blocks at best, so only dip a about an 1/8 inch of the tip into the paint to begin with and just past the tip bend after that. The stuff skins over so quickly that trying to get more than one set of blocks is a real problem. This only gets worse with colors.
If you need to thin the paint use 99% pure isopropyl alcohol and just a drop or two at a time.
I use a copper end cap from plumbing pipe, of an appropriate size, to keep the bottle from tipping over as I wipe the tip sides, while blurrily looking at the bottle. This because I use an additional set of magnifying lenses, the plastic visor with plastic lenses sold at hobby shops, to allow me to see how uneven I am being. I stop if I am not paying enough attention.
Never have caffeine before you EnABL!!!!!!!!!
Just keep after it, on flat pieces of absorbent and non absorbent paper until you have developed a rhythm of dip and draw that allows you to quit worrying about how perfect every line is. I realize everyone wants to do perfect work, as each of us agonizes over every small error we make. Please understand that from across the room you will not see the errors, even close up no one else will see them and they will not make a difference in the sound.
Another thing to do, when applying the blocks on a cone is to end by pushing the pen tip back into the paint slightly as you lift the pen tip. This will keep you from leaving a right angle tail in the paint, at the end of the block.
Then only pens used upside down are the A 0 through A 5 tips. The sharp pointed ones are used in the normal fashion and they actually will carry enough paint for two block sets.
Bud
Bud,
By a block set do you mean a pair of spots? ... that is about right, you get more consistent spots if you don't try to do to many spots with each paint load. Depending on what the current state of the tip is, things may flow nicely or not. If it isn't clean the tip. Also make sure that the top of the bottle -- where you are wiping the tip -- is cleraned as well. Some isopropynol on a paper towel is useful every once in awhile.
This is a good place to mention that the majority of your pollyscale will end up on paper towels.
dave
Bigun,
Looks like a good job. You have a steady hand.
These look to be 60d arcs. Are you using a brush or foam pad?
I saw some itty bitty foam pads on sticks at the craft store. My one sample piece I did I used a Q-tip but the pattern got kinda large.
Looks like a good job. You have a steady hand.
These look to be 60d arcs. Are you using a brush or foam pad?
I saw some itty bitty foam pads on sticks at the craft store. My one sample piece I did I used a Q-tip but the pattern got kinda large.
Member
Joined 2009
Paid Member
Thanks guys, good to know we're on the right track.
I stole one of my kids many little paint brushes. Nothing fancy.
What I did was to take a ruler and hold it across the front of the driver, judging by eye to keep it horizontal and passing through dead-centre. I put a small pencil mark on the edges of the driver at the left and the right. Then I tilted the ruler to go through the centre and where the voicecoil wire passes through the cone which is roughly 60d and did the same. These little pencil tick marks were used as a guide for the extent of the brush strokes.
Yes I did mean just two blocks, from one block set, in one ring.
Another useful thing to do is to shake the bottle, with the lid tight, before using. You must wipe out the cap inside and bottle edge after opening the bottle or when you relid the bottle and leave it overnight, it will glue permanently to the bottle top.
Bud
Another useful thing to do is to shake the bottle, with the lid tight, before using. You must wipe out the cap inside and bottle edge after opening the bottle or when you relid the bottle and leave it overnight, it will glue permanently to the bottle top.
Bud
Member
Joined 2009
Paid Member
Progressing...
OK, first coating of thinned modge-podge just went on.
Not sure if it was the right consistency, the first driver I did it was perhaps not thin enough, the other two were better in terms of it going on fairly transparent.
I'll wait til this evening for the 2nd and final coat.
OK, first coating of thinned modge-podge just went on.
Not sure if it was the right consistency, the first driver I did it was perhaps not thin enough, the other two were better in terms of it going on fairly transparent.
I'll wait til this evening for the 2nd and final coat.
I have been studying P-10's templates for the trifoil pattern but not coming up with a method for that. My sample sacrificial pieces that have gone through other mods and were real cheap (and I have drawer full) are not the same size as the FE127e. If I take a cone off to use as a template the size will be approximate and maybe too small.
The trifoil patten has to clear the outer ring below and the inner ring above. One template for each.
The trifoil patten has to clear the outer ring below and the inner ring above. One template for each.
loninappleton said:I have been studying P-10's templates for the trifoil pattern but not coming up with a method for that. My sample sacrificial pieces that have gone through other mods and were real cheap (and I have drawer full) are not the same size as the FE127e. If I take a cone off to use as a template the size will be approximate and maybe too small.
The trifoil patten has to clear the outer ring below and the inner ring above. One template for each.
I must have spots before my eyes.
FE127e has the 'stealth ring' down near the dust cap but no inner ring.
I'm getting ready to do surgery on the old Pioneer.

- Status
- Not open for further replies.
- Home
- Loudspeakers
- Full Range
- EnABL How-To for Fostex FE127e and other speakers