Yes, I was hoping for specifics as to make, model and value. You know, the basics, lol.I used higher quality capacitors.
Mine is much better than stock but it still needs help, as do I.
Pete
Today when I was going through my parts bin for the EAR clone that I ordered back when I first started the Bare PCB built and guess what I found? I guess I had ordered the Same Hammond 154E Choke. So I think I will put this in., does it need to be isolated from the PS chassis? Just making sure I don't cause any issues.
Also I have mentioned that I have 100uF/400vdc Nichicon KX caps for the main PCB but I also found I had order some 68uF/400Vdc Nichicon KX caps too. I want to use the 68uF/400vdc caps since they are double the 33uf caps that are in there now, hopefully this will not put too much of a strain on the Power Transformer.
I also found a KX 330uF cap for the upgrade to replace one of the 100uF one of the caps in the power supply. Along with these finds I also found the Diodes I was going to put ON Semi MUR4100EG 1000V/4A in for the B+ side but don't know if this will cause an issue.
Any thoughts?
Try this first. I have a lundhahl 15H choke the I want to try is in the same spot. Just need to monitor the voltage supply change.Same Hammond 154E Choke
Today I'm going to solder the components I bought in my original purchase into the PS board. once all in I will swap the PS in the 834P now for the one I just build so I don't have to unsolder parts and compare. Hopefully this will improve the sound of the 834P clone, then I will go after the preamp PCB and do the same with PCB I bought back in 2020. That one will have all the Jensen Copper foil PIO caps though out.
As of last night the EAR 834P clone was really starting to open up and had a deep wide soundstage. This has only been in the system about 25 hours but less hours with the capacitor up grades. Perfect match for the Sumiko Amethyst cartridge.
I forgot to mention that this Phono preamp response nicely to better AC cables then just a regular computer grade AC cable. I tried the regular cable first and sound good but really changed when I put the better AC cable in after.
I finished the spare PS board with all the upgrades. I soon found out I misplaced the 10uF 450V cap so I have to order another. I will order the resistors for the power lines and others at the same time to finish this up once and for all on the spare preamp and PS pcb's.
I did find the CD silver Mica caps so I will remove the ones that are in there now and replace them with the CD caps. I need to drill holes for the mounting screws for the choke.
I was going to order some Mills resistors but I don't see them on the Digikey website anymore. There was the regular Mills and Vishay Mills, but neither came up.
Hi everyone.
I exchanged the Mundorf EVO coupling capacitors with Jantzen Superior Z-Caps and I'm surprised by the improvement. They only have an hour or so on them but the improvements are already substantial.
It is as if the players all moved their seats farther apart and especially further back. The soundstage is quite a bit wider and much deeper but the virtual images on the stage are a bit more tightly focused. There is now more empty space in between the players.
The modifications and upgrades that I have made:
I replaced the RIAA network parts with higher quality components but kept the stock values.
I replaced the coupling caps with higher quality components. I currently have a Mundorf EVO Oil capacitor between V2 and V3 and Jantzen Superior Z-Caps on the inputs and outputs.
I replaced the caps on the cathode of V2 with Elna Silmic 2 100uf 16V capacitors bypassed with 0.1uf film caps on the bottom of the board.
I removed the resistor and installed a choke in the power supply.
I added a heat sink to the 6.3V Bridge Rectifier in the power supply.
So far, so good!
Pete

What prompted you to swap out the Mundorf coupling caps?
I too use a Jentzen as the first coupling cap, but I have an Audyn in the output spot.
I too use a Jentzen as the first coupling cap, but I have an Audyn in the output spot.
Only one pair of them were the oil filled ones. They made such a dramatic improvement that I wanted to try even better ones. It turns out that it was money and time well spent!What prompted you to swap out the Mundorf coupling caps?
How did you decide to use an Audyn for the output cap? I have been poking around on the Humble Hifi capacitor test:
https://www.humblehomemadehifi.com/Cap.html
Pete
Hi everyone.
I exchanged the Mundorf EVO coupling capacitors with Jantzen Superior Z-Caps and I'm surprised by the improvement. They only have an hour or so on them but the improvements are already substantial.
It is as if the players all moved their seats farther apart and especially further back. The soundstage is quite a bit wider and much deeper but the virtual images on the stage are a bit more tightly focused. There is now more empty space in between the players.
The modifications and upgrades that I have made:
I replaced the RIAA network parts with higher quality components but kept the stock values.
I replaced the coupling caps with higher quality components. I currently have a Mundorf EVO Oil capacitor between V2 and V3 and Jantzen Superior Z-Caps on the inputs and outputs.
I replaced the caps on the cathode of V2 with Elna Silmic 2 100uf 16V capacitors bypassed with 0.1uf film caps on the bottom of the board.
I removed the resistor and installed a choke in the power supply.
I added a heat sink to the 6.3V Bridge Rectifier in the power supply.
So far, so good!
Pete
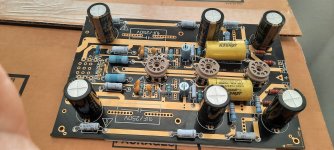
View attachment 1232911
I used These same Jantzen Superior Z caps in my Transcendent Sound Masterpiece 300b preamp build. Very nice caps, different from my Jensen Copper Foil PIO caps.
Just wait, you aint heard nothing yet. once you get around to 150 hours they are really something! I just the AudioCap Thetas in for Coupling caps and the Mundorf EVO oil because Audiocap didn't make that value.
You need to replace all them 33uF Gold/ Yellow caps, once you do that then this will be even better sounding. I older more parts for the power supply and main preamp. Once I finish putting all the parts I will then do the Pot, RCA connectors and maybe the AC input to a better one.
Enjoy!
Now that's funny!You need to replace all them 33uF Gold/ Yellow caps, once you do that then this will be even better sounding.
I've been listening to this thing for several hours now and it sounds very nice when it isn't being asked to do much. As soon as the music builds it gets congested, which makes me think that the power supply doesn't have enough reserve capacity.
Those 33uf electrolytics are acting as a local reserve for each stage, not filtering per se? That makes sense.
I have been hesitant to replace those guys because they won't be easy to remove. I used to have access to an actual solder sucker but these days I only have the stupid plunger type. In any event, that seems to be the next step.
Pete
Pete,
What you are hearing is the Jantzen caps, they need break in before you start run them through their paces and start comparing. Mine did this as well and didn't start to open up until around 50-60 hours on them. So be patient. 🙂
If you have an adjustable soldering iron with and good size tip it is easy to remove those cap but you will have to be careful not to damage the PCB. You do care about the part so that is no biggy. You will apply the tip/heat to the lead of the cap and slowly wiggle while slightly lifting the that side of the cap that you are desoldering. Then work the other side until going back and forth between the cap leads until you can get the part out safely.
I installed 100uF for the 6 caps on the spare Zhili PCB I have and when I'm complete, I will do the PCB swap. I'm done with the Zhili spare PS board and all the upgrades, I'm just waiting on my parts that I ordered to come in so I can finish the preamps side. I will try to take pics of the PCB's when I'm finished. I also put the 330uf cap and the 220uF cap on the PCB and will insert the Choke upgrade as well.
Then I will start on the RCA connector upgrade and putting the TKD Pot. I'm also thinking of putting a CL-90 NTC on the AC input line.
I did a quick comparison between my SPL Phonos and this EAR 834P clone with the cap coupling cap upgrade and to my surprise it is pretty close, with additional upgrades I will do this will be very interesting how they compare. they have their strengths and weaknesses but surprised at close the EAR cap. The thing I see hear different most in the back noises are slightly more quiet with the Phonos and it has a tad more slam.
Last edited:
Yes, exactly. As I mentioned, a real solder sucker with a hollow tip and a vacuum pump would make short work of the removal.If you have an adjustable soldering iron with and good size tip it is easy to remove those cap but you will have to be careful not to damage the PCB
Do you think that I need to be playing music for the caps to form or can I just leave it on? A have some cheap Chinese 12AT7s that I can install so I'm not wasting the life of decent ones currently installed.
Pete
"Yes, exactly. As I mentioned, a real solder sucker with a hollow tip and a vacuum pump would make short work of the removal."
Yes, I agree but I was just giving some advice if you don't have access to one. Or you could just buy the proper tool for the job.
"Do you think that I need to be playing music for the caps to form or can I just leave it on? A have some cheap Chinese 12AT7s that I can install so I'm not wasting the life of decent ones currently installed."
Yes, you need Music hrs. for them to break in properly. Put the tubes you don't care about in when doing the caps break in process.

I am very interested in hearing copper in oil caps and those Jensens are on my list! This seems like it will soon be a good test bed.Jensen Copper Foil PIO caps
I'm ordering caps for the PCB from Mouser. They are out of stock on 100uf so I'm getting 82uf ones. I'm getting the snap in version, I hope that's what I need!
I'm also ordering bypass films to put on the bottom, ECW-F4824RHL.
Pete
Pete, The Jensens are very and that's what BAT used in their gear but they are no longer made and Duelund I think bought the rights to them I know there are places that still sell them like Tube Depot Angela Instruments under "Angela" but those are Jensen Copper Foils.
I was having a hard time ordering parts as seems like quite a few parts were out of stock. Those Nichicon KX caps I had to special order and took almost 8 month to get them.
Good luck with the bypass caps, I only had a couple of success stories. That's why I don't waste my time with them. When I was in my late 20's I did a lot of experiments on all kinds of tweaks and cablings. So I learned very fast what worked and what didn't. 🙂
Haha, I'm not willing to wait that long so I went with the 82uf version that was in stock.I had to special order and took almost 8 month to get them
The first tube amp that I worked on was a Dynaco Stereo 70 and the improvement when I added a polypropylene bypass cap to the main filter electrolytic caps was startling. So, I figure it's worth trying. I had used photoflash caps so I don't expect anything like the same improvement over the Nichicons that I'm going to use, but still....
I also ordered replacement diodes. The onsemi parts specified in the Lenco mods are obsolete, so I ordered these Panjit parts: UF4010G_AY_00001
Hopefully I chose wisely, lol.
Pete
I have the VAT-120 and also did some upgrading on that.
My parts will be coming on Monday so I can finish this project.
My parts will be coming on Monday so I can finish this project.
Ok, today I finished the spare power power supply with the choke in the schematics and 330uf cap before and 220uF cap the choke. I'm getting 300VDC on the B+ input to the preamp pcb. For both left and right channels Power voltages are:
I haven't touched any of the resistors on the preamp PCB. I'm wondering if some are really out of tolerance.
With the Variac set at 115vdc these are the voltages I get.
After the 2k = 298vdc
After the 20k = 278vdc
After the 200k =212vdc
Plates Voltages are:
V1 95Vdc
V2 125vdc
V3 297vdc
I did use some 68uF caps instead of the 47uF caps that in that circuit for the Transistor and Zeners for the regulation.
Does anyone one know what the voltage tolerances are for these Clones?
My voltages are higher than what I have seen on others, my B+ input voltage is 300vdc. Should I just increase the value the first resistor (2K) to get it closer to the proper voltages since I'm using the choke in the power supply?Try this first. I have a lundhahl 15H choke the I want to try is in the same spot. Just need to monitor the voltage supply change.
- Home
- Source & Line
- Analogue Source
- EAR834P Project