I made similar experience with TRS, kind of non-linear contact resistance.
But applied as a connector for a hi-z input these work fine for my limited resolution equipment (EMU-tracker USB soundcard)
But applied as a connector for a hi-z input these work fine for my limited resolution equipment (EMU-tracker USB soundcard)
My miserable English...Unlocking TRS connectors can (and do) cause distortion indication fluctuations (contact issues).
What about 0.001% instead of 0.0001% ?
😉
George

It should be Non-locking TRS connectors
George
https://eu.mouser.com/ProductDetail/L-Com/BAC1503?qs=%2BHhoWzUJg4I36a3fC%2BBaMg==Another device for ultrasounds has a very nice insulated BNC. This I would by if I could find.
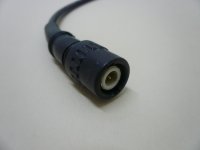
Thanks but what I'm looking for is the male connector that goes to the cable and the particular has the twist lock made of plastic. Good for testing signals with DC offset -this soundcard can handle 400V DC. Even more useful for a DIY tube curve tracer that is designed to work with the oscilloscope. Although it's floating and properly grounded when connected, it's there to bite when you hold it in the air...
Is this aiming to be a project for a one-off build, or are you looking to make this something that will be built and used by a wider community? If you're looking at a wider community I'd suggest to use something a bit more standard aimed at balanced cabling, like an XLR or TRS jack. If these need more space, use a larger box.

Apologies for my misconception, I thought that BNC is the standard and then adapters like these


On the other hand, it's not difficult for me to upload corrected gerber files with all improvements suggested here, but it would be impossible to test them.
On the other hand, it's not difficult for me to upload corrected gerber files with all improvements suggested here, but it would be impossible to test them.
I should mention this combo is avallable for XLR-F only, i.e. for input connectors.My personal favourite is an XLF-F/TRS-6.3mm combo jack from Neutrik for these applications.
Mini XLR being another option.
So, output will be XLR or TRS only. If you have in mind a specific male right angle PCB mount XLR, now it's the time to speak. 🙂
I'd suggest to use the same connector type for both input and output. Makes life easier on the workbench if you don't have to mix and match different cables and connectors. I am in the XLR camp, as I already have a lot of these.So, output will be XLR or TRS only.
Sweet spots... I get a new one every time I attempt a re-calibration. I tried to move it to hardware domain. I increased the I/V resistors and/or reduced the output buffer gain. Result was just a new sweet spot... This is not what I had in mind. With the first version, I enjoyed most to crank it up at full scale for best figures. Anyway, I call this version an overall upgrade in terms of performance, simplified construction and not least, cost. I'm posting today's sweet spot. 🙂

I replaced the 1μ output polypropylene caps with 10μ MKS2 and I'm happy to see that the low end bandwidth is restored without signal degradation. I didn't try better regulators. What would you suggest is the limit of CS5381 without notch filters and the alike?
I replaced the 1μ output polypropylene caps with 10μ MKS2 and I'm happy to see that the low end bandwidth is restored without signal degradation. I didn't try better regulators. What would you suggest is the limit of CS5381 without notch filters and the alike?
This is how the XLR option is shaping up. PCB dimensions are 183 x 110 mm. I had the chance to improve the layout a bit more and move the two opamps from the bottom side to the top. To the low left are the input XLR/TRS compo. Only pins #2 and #3 or tip and ring respectively are connected. No ground at any pin, not needed. For SE, connect the DUT ground to pin #3 or ring. To the low right are the output XLR but also there are pads for neutric style TRS. You can solder either of these two. Actually, both can be soldered, XLR on the top and TRS on the bottom side. Here ground is needed for SE output but may cause problems with balanced, so the bal/unbal switch is renamed to float/gnd. It connects pin #1/sleeve to ground. Pins #2 and #3 are always hot and cold.

FWIW, I also designed a front panel with generic dimensions 200 x 50 mm. No channels assignation. Left is to the left, right to the right, or Arabic numerals.

Please let me know your thoughts about it.
FWIW, I also designed a front panel with generic dimensions 200 x 50 mm. No channels assignation. Left is to the left, right to the right, or Arabic numerals.
Please let me know your thoughts about it.
What would you suggest is the limit of CS5381 without notch filters and the alike?

No one can claim better numbers than those at the datasheet.
What are the settings for this FFT? (click over upper right gear wheel)
George
Attachments

Hi George,
FILT+ cap is 220μ and REW settings are the following

I don't seem to get the datasheet figures


I think that's all I can do. Get ready to take over. 🙂
FILT+ cap is 220μ and REW settings are the following
I don't seem to get the datasheet figures
I think that's all I can do. Get ready to take over. 🙂
Pin 1 is not part of the audio signal. It should be connected to the chassis, not GND.It connects pin #1/sleeve to ground.
- Home
- Design & Build
- Equipment & Tools
- DIY soundcard intended for measuring amplifiers