Hi JW, i also received that thanks, seems like he will have a few, but too pricey for me (cheapskate!)..........Mike(and anyone else interested)
I have just received an email from a chap who has started supplying
Panzerholz to the Uk Hifi Diy market. £200 for approximately 500x500x25mm. Plus postage. Let me know if you need contact details.
A bit pricey but at least we can get hold of it now.
How did your resistance and level checks go?
M
I’m glad he contacted you. I would like his venture to succeed but it is quite steep, probably understandably so.
Well as I expected, I started back at work about a month ago and all of a sudden I have no time. Everything as drawn to a halt so I am embarrassed to say I have not moved on at all...other than I am now earning money again-hooray. I have a window of opportunity in a few weeks time so hopefully I can make some progress then. 🙂
Well as I expected, I started back at work about a month ago and all of a sudden I have no time. Everything as drawn to a halt so I am embarrassed to say I have not moved on at all...other than I am now earning money again-hooray. I have a window of opportunity in a few weeks time so hopefully I can make some progress then. 🙂
Hi JW, i also received that thanks, seems like he will have a few, but too pricey for me (cheapskate!)..........
How did your resistance and level checks go?
M
I keep meaning to say, my name is Jonathan... I forget yo sign.
In balance good news Jonathon, got to be good that some things are returning to normal and excellent that work is back on, what are you doing?I’m glad he contacted you. I would like his venture to succeed but it is quite steep, probably understandably so.
Well as I expected, I started back at work about a month ago and all of a sudden I have no time. Everything as drawn to a halt so I am embarrassed to say I have not moved on at all...other than I am now earning money again-hooray. I have a window of opportunity in a few weeks time so hopefully I can make some progress then. 🙂
Looking forward to progress when you're back at it.
Maybe follow the Panzerholz availability by posting on LH?
M
Ball point pen tips are not smooth. They are intentionally rough so they can hold ink.
Hi SB, interesting thought, just wondering what you are thinking, if they rotate in their seat as manufactured by the pen manufacturer and grip the cup we use then surely that's fine, we are hoping they do that and don't slide in the cup.
Are you thinking this could be a problem?
I like the idea because someone else provides a very close tolerance low friction pivot for 50Pence!
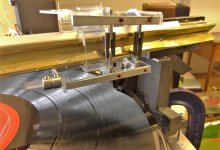
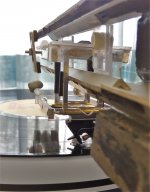
My Pen tip paralelogram is now working in orientation parallel to the rails as a prototype.
It uses an X section rail and so far is all OK, picture and first measures attached.
Interested to have feedback
I was going to wait to publish until i did a tidy version but............for me this is about as good as any of my experiments, but delivering these results on its first day and my expectation is there will be more potential unless i have learnt enough to go straight in at the top of the curve, which i doubt very much!
Attachments
In balance good news Jonathon, got to be good that some things are returning to normal and excellent that work is back on, what are you doing?
Looking forward to progress when you're back at it.
Maybe follow the Panzerholz availability by posting on LH?
M
Yes Mike good news for sure. I am a fencing coach. Schools, after school clubs, competition fencers, competition at weekends at home an abroad(they haven’t started yet)... as you are aware sport has been hit rather hard and indoor sport particularly. Hopefully we are coming out of it now.
Yes you are right I should drop something on LH... I will do, good idea.
Ball point pen tips are not smooth. They are intentionally rough so they can hold ink. #4465
So what?
Having an oil film (or greasy ink in our case) is essential for any sliding in bearings: from sintered bronze bushing up to the sapphire bearing of a Rolex. Material's coupling of different hardness and crystal structure are chosen both to adapt to each other, and for their affinity with lubricants.
In MiKe's parallelogram case of (as well as in my Lil Casey MK2-3) the rotation is a just few degrees, and therefore it's good for us that were invented the current sintered spheres* (previously machined like those of ball bearings), avoiding the oil spreading from the contact surfaces due loading.
carlo
*same or bigger smoothness, but completely different porosity
Last edited:
Thanks Carlo! I made a mistake cleaning out the oil, while I learned the friction is much higher after that.
Hello Thread!
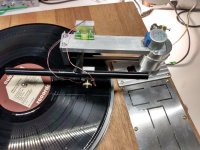
Here is my take on a linear tracker. Very much inspired by the Great Calo and his work with Lil Casey.
The tube and carrier is stolen directly from that design, but I decided to make a short arm and a knife edge bearing as the vertical bearing.
Still need some finishing and I haven´t decided what to do with the green LED and if I need it at all.
Here is a link to two videos, 1 showing how it operates and 2 a close-up on the cartridge showing very little bending of the cantilever, indicating, to me at least, not too much friction:
Dropbox - Linear Tracker - Simplify your life
Enjoy 🙂
Attachments

Great Karsten: it looks beautiful even next to the legendary SME, as in the video.
Seeing the family of radials expand and enrich with new, valid, ideas is something that fills me with satisfaction.
You have managed to make a radial arm even simpler than the LC (obviously automatic lifter excluded, a demonstration of mastery and competence) and with remarkable tracking behavior.
A new, broader road open to experimentations
carlo
Hey Karsten,Hello Thread!
Here is my take on a linear tracker. Very much inspired by the Great Calo and his work with Lil Casey.
The tube and carrier is stolen directly from that design, but I decided to make a short arm and a knife edge bearing as the vertical bearing.
Still need some finishing and I haven´t decided what to do with the green LED and if I need it at all.
Here is a link to two videos, 1 showing how it operates and 2 a close-up on the cartridge showing very little bending of the cantilever, indicating, to me at least, not too much friction:
Dropbox - Linear Tracker - Simplify your life
Enjoy 🙂
Looking great, i love the function of the lift and the general simple execution.
I look forward to hearing that it sounds as good as it looks.
It also shows how many different ways there are to approach LTA.
The electronics are all way out of my league but i hope to post further progress on the old mechanical thing soon!
Congrats
Mike
Hello Thread!
Here is my take on a linear tracker. Very much inspired by the Great Calo and his work with Lil Casey.
The tube and carrier is stolen directly from that design, but I decided to make a short arm and a knife edge bearing as the vertical bearing.
Still need some finishing and I haven´t decided what to do with the green LED and if I need it at all.
Here is a link to two videos, 1 showing how it operates and 2 a close-up on the cartridge showing very little bending of the cantilever, indicating, to me at least, not too much friction:
Dropbox - Linear Tracker - Simplify your life
Enjoy 🙂
Congratulations Karsten!
This looks super, I can not see much needle drag probably due the light weight of the carriage.
Is that a Lenco?
Cheers!
Wei
Last edited:
Hi Karsten,
Very nice! I especially like the lifting and retrieve mechanism.
But it seems to me that you used a regular LP to test stylus drag. When I did my test, I expanded the center hole of a test LP a little over 2 mm. Then, I placed the test LP off-center and played back the 1KHz track on the test LP. A regular LP should be ok as well. 2 mm of eccentricity is probably a bit too extreme. If the cartridge can pass 2 mm eccentric torture, you should be ok in most cases.
Anyway, great job!
Jim
Thanks!Congratulations Karsten!
This looks super, I can not see much needle drag probably due the light weight of the carriage.
Is that a Lenco?
Cheers!
Wei
Yes the light weight and the fact that the rail is directly over the carriage.
Yes that is a Lenco with a tachometer speed control.
Thanks Jim!Hi Karsten,
Very nice! I especially like the lifting and retrieve mechanism.
But it seems to me that you used a regular LP to test stylus drag. When I did my test, I expanded the center hole of a test LP a little over 2 mm. Then, I placed the test LP off-center and played back the 1KHz track on the test LP. A regular LP should be ok as well. 2 mm of eccentricity is probably a bit too extreme. If the cartridge can pass 2 mm eccentric torture, you should be ok in most cases.
Anyway, great job!
Jim
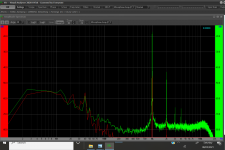
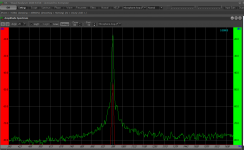
I know that in order to torture test the arm, a record with higher eccentricity will show it more clearly. Still I think you can see that there are no abrupt movement of the cantilever, when it tracks a normal record. I have made a couple of Linear Trackers before this and non of them passed the close-up test on that record. You could easily see the cantilever bending before the carriage moved.
Still I should probably find or make a record with more eccentricity , just to test it. I have no intention to listen to a record with 2 mm eccentricity, though 😀
Hi Carlo.Great Karsten: it looks beautiful even next to the legendary SME, as in the video.
Seeing the family of radials expand and enrich with new, valid, ideas is something that fills me with satisfaction.
You have managed to make a radial arm even simpler than the LC (obviously automatic lifter excluded, a demonstration of mastery and competence) and with remarkable tracking behavior.
A new, broader road open to experimentations
carlo
I am flattered by you kind remarks, but you are too kind.
I know my skills in the workshop is lacking, especially compared with your works of art!
The goal was to make a simple linear tracker, and it is , conceptually, but it turned out to be not that simple after all. Wow there are many parts in that design. 😱
Thanks Mike.Hey Karsten,
Looking great, i love the function of the lift and the general simple execution.
I look forward to hearing that it sounds as good as it looks.
It also shows how many different ways there are to approach LTA.
The electronics are all way out of my league but i hope to post further progress on the old mechanical thing soon!
Congrats
Mike
Many ways to do that, yes. And you have indeed shown a lot of new ways to do it. It is a fun and interesting journey, although frustrating from time to time, as you are well aware of.
Keep them coming!
It was my intention to make a simple arm that worked, before I made an attempt on the arm I really dreamed to make, but it took far more time an effort than I had ever imagined. So it will probably be a while before I start all over again on the dream arm (hint : passive linear tracking with some help 😀😀😀😱)
stability issue
Working on the LC prism (Thanks Carlo for sharing the design).
Ortofon vms works well but not with this Z1, wondering how can I get it balanced (the stylus should be aligned well with carriage)
Video with Z1
BTW, any tips to attach animated GIF?
Working on the LC prism (Thanks Carlo for sharing the design).
Ortofon vms works well but not with this Z1, wondering how can I get it balanced (the stylus should be aligned well with carriage)
Video with Z1
BTW, any tips to attach animated GIF?
Last edited:
It seems i had learnt very little, the X rail has gone away for now as i couldn't get tracking as good as before, it played records but was not the progress that i hoped for. I am using a previous rail now, Inverted V over V, i will refine the new paralelogram and see if it is worth keeping. then i will have a look back at rails again.My Pen tip paralelogram is now working in orientation parallel to the rails as a prototype.
It uses an X section rail and so far is all OK, picture and first measures attached.
................ my expectation is there will be more potential unless i have learnt enough to go straight in at the top of the curve, which i doubt very much!
I am still not sure whether the paralelogram orientation is happier parallel to the groove or along the arm?
M
Attachments
- Home
- Source & Line
- Analogue Source
- DIY linear tonearm