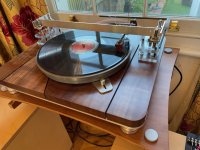
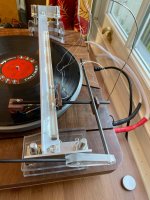
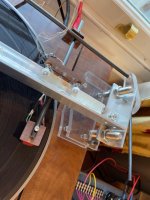
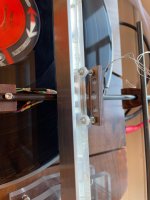
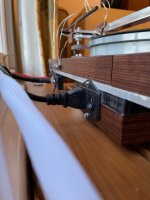
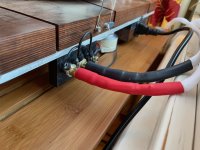
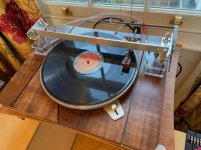
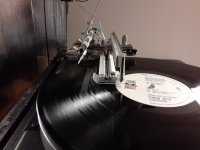
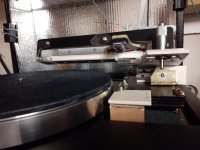
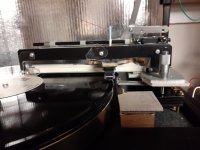
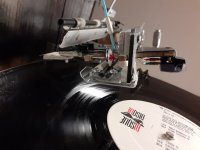
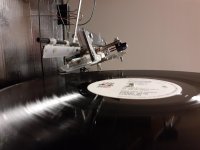
As requested. I’ll try and post a few pictures. It’s a lenco 75 with a ptp6 plate, it has his ruby bearing. It’s a panzerholz plinth split into 4 with the motor isolated from the bearing and the two ends of the linear arm also isolated. You can see what is going on with the arm really. All the parameters are adjustable, the only one that’s a bit tricky is the azimuth, it’s not as accurate or easily adjustable as I would like. I’m still thinking about that....it pivots with a grub screw but I can’t get fine adjustment. . The headshell, carriage and weight are all panzerholz as well. I am a huge fan of then panzerholz, it has made a big difference to this deck.
Attachments
-
 16BA9E2E-2DF9-49A0-B9F5-CEC19E3C43B8.jpeg948.5 KB · Views: 305
 -
 DE48F9D4-2619-4249-A8FB-C4A6CC44F541.jpeg892.5 KB · Views: 232
 -
 EFDC979A-1628-48EE-BCD5-DBEDB1C1CB65.jpeg900.5 KB · Views: 220
 -
 0435A530-BB2A-448C-8113-5E793CEB187F.jpeg855.6 KB · Views: 270
 -
 6DF033F4-1560-422C-8A2B-75C7C50B0A00.jpeg659.6 KB · Views: 263
 -
 1162D224-58F9-4F6E-957B-870BBF103A71.jpeg877.1 KB · Views: 282
 -
 68B25BD7-0025-4658-89CA-6168E59DB7D8.jpg341.4 KB · Views: 288
Last edited:
As requested. I’ll try and post a few pictures. It’s a lenco 75 with a ptp6 plate, it has his ruby bearing. It’s a panzerholz plinth split into 4 with the motor isolated from the bearing and the two ends of the linear arm also isolated. You can see what is going on with the arm really. All the parameters are adjustable, the only one that’s a bit tricky is the azimuth, it’s not as accurate or easily adjustable as I would like. I’m still thinking about that....it pivots with a grub screw but I can’t get fine adjustment. . The headshell, carriage and weight are all panzerholz as well. I am a huge fan of then panzerholz, it has made a big difference to this deck.
As you know i think your deck looks absolutely great and as it performs well its a great success. Looking at your arm its going to be quite easy to introduce an alternative rail and carriage because as you say its all demountable. i have a Lenco waiting as well......
Changing the wiring (to Niffy style) as we discussed before is going to help a lot.
It looks to me as though you can do the experiment in situ to measure friction. if you adjust the CW can you get a neutral balance at 0 VTF?
If so it will also help you to check the rails are really level, the arm will run differently side to side if not.
Once its level, then find out how many mm raise on one end causes it to move, it may be a few mm at the moment, but if its just 1mm you already have quite low friction, just you have rattly BB's in the arm.........
I assume the azimuth screw is where the arm joins the carriage, if so just add a lever to the arm up against the mounting plate, it looks like you have 50mm to work with and the end of this lever can be a guide and control and allow accurate setting, you can then clamp that and the grub screw tight when finished. VA will help you adjust azimuth to get precise channel separation more easily than by ear.
M
Niffy, Thanks for that reply and posting all that great work!
Mike56, Looking forward to seeing what you come up with.
Hugh
Hugh, i often take a look back on the thread for ideas and found old pics of your work, how is it now please?
Mike
As you know i think your deck looks absolutely great and as it performs well its a great success. Looking at your arm its going to be quite easy to introduce an alternative rail and carriage because as you say its all demountable. i have a Lenco waiting as well......
Changing the wiring (to Niffy style) as we discussed before is going to help a lot.
It looks to me as though you can do the experiment in situ to measure friction. if you adjust the CW can you get a neutral balance at 0 VTF?
If so it will also help you to check the rails are really level, the arm will run differently side to side if not.
Once its level, then find out how many mm raise on one end causes it to move, it may be a few mm at the moment, but if its just 1mm you already have quite low friction, just you have rattly BB's in the arm.........
I assume the azimuth screw is where the arm joins the carriage, if so just add a lever to the arm up against the mounting plate, it looks like you have 50mm to work with and the end of this lever can be a guide and control and allow accurate setting, you can then clamp that and the grub screw tight when finished. VA will help you adjust azimuth to get precise channel separation more easily than by ear.
M
Thanks Mike. I’m not sure if the weight is capable but I have additional weights so it shouldn’t be an issue. That’s a good idea for the weekend.
With regard to azimuth. That is exactly what I was thinking..I just need to get the grub screw with enough friction to move with a bit of gentle force, then tighten once set. I can drill a hole and use a carbon rod to move it. I have a fozgometer that I use for azimuth usually but I am intrigued by your system. It’s just a bit fiddly with the grub screw under the carriage. If it was accessible from the top or side it would be better.
Absolutely a rewire is required. I have the copper but not the motivation 😀😀. I will address it.
As you know i think your deck looks absolutely great and as it performs well its a great success. Looking at your arm its going to be quite easy to introduce an alternative rail and carriage because as you say its all demountable. i have a Lenco waiting as well......
Changing the wiring (to Niffy style) as we discussed before is going to help a lot.
It looks to me as though you can do the experiment in situ to measure friction. if you adjust the CW can you get a neutral balance at 0 VTF?
If so it will also help you to check the rails are really level, the arm will run differently side to side if not.
Once its level, then find out how many mm raise on one end causes it to move, it may be a few mm at the moment, but if its just 1mm you already have quite low friction, just you have rattly BB's in the arm.........
I assume the azimuth screw is where the arm joins the carriage, if so just add a lever to the arm up against the mounting plate, it looks like you have 50mm to work with and the end of this lever can be a guide and control and allow accurate setting, you can then clamp that and the grub screw tight when finished. VA will help you adjust azimuth to get precise channel separation more easily than by ear.
M
Actually thinking about it. If I have to add more weight to get zero vtf that may muddy the waters? It’s been too many years since I did physics or applied maths, and even then at a low level.☹️ I’ll see what happens on the weekend.
Hi JW, having read it all, my feeling is that the experiment is not perfect and any change that may arise from a small additional weight will fall within the variance and experimental error anyway. These mechanisms should probably be sensitive to the carriage weight but in reality they don't seem to be, certainly not much.Actually thinking about it. If I have to add more weight to get zero vtf that may muddy the waters? It’s been too many years since I did physics or applied maths, and even then at a low level.☹️ I’ll see what happens on the weekend.
You will also probably find that the results vary considerably because of where you start the carriage, dirt, imperfections and so on. It is quite difficult to reach a repeatable result, i would say my results vary 10-20% and i take an average for purposes of judging the result. I think you will find that adding a few grams of blutack to the counterweight will make no measurable difference.......as always i look forward to the evidence being different!
I am sure others will be able to offer some science behind what i find pragmatically, best, mike
Hi, jw67
Nice job on the turntable and linear tonearm !!
There is a precise way of obtaining a precise VTA, but not very cheap, by using a pair of Z axis stage units similar to this one on ebay. Sometimes you can get cheaper, used units.
https://www.ebay.com/sch/i.html?_fr...13&_nkw=Z+axis+stage+with+micrometer&_sacat=0
Good luck,
Joe
Or a cheaper alternative. You can adjust VTA on the fly.
3D Printer Z-Axis Lead Screw T8 Z Axis Diy C-Beam Cnc Sliding Table 150Mm Linear | eBay
3D Printer Z-Axis Lead Screw T8 Z Axis Diy C-Beam Cnc Sliding Table 150Mm Linear | eBay
Hugh, i often take a look back on the thread for ideas and found old pics of your work, how is it now please?
Mike
Hi Mike,
I've built two LTAs. I presume you saw the Niffy style one with the Carbide rails. It's sounding great thanks, but I'll be attempting to do better.
Mine is mounted on an old Heybrook TT2 Turntable with an Aluminum chassis and spring suspension. The next will be mounted on a Panzerholz plinth. I will likely use Panzerholz to support the rails as well.
I find that the ability to adjust Vertical tracking is very important with these short arms. The vernier on the front allows me to adjust it without lifting the arm.
Hugh
Any pictures please Hugh?Hi Mike,
I've built two LTAs. I presume you saw the Niffy style one with the Carbide rails. It's sounding great thanks, but I'll be attempting to do better.
Mine is mounted on an old Heybrook TT2 Turntable with an Aluminum chassis and spring suspension. The next will be mounted on a Panzerholz plinth. I will likely use Panzerholz to support the rails as well.
I find that the ability to adjust Vertical tracking is very important with these short arms. The vernier on the front allows me to adjust it without lifting the arm.
Hugh
Hi JW, having read it all, my feeling is that the experiment is not perfect and any change that may arise from a small additional weight will fall within the variance and experimental error anyway. These mechanisms should probably be sensitive to the carriage weight but in reality they don't seem to be, certainly not much.
You will also probably find that the results vary considerably because of where you start the carriage, dirt, imperfections and so on. It is quite difficult to reach a repeatable result, i would say my results vary 10-20% and i take an average for purposes of judging the result. I think you will find that adding a few grams of blutack to the counterweight will make no measurable difference.......as always i look forward to the evidence being different!
I am sure others will be able to offer some science behind what i find pragmatically, best, mike
Thanks Mike. Noted and that makes sense, it seems a sensible approach.
Hi, jw67
Nice job on the turntable and linear tonearm !!
There is a precise way of obtaining a precise VTA, but not very cheap, by using a pair of Z axis stage units similar to this one on ebay. Sometimes you can get cheaper, used units.
https://www.ebay.com/sch/i.html?_fr...13&_nkw=Z+axis+stage+with+micrometer&_sacat=0
Good luck,
Joe
Thank you Joe that’s very kind of you. The plinth I’m happy with really. The arm is getting there. I have a mk2 in my head with more panzerholz instead of polycarbonate....and a few other things to make adjustment easier. It’s an ongoing thing but in the current state it doesn’t skip and it sounds nice so that’s good but definitely improvements need to be made.
I looked at the z axis platforms for ages but they are really expensive and in the end I thought I would try and make it all for a first go but you’re completely right, they are the things to have.
Or a cheaper alternative. You can adjust VTA on the fly.
3D Printer Z-Axis Lead Screw T8 Z Axis Diy C-Beam Cnc Sliding Table 150Mm Linear | eBay
That is definitely a better price point. Well done for discovering it...I get fed up searching for things after a while. 🙂
jw67,
Nice work on that Panzerholz plinth!
Hugh
Thank you that’s kind. Panzerholz is my favourite material to work with... I’m using permali currently on another plinth as you can’t get panzerholz in the uk anymore (currently at least). It seems a bit more “agricultural”, not quite as refined but it may well sound the same...fingers crossed.
Any pictures please Hugh?
Mike,
Did you mean pictures of the existing one? If so, here's a few. Forgive the lack of Aesthetics.
If you meant the new one, It's just a slab of Panzerholz and some parts from Tangospinner for now.
Hugh
Now this time with pictures...
Attachments
-
 rt end view_20210415_171058.jpg272.9 KB · Views: 248
 -
 left end_20210415_171340.jpg206.8 KB · Views: 270
 -
 front_20210415_171142.jpg258.4 KB · Views: 254
 -
 front w rails down_20210415_171257.jpg225.5 KB · Views: 262
 -
 close up of carbide ring and rails_20210415_171527.jpg220.8 KB · Views: 243
 -
 left end carriage up_20210415_171457.jpg818.9 KB · Views: 205
Thank you that’s kind. Panzerholz is my favourite material to work with... I’m using permali currently on another plinth as you can’t get panzerholz in the uk anymore (currently at least). It seems a bit more “agricultural”, not quite as refined but it may well sound the same...fingers crossed.
JW, do you have a link please for the permali material and prices?
Mike,
Did you mean pictures of the existing one? If so, here's a few. Forgive the lack of Aesthetics.
If you meant the new one, It's just a slab of Panzerholz and some parts from Tangospinner for now.
Hugh
Thats great thanks, always interesting to see! mike
JW, do you have a link please for the permali material and prices?
Hi,
The chap is Simin Lear, sales@permalideho.co.uk and this is his number, 01452 411607
In terms of cost I think it was less than £400 for 1m square which is the minimum size. It’s enough for 4 plinths though. I think it was £340...I can’t remember. The panzerholz was £150 for 500x500mm so it’s a lot cheaper in the long run. You can’t get the panzerholz now as I’ve previously mentioned...of course Brexit may have had a bearing on the prices. He’s around Gloucestershire I think so if you’re near that may save postage which was £40.
- Home
- Source & Line
- Analogue Source
- DIY linear tonearm