Ralf ... A digital slide rule is a calculator Slide rule - Wikipedia, the free encyclopedia
and the analog CAD is a pencil and paper.
Zene
and the analog CAD is a pencil and paper.
Zene
Colin and all .. I think the most important thing to do is pay attention to Damping Factors of materials. Just because the flavor of the month is Graphite or aluminum does not mean it's optimum in building a good arm and support. Don't believe almost any of the mfg's B.S. or the guys that say their arm sounds great. Think they may say their new baby is cute when it looks like a prune? Yep!
This damping factor values : damping factor values is a good starting place. Notice no metals make the cut. Doing the reverse of high damping will show materials to isolate vibrations where needed. As soon as we start looking at the short arm tangent arm much more seriously instead of how can we make a down and dirty version that sounds fair we can do something great.
You've convinced me that shorter is better (wife looking over my shoulder, laughing) and I'd like to at least antagonize as much as I can.
Zene
Ahh,but Zene, it's just so much more fun to build than debate endlessly, the only real learning will come from execution, I sat and debated a linear arm for 7 years in my head off and on, didn't help much 🙂.
Colin
Colin
In my opinion zene has a point here as does Colin...
Building is mor fun than debating so please experiment and be bold with new materials. 😀
Brgds
Building is mor fun than debating so please experiment and be bold with new materials. 😀
Brgds
Though, however polycarbonate is a somewhat new material to tonearm design, I notice someone selling a rega end stub replacement made of polycarbonate but thats about it. With so much material out there though, we are still stuck at a compromise of rigidity vs damping vs weight. But, we are lucky here, as the arm is much shorter the sonic influence is greatly diminished therefore leaving the largest focus on distribution of mass and the drive system and rigidity of the linear motion and stylus interface.
Colin
Colin
Last edited:
Damping certainly is of importance. There is a reason why bows for string instruments traditionally are made of pernambuco wood (high damping factor). However, wikipedia says that carbon fiber bows have become very popular, and some of the better carbon fiber bows are now comparable to fine pernambuco sticks. So I think I will use carbon fiber.
Wilfried
Wilfried
arm up&running
Hi Guys ,
The arm is up and running here . I had some minor issues to solve with the wiring and getting the arm construction perfect water level . but after all the efforts I have enjoyed a couple LP's already . A Pickering XV15 body with brand new D625 needle to give it a shot 😀 1.7 Gram tracking force at this moment . well.. everything works flawless !! i.e. NO tracking issues and not a sign of other problems too . this arm just works great when using the suggesting materials , weight , lenght etc. also the bearings are following the cart perfectly smooth . very nice soundstage and Freq. extentions . steady lows and indeed DEEP .. but also voices and microdetailling is just as good as my better gymbal arms are up to . So .. happy as can get and now it's time to have it settle a little bit givin the new needle etc.
A huge thanks to everyone of course , especialy Colling who shared his ideas and knowledge with us DIY community !!
More to come soom ..
THX
Paul
Nice SW...
Still gathering parts for miself.
So vynuhl.adict gave us an arm - what about the rest?
Miself I have one Lenco 75 that I'm willing to sacrifice - my head system is not to be touch though - also a Lenco 75 a bit trimmed.
How do we get the rest of our players to get the maximum out of VA's arm? Am I expected to glue the arm to the chassis as the motor is already hanging on it or should the arm be outside the platterworks?
Brgds
Last edited:
Polishing my rod
I'd like to request of Chris that he post a photo, or three, of the details of his tonearm mount. Chris, why the offsets of the three leveling screws on the mounting washers? What happens underneath the top washer?
As to 'rod polishing' (ahem!) there maybe a cautionary tale here? The photo of the "ground & annealed" 17-4 SS rod shows on the right side about 15 minutes of hand polishing. Obviously the rod wasn't ready for prime time. Another photo shows a section of the rod in my drill press for more extensive work. More details later. My cache of 10mm borosilicate tubes certainly would make things easier.
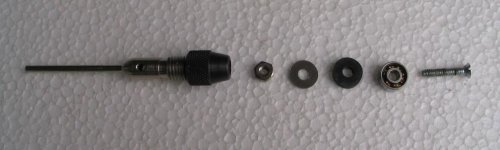
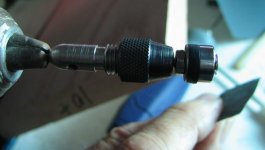
How about 'bearing edge polishing'? My ACER ceramic bearings under magnification of a x10 loupe showed quite a bit of machine tool marks on the edges - seemingly not good. I'd already removed the dust covers of the bearings, but decided to polish the edges anyway. The secret of the polishing jig was the rubber washer - see photo. There's a photo of the jig mounted in my hand drill, in a vise.
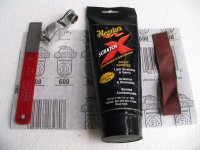
Under scrutiny of the x10 loupe (shocking, just shocking) I used a four-stage process: 'fine' diamond honer, 600 grit sandpaper, auto polish, and rouge on leather. See photo. Time consuming, yes! Nothing like 'rod polishing' though.
I only polished one side of each bearing - and they look very nice now. I rounded the top edge a bit too. Whether this is needed I have no clue. The x10 loupe is merciless, getting a mirror finish is not trivial ... I can't give up on the SS rod now. Too much time involved.
I'd like to request of Chris that he post a photo, or three, of the details of his tonearm mount. Chris, why the offsets of the three leveling screws on the mounting washers? What happens underneath the top washer?
As to 'rod polishing' (ahem!) there maybe a cautionary tale here? The photo of the "ground & annealed" 17-4 SS rod shows on the right side about 15 minutes of hand polishing. Obviously the rod wasn't ready for prime time. Another photo shows a section of the rod in my drill press for more extensive work. More details later. My cache of 10mm borosilicate tubes certainly would make things easier.
How about 'bearing edge polishing'? My ACER ceramic bearings under magnification of a x10 loupe showed quite a bit of machine tool marks on the edges - seemingly not good. I'd already removed the dust covers of the bearings, but decided to polish the edges anyway. The secret of the polishing jig was the rubber washer - see photo. There's a photo of the jig mounted in my hand drill, in a vise.
Under scrutiny of the x10 loupe (shocking, just shocking) I used a four-stage process: 'fine' diamond honer, 600 grit sandpaper, auto polish, and rouge on leather. See photo. Time consuming, yes! Nothing like 'rod polishing' though.
I only polished one side of each bearing - and they look very nice now. I rounded the top edge a bit too. Whether this is needed I have no clue. The x10 loupe is merciless, getting a mirror finish is not trivial ... I can't give up on the SS rod now. Too much time involved.
Attachments


Paul,
I'm more than happy to offer this idea to all interested!.I was going to sit on it but felt it be a great disservice to us crazy diy nuts to not offer something that performs this well since my start began here on DIY and led to working with Hugh Dean of AKSA on the Soraya up to the Maya power amps. So to give back to this forum has been a pleasure in search of audio nirvana 🙂.
Colin
Last edited:
John ASLR:
Diy is a fun way to get great performance for not much money using some manual labor.
I had posted a few weeks ago about my thoughts on the carriage support using tungsten carbide rod.
Unless you have accurate measuring tools sanding, polishing etc.to make the carriage support " look nice " is not enough. This is the most critical part of this design, IMHO. To get a metal rod perfectly round, straight, without micro peaks and valleys is extremely difficult. The carriage must ride free of any imperfections if the best performance is desired. I am sure you can get the arm to work ok using your method but will not be optimal. Depending on your expectations and budget tungsten carbide should be on your possible materials list. For those who tuned in late let me give the virtues of using tungsten carbide rod:
1. Super hard ( 90+ Rockwell hardness--used for cutting glass and machine cutting tools. Comes in all diameters, metric and English.
2. Centerless ground and polished to .0005 inch.
3. Leaves you free to concentrate on the carriage and arm design.
This material is expensive but in my opinion worth it. Unless you find a precision tubing company that grinds and polishes ceramic or glass ( which will also be expensive ) a tungsten carbide rod may be the best choice.
Keep and eye on ebay under " tungsten carbide blanks " I bought a 12" long by 1/2" diameter rod for around $70. It will be hit and miss but keep looking.
Using any extruded material that is not hard, factory ground and polished is pretty large compromise IMHO.
Joe
Joe,
Out of interest, what does a 70 dollar tungsten rod do better than a 10 dollar glass tube?.
Colin
Out of interest, what does a 70 dollar tungsten rod do better than a 10 dollar glass tube?.
Colin
...
So vynuhl.addict gave us an arm - what about the rest?
Miself I have one Lenco 75 that I'm willing to sacrifice - my head system is not to be touch though - also a Lenco 75 a bit trimmed.
How do we get the rest of our players to get the maximum out of VA's arm? Am I expected to glue the arm to the chassis as the motor is already hanging on it or should the arm be outside the platterworks?
Brgds
I believe I will put the arm outside the TT as the only coupling should be thru the needle and record. Any thoughts folks?😕
Brgds
Last edited:
Turbon,
On my TT design only the platter bearing and arm mount share the same upper plinth, the motor is isolated on I own plinth below to eliminate any motor induced noise which is sunk Into a constrained layer.
Colin
On my TT design only the platter bearing and arm mount share the same upper plinth, the motor is isolated on I own plinth below to eliminate any motor induced noise which is sunk Into a constrained layer.
Colin
arm mount
Some people seem to wanna know what methode should be used to mount the arm construction onto their TT .
I think that this is strongly depending on the turntable construction in the first place .. I put my arm on a lenco Multilayer birchply plinth that weighs
over 25 KG in total . also I used a PTP2 Multi arm plate that can be found
on the Lencoheaven forum . this thing is absolutely dead and a good absorber for mechanical resonances . another detail is that I only use this plinth as a support for the platter bearing and tonearm mount via armboard ... the platter is driven by a remoted direct drive quartz controlled TT via filament wire . so I don't need to manage motor and or mechanical vibrations of any kind on my heavy lenco deck due to the absence of a motor etc.
This realy works out very good for me . and enjoy an abolute good sound free
of any rumble whatsoever . will show some details at a later point .. I'm way too busy at the moment but will provide more details here asap.
Collin , thx again for this great sounding tonearm . I'm already start building
a second one , that is of another .. more riggid contruction .. I wanna hear the differences between a single side mount system vs two sided bar contruction . curious !
THX
Paul
Last edited:
i.e.
I can realy HIT my TT plinth without any jumps of the tonearm itself !
but I do have some audible feedback when knocking the glass tube during playing a record . no wonder of course .. but this might be something to work on in the future .. further damping of the arm construction itself .
I can imagine that a lightweight or suspending TT can become a nightmare with this tonearm regarding decoupling etc.
I think that expirimenting can do magic , and tells you more than any theory books can tell .
THX
Paul
Last edited:
I am not confident in my audio memory and I did break the cartdridge but I feel that the steel bar compared to my current glass tube did give a tighter bass and better definition.Joe,
Out of interest, what does a 70 dollar tungsten rod do better than a 10 dollar glass tube?.
Colin
As I said its a poor comparison so far but I wonder if anyone else has compared the 2.
The hobby shop has a 10mm stainless steel rod just the right size that might be worth a try.
Kffern
Ps. The tubes I bought off fleabay work fine. I will have a few spare which I might get rid of at cost (A$ 3.0 each plus post) so ppm if interested.
Last edited:
Colin (or anybody else who knows),
Just getting started on one of your arms. Forgive me if this is a repeat question. What diameter of rod do you use inside the 10mm tube? I'm having difficulty finding O-rings that fit both.
Also, to support the glass, I'm not sure if I'll use Aluminum, Maple or Corian. Does anybody have any thoughts on the sounds created by these materials?
Hugh
the other arm in progress here , will use 10MM diameter Duran glass tube , but decoupled to a stainless bar ( larger diameter ) by using rubber grommets . will show details later as I must recharge my cam battery first .
no experience other than polycarbonate as I used with my first arm approach .
perhaps I'll try some softer polymer plastic soon as well .
Paul
no experience other than polycarbonate as I used with my first arm approach .
perhaps I'll try some softer polymer plastic soon as well .
Paul
- Home
- Source & Line
- Analogue Source
- DIY linear tonearm