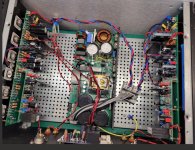
I turned it around and Its working now.Now the current is about 40mA per rail.before it was about 190mA.
So the drivers dont get hot now.
I was worried there for a while... 🙂
So the drivers dont get hot now.
I was worried there for a while... 🙂


Ready .
8 hours today.
All fixed with temperature
sitting steady at 40 degrees Celsius.
left the lids and legs to
finish this build .
Thanks to the Wolverine team for this great design
8 hours today.
All fixed with temperature
sitting steady at 40 degrees Celsius.
left the lids and legs to
finish this build .
Thanks to the Wolverine team for this great design
https://www.ebay.com/itm/2746968502...6hZKYH3lMTbxcpski+wlHblgY=|tkp:Bk9SR4i5iI20ZQ
it's for testing, since I didn't have anything else here 10mf.
and yet they play quite well,
(I certainly don't have a yardstick for comparison)
I have some other options in mind, I'm looking for them
it's for testing, since I didn't have anything else here 10mf.
and yet they play quite well,
(I certainly don't have a yardstick for comparison)
I have some other options in mind, I'm looking for them
Hi Minoas, be careful where you place the input caps. We had issues when we were laying out the board, as the input cap(s) were acting like "aerials". We detect this type of distortion when we were testing the amp and had to orientate the caps differently on the PCB to get better results.
Yes, but you need to add the 9.1k resistor in parallel with R17 on the Input (IPS) board. Do not forget to remove that 9.1k resistor before applying full rail voltages. I just did this and it works extremely well.
Mount the IPS board and solder in the outputs. You can solder in just one of each type, NPN and PNP, but you must measure from emitter to emitter to adjust bias. If this doesn't make sense, just mount them all and measure from the two test points.
I've been listening to my just completed Wolverine EF3-3 amp. Sounds great through my Magnepan 2.7i speakers.
Many of you helped me along the long way I took to crossing the finish line and I really thank you. Even with that help I got stuck. RickRay came to the rescue and offered to look at my boards. I shipped the amp off to him and he got to work. You may have seen some of this postings. What came back to me was a working amp. I can't thank RickRay enough, he went above and beyond.
This kind of team support is what makes the diyAudio forums so rich.
I also thank the design team that made all this possible. Incredible work and diligence.
Now back to the music.
Attachments
@Mainframe
Moving discussion here.
I see that there is no soft start board included with the kit purchase. I will get one with the W12 PSU though, but it's probably not good for this specific build as it's supposed to be used with the class A amps.
This is the one I will get with the PSU:
C1: 3300pF, X1 safety rated (Digikey: 399-9513-1-ND)
TH1: CL-60 (Digikey: KC006L-ND)
TH2: same as TH1

Is this good enough or should I be looking somewhere else? Much appreciated!
Moving discussion here.
I see that there is no soft start board included with the kit purchase. I will get one with the W12 PSU though, but it's probably not good for this specific build as it's supposed to be used with the class A amps.
This is the one I will get with the PSU:
C1: 3300pF, X1 safety rated (Digikey: 399-9513-1-ND)
TH1: CL-60 (Digikey: KC006L-ND)
TH2: same as TH1
Is this good enough or should I be looking somewhere else? Much appreciated!
This is probably one of the most rewarding remarks in this forum/thread and I certainly agree with the tremendous support in order to get this baby up and running. Needed quite some support as well and i'm enjoying every bit of it on a daily basis. Nice going Rickray and Chiptech.......👏RickRay came to the rescue and offered to look at my boards.
Last edited:
I like that soft start inrush board by Rhthatcher. Some folks may prefer a more complex soft start like Mark Johnson's H9KPXG, that bypasses the thermister after inrush current has passed.Is this good enough or should I be looking somewhere else? Much appreciated!
Yeah, soft starts are really up to you. There are so many available so pick your favorite. Everyone has their preference.
I used the hypex soft start because it has some housekeeping functionality - low voltage to a start switch, bi-derectional LED for standby/on, unfortunately no 12V trigger input but I made it work with a little 12V relay switching a normally closed contact in series with a normally closed front switch. (oddly, breaking the circuit turns the amp on)
https://www.diyclassd.com/products/diy-components/smps/softstart-module
Docs: https://www.diyclassd.com/media/d6/7f/50/1700253602/Softstart_02xx_R4.pdf
- Home
- Amplifiers
- Solid State
- DIY Class A/B Amp The "Wolverine" build thread