I meant the machine.
Also, do you have clamps that hold the work against the fence, not the base? As shown, the blade is applying what amounts to twisting forces on the clamp.
I try to avoid any setup that might conceivably allow the work to close on the blade. Even if the cut is safe, the squareness and finish may suffer.
E

Re: Definately A.
Not according to my manual. It clearly shows pictures of angle being cut as in 'B', which minimizes the cross section being cut at any instant.
ekd said:Definately A.
Not according to my manual. It clearly shows pictures of angle being cut as in 'B', which minimizes the cross section being cut at any instant.
Go with the manual...
And go with God...
I retract my suggestion... and you will never see me make that cut. I'm relying on my experience with all kinds of material, in all thicknesses.
If you want to see why... place a thin piece of angle in that setup, and cut it too quickly. Heck, just clamp it in, and try to pull it out... B will work fine if clamped against the fence, but against the base, there is no solid indexing. Fit and finish will suffer, and the chances of shifting are multiplied.
Worrying most about the cross section is only important if the machine has too little power, has a dull blade, or is being fed too quickly.
Try them all w/o power, and attempt to shift them with your hands, in the direction the cut will apply it's force. Go with what that teaches you. Do NOT listen to me...
E
Upon further thought, I have decided that the best advice is...
DO NOT use a tool that is not specifically designed for the material used, DO NOT spit into the wind, DO NOT tug on Superman's cape, and DO NOT mess around with Slim...
🙂
Ok, I updated my model. I've added round ventilation holes instead of slots. Man, is this GF2 Pro slow! I can't even decently orbit around the model, it's just start shocking, horrible...
Anyway, I've got another problem now. I don't know what style I like most 😛. On the left side you see from inside to outside: 6mm - 5mm - 4mm hole, on the right side: 5mm - 6mm - 7mm. I don't think that the smaller holes on the left will be a problem, there's more than enough of them to allow vertical air movement.
Oh btw, ekd (or whoever it was who proposed the following, can't remember who it was), I tried it with holes above the cooling fins too, but I really didn't like that. I find that the sudden appearance of the cooling fin in the hole disturbs the "unity", the "slickness" of the chassis. Well, I don't know how to say it, but maybe you understand what I'm trying to say 🙂.
So, tell me, what style do you guys like most 🙂?

This is how I set 'em up.
Clamped (at both ends) directly opposing the forces to be applied. With the overhead clamp, and the B config, you are relying on the traction between the base and the piece to oppose the cut. With this alternative, you will have to tear the fence off (or strip out the threads on the clamp) to allow even the slightest shift. Neither is very likely...
A good, slow, and steady feed will not reveal any problems with any of these setups. But one distraction, or anything that causes even a momentary overfeed, and this will become all too clear.
What does your manual suggest when the material is flexible enough to be crushed (or even very slightly deformed) by the clamp?
Want to have some real fun? Try a fast cut on a piece of heavy, large dia. tube in an overhead clamp setup. Then, let us know which room you are in, and whether you are allergic to any kinds of flowers.
Again, go with the manual. If they can cover all conditions, and materials, with a couple of sentences, they can cover all expenses with a couple of checks. That'll fix everything, right?
E
Attachments
Re: 1 vote for the left...
Well, it's certainly going to be fun: 29 holes x 3 x 2 for each pannel, 2 pannels. Hmm, 348 holes, that's going to be a lot of fun... 😀.
Yeah, I looked at it again and left seems better indeed 🙂. There won't be problems with those hole sizes with vertical air movement, right?ekd said:Re: 1 vote for the left...
🙂
E
Well, it's certainly going to be fun: 29 holes x 3 x 2 for each pannel, 2 pannels. Hmm, 348 holes, that's going to be a lot of fun... 😀.
Bored yet?
I'm not beating a dead horse here, am I?
I just don't ever want to think that I had any hand in costing someone a body part/function. Even if I am technically correct, and simply didn't com it well... So,
My experience is all gained using heavy duty tooling. I have no experience with the kinds of tools that can be safely stalled by overfeeding. The stuff I learned on could "follow you home".
Seems to me that the real danger of these tools comes in having a lot of success with them, developing good methods for them...
And then buying a good one, and having it "collect" you.
The best way to make the cut first proposed would be to use the B config (for the reasons T stated), horizonally clamp it only as firmly as the material will take w/o flexing, and then vertically clamping it as firmly as possible. The fit and finish will be superb. Safety wll be at max. Satisfaction as well...
E
"There won't be problems with those hole sizes with vertical air movement, right?"
Nah. Just opening the trap covered it.
I like the right, too. The proportionally sized holes look better than one size. Either way.
Your drawing skills sure make this forum stuff easy, huh?
E
Nah. Just opening the trap covered it.
I like the right, too. The proportionally sized holes look better than one size. Either way.
Your drawing skills sure make this forum stuff easy, huh?
E
Re: Definately A.
E,
Sorry I misunderstood the question. The saw is a CRAFTSMAN from SEARS department store.
2.5HP
10" Blade
4500 R.P.M.
Compound Mitre Saw
Crosscut: 2-5/8" x 5-11/16"
Mitre 45 R. & L 2-7/8" x 3-1/2"
Bevel 45 L 1-9/16" x 5-11/16"
Compound 1-9/16" x 3-1/2"
It does not have the side clamps you mentioned. May be they can be purchased as accessories?
You seemed a little bit touchie with T, everybody just trying to help don't take offends please,, and thank you for your input.. all newbies reading this thread will benefit I hope..
Regards,
Chris
ekd said:Brand of saw?
E [/B]
E,
Sorry I misunderstood the question. The saw is a CRAFTSMAN from SEARS department store.
2.5HP
10" Blade
4500 R.P.M.
Compound Mitre Saw
Crosscut: 2-5/8" x 5-11/16"
Mitre 45 R. & L 2-7/8" x 3-1/2"
Bevel 45 L 1-9/16" x 5-11/16"
Compound 1-9/16" x 3-1/2"
It does not have the side clamps you mentioned. May be they can be purchased as accessories?
You seemed a little bit touchie with T, everybody just trying to help don't take offends please,, and thank you for your input.. all newbies reading this thread will benefit I hope..
Regards,
Chris
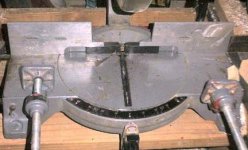
chris ma said:From the back of the mitre saw to the front, which way to lay the L angle stock for cutting is the best way , A, B and C?
Thanks,
Chris
I usually do B and never use a clamp.
But again, I'm cutting a lot😉
Mitre cuts are usually not accurate, and I'm doing final trim on table saw with 90deg mdf corner for proper alignment. Also in B position, as my blade doesn't raise that hight for 2" angle. Without any clamp, I imagine it's the safest position.
Chris, I'm betting that the existence of the mounts for the side clamps is an indication that they may be available. Heck, the ones from my Makita look like they'd work on yours.
T, everyone, -please- don't think I am jumping on anyone. What is displayed here is my reaction to the possibility that I might cause an injury (or even start habits that eventually do).
I am accutely aware of my lack of com skills in this medium, and just a bit frustrated by the fact that in person (especially with a part or process to display), I can actually appear (for some time) semi-articulate, and somewhat knowledgable.
I also get a bit peaved at the guys who write manuals. Simplistic is one thing...dangerously vague is another. .250 thick angle will clamp strongly and cut beautifully in B comfig, .062 could be jerked, by hand, right outa that setup. Try it.
And if anyone thinks that because it's thin it doesn't need to be securely clamped?... imagine if the power is interupted for a second during a deep cut. Let's say just long enough to grab the part... and then comes back on.
Chris, thanks for making this clear to me. Hope my position is too?
T, you did the right thing by pointing out what may be in many manuals. My experience varied, that's all... 🙂
E
Peter, just saw your post. I agree. Without clamps B is it. In fact, this is the perfect example of a need to present minimum surface area to the blade.
Chris
Measure the hole highlighted in the pic. If it is .700" ID or bigger, the Makita clamps will work. They have a really neat quick-release feature that makes fast one-handed clamping a breeze.
And until you can clamp in both planes, don't do large tubes without a V-block.
Enough of my pedantic crap... let's have a brew... 😀
E
Well, I though some more about it and I think the left ones will be a lot nicer in real life because the heatsink fins become smaller the more they get to the outer edge. I also find that the left style makes the chassis look thinner, more elegant, while the right one makes it look somewhat bulkier.ekd said:I like the right, too. The proportionally sized holes look better than one size. Either way.
Your drawing skills sure make this forum stuff easy, huh?
E
There aren't too much skills involved, well, except for the skills I needed not to become frustred by the slow 3D card 😉. But I agree that it's a lot easier to make things clear.
If I could draw like that...
My posts would consist of beautiful drawings, points, and grunts...
Better for everyone, and so much more like my life... 🙂
I know what you mean. Elegance is what I always aspire to. Couldn't translate it in under 2000 words, but I know what you mean. You have an eye for this...
E
My posts would consist of beautiful drawings, points, and grunts...
Better for everyone, and so much more like my life... 🙂
I know what you mean. Elegance is what I always aspire to. Couldn't translate it in under 2000 words, but I know what you mean. You have an eye for this...
E
You're gonna hate me for this, but...
Maybe consider disappearing the front fasteners? Sinking the top ones?
Heck, as long as it's all virtual, we can set flawless diamonds along the face?
Sick of me yet, D? 😀 It's OK, you can say so...
E
Maybe consider disappearing the front fasteners? Sinking the top ones?
Heck, as long as it's all virtual, we can set flawless diamonds along the face?
Sick of me yet, D? 😀 It's OK, you can say so...
E
Question.
How do you convert drill bit numbers ? For example, to tap 4-40 and 6-32 threads I need bit # 43 and 36 . I went out and bought a DeWalt drill bit kit but they aren't numbered in the same way 😕
How do you convert drill bit numbers ? For example, to tap 4-40 and 6-32 threads I need bit # 43 and 36 . I went out and bought a DeWalt drill bit kit but they aren't numbered in the same way 😕
Re: You're gonna hate me for this, but...
Please go on 🙂.
I plan on countersinking all the bolts & screws. I'll update the model one of these days 🙂.ekd said:Maybe consider disappearing the front fasteners? Sinking the top ones?
Heck, as long as it's all virtual, we can set flawless diamonds along the face?
Sick of me yet, D? 😀 It's OK, you can say so...
E
Please go on 🙂.
- Status
- Not open for further replies.
- Home
- General Interest
- Everything Else
- Cutting, drilling, mounting etc. for the absolute beginner