Cubie 3 PSU is OK for Cubie 2 amp and +/-25V is OK for Cubie 2 but with that voltage the 160VA power transformer will suffice just for one channel - Cubie 2 is a class A amp and the bias should be raised to 1A.
I would rather use that transformer for lower power version of Cubie 3..
I would rather use that transformer for lower power version of Cubie 3..
Hi juma,
I choose cubie 2 because I have PCB which is 95% of cubie2.
To convert the PCB to cubie3 is not easy and may not have enough space on PCB to host the extra components.
Is there anyway to run cubie 2 with one single transformer of 160VA?
Regards,
Tat
I choose cubie 2 because I have PCB which is 95% of cubie2.
To convert the PCB to cubie3 is not easy and may not have enough space on PCB to host the extra components.
Is there anyway to run cubie 2 with one single transformer of 160VA?
Regards,
Tat
It can be made to work but it will work poorly - your transformer has too high secondary voltage and lower power core so it can not deliver enough current. Amp will sound bad and you will blame the designer...
If you insist on using that transformer for Cubie2, rewind the secondaries to 2 x 13V AC with thicker wire and double the capacity in PSU (leave the cap. multiplier out).
If you insist on using that transformer for Cubie2, rewind the secondaries to 2 x 13V AC with thicker wire and double the capacity in PSU (leave the cap. multiplier out).
Thanks for your advice. I will build cubie3. Rework the PCB is easier to me than rewire the transformer.
Hi volavola,Hi Juma
Can I use the sk 1530/sj201? Because I don't find the sk1058/sj162
Regards
Stefano
yes, you can use k1530/j201 with 0R33/5W source resistors added. Also, Q13 has to be changed to bd139 (or similar) and mounted on the main heatsink together with k1530/j201. Raising the output stage bias current (P1) to at least 0.5A is recommended. I tested them and I like k1058/j162 more. Use k1530/j201 only if you are sure that you know what are you doing - there are behavioural differences between those two types of MOSFETs.
You can easily buy k1058/j162 here:
NEDIS Webshop | Your partner in consumer electronics and accessories
NEDIS Webshop | Your partner in consumer electronics and accessories
or in many others reliable online shops.
Cheers !
Hi everybody
I found a couple of k1058/j162. I convinced that k1530/j201 are lateral. I'll use them for psu. Thank you
I found a couple of k1058/j162. I convinced that k1530/j201 are lateral. I'll use them for psu. Thank you
it's the way they are manufacturered.
The lateral has the Source attached to the backplate and the other layers are on top of that source layer. The currents are substantially along the width of the device. i.e. the currents flow laterally.
The vertical has the drain attached to the backplate and the other parts are etched into the drain. It's the downwards etching that gives the vertical arrangement that becomes a Vertical mosFET.
Not a very good idea. In your cap. multiplier you want MOSFETs with high transconductance - IRFP240/9140 are better choice for this duty. Also, they are cheap and abundant. K1530/J201 are not and they will do much better job in some amp's output stage (F4, F5 or similar)... I'll use them for psu...
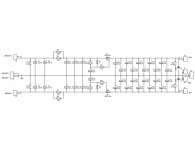
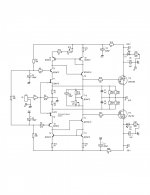
Cubie3 mono blocs
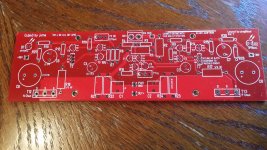
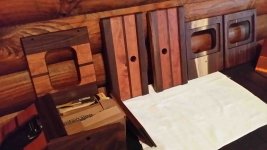
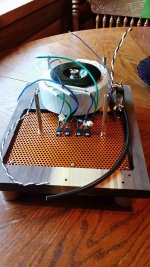
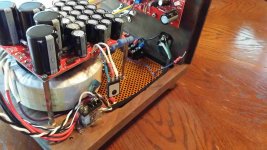
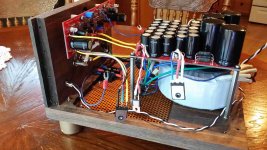
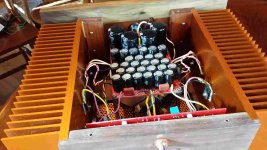
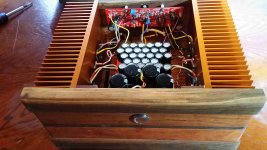
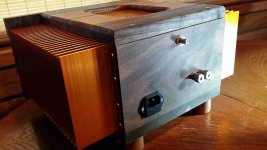
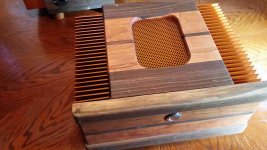
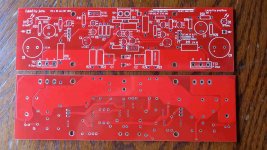
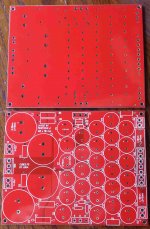
I wanted to build Cubie3 as two mono amps with a nice looking wood enclosure. This project took much longer and cost more than I intended (don't they all?) but I am extremely happy with the results. First, I got a friend to draw it up in his 3D CAD. I drew up a pcb using BD139, 140, as Juma suggested, so that it could do two pairs of LATFETS if wanted. Mine used one pair per channel. I made the pcb the size of an F5 pcb with diy UMS hole pattern, although I would mount it as a mono on the back panel. The heatsinks are HeatsinkUSA 10.08 at 5 inches high. I was going to go taller (it is named Cubie3 after all), but that cost more and 5 inches is plenty of cooling. I found an Anodizing company (Quick Turn Anodizing for those of you in the USA) who does cheap min batch price and used a pretty copper gold dye. A local woodshop glued up the walnut and cherry wood after doing router work. I assembled, drilled screw holes, then disassembled and applied Tung Oil. I drew up and had the cap multiplier pcb's made also. Xfrm is Antek 200VA, AS2230, just in case I would use 2 output pairs sometime. The relay with a 12V coil is so that the amps can be turned on with either a 12VDC outside signal from my preamp or the front round switch. One heatsink will have attached the IRFP240, a load resistor, the Hitachi LATFET and a ground wire.
I wanted to build Cubie3 as two mono amps with a nice looking wood enclosure. This project took much longer and cost more than I intended (don't they all?) but I am extremely happy with the results. First, I got a friend to draw it up in his 3D CAD. I drew up a pcb using BD139, 140, as Juma suggested, so that it could do two pairs of LATFETS if wanted. Mine used one pair per channel. I made the pcb the size of an F5 pcb with diy UMS hole pattern, although I would mount it as a mono on the back panel. The heatsinks are HeatsinkUSA 10.08 at 5 inches high. I was going to go taller (it is named Cubie3 after all), but that cost more and 5 inches is plenty of cooling. I found an Anodizing company (Quick Turn Anodizing for those of you in the USA) who does cheap min batch price and used a pretty copper gold dye. A local woodshop glued up the walnut and cherry wood after doing router work. I assembled, drilled screw holes, then disassembled and applied Tung Oil. I drew up and had the cap multiplier pcb's made also. Xfrm is Antek 200VA, AS2230, just in case I would use 2 output pairs sometime. The relay with a 12V coil is so that the amps can be turned on with either a 12VDC outside signal from my preamp or the front round switch. One heatsink will have attached the IRFP240, a load resistor, the Hitachi LATFET and a ground wire.
Attachments
Cubie3 mono blocs
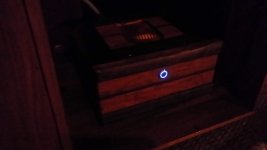
The pcb's are 2 sided, 2 oz., and 2mm thick. After assembling, I set Iq at 1 A. The heatsinks do not get very hot, but I later lowered it to 890mA so that the LATFETS will not be too hot and live a long life. It still should stay in class A up to about 50 watts peak into 8ohms. In dim light the amber LED,s give a warm glow inside the amp. When I first powered it up, it sounded somewhat similar to my Aleph J, so I knew I was in for a real treat. The first thing I noticed is that it has more detail, more control, or as Juma says, finesse. Special thanks to Juma, Nelson Pass, of course for these ideas, and Teabag for help on getting the pcb's made.
The sound? After burning in for a couple of days I sat down for serious listening one evening. My wife says it best, but first a little background. Three months ago she asked, "What are you doing?" "Building an amp." "Don't you already have an amp?" Well, when you go and paint another oil painting, it is not like we have a bare spot on the wall that needs a painting." Then she said, "I guess you just always have to be building something or doing something." Anyway, after playing several songs that evening, she walked into the room and said, "It sounds more real; like they are really there playing." The next morning, she wrote me a note saying, "Thank you for all the hard work you did to provide such beautiful music for our home." Does that describe enough how the Cubie3 amps sound?
Attachments

Making wives happy - that's what it's all about, right ? 😀
You did a great job, glad you like the result
You did a great job, glad you like the result
Very nice project!!
This could be a really nice adition to the diyaudio store portfolio as a high bias class AB amp (no project at the moment) should juma and you agree to share your work.
This could be a really nice adition to the diyaudio store portfolio as a high bias class AB amp (no project at the moment) should juma and you agree to share your work.


Hello Juma, I'm still enjoying my Cubie2 every day!... but was wondering if there was any new amp in the make... are you still using your Cubie3?
Best regards, Berny
Best regards, Berny
Very nice project!!
This could be a really nice adition to the diyaudio store portfolio as a high bias class AB amp (no project at the moment) should juma and you agree to share your work.
Is there anything you want from me besides my permission, which you have? Please explain.
I learned that any submission from juma is going to be very good, and that juma tends to understate his work. Coming from me...this amp sounds extremely good. It is almost eerie how good. More detail than my Aleph J, which I really like, without adding any harshness, dryness, brightness or anything bad. It is addicting to listen to. I do not think anyone who has built the Cubie2 or Cubie3 thinks otherwise.
All that said, I will help anyone else enjoy this amp any way I can. If someone wants the drawing files, PM me and I will email them in pdf format. Too big to post except for the heat sinks, which I am attaching. On these I raised the holes 5mm and changed the dims to inches for a local machine shop to drill and tap holes. However, anyone with a diyAudio store 4U or 5U deluxe or just their heat sinks can use the pcb's that I made, which have a UMS hole pattern like the F5 pcb. I can also give the Gerber files, but I think the cheapest and easiest way for someone is to have a group buy. If I can get maybe 10 or more pairs sold, I could probably be able to sell them for about $25/pair for the amp pcb's and $18/ea for the PS cap multiplier pcb. One PS board with larger caps is plenty for a stereo Cubie3. They both are 2 layer, 2 oz copper and 2mm thick, very well made. Details and sizes are printed on the pcb's. The PS pcb has the D and S reversed for the IRFP9140, so you would just solder the wires to it to the correct place, but new pcb's will be have correct lettering there. I will explain more later. Let me know if I can help any other way.
Attachments
Hello Juma, I'm still enjoying my Cubie2 every day!... but was wondering if there was any new amp in the make... are you still using your Cubie3?
Best regards, Berny
Hi Berny,
glad you enjoy the music daily ! 🙂
There's been more stuff since Cubie3, it will be published eventually...
All the best !
- Home
- Amplifiers
- Pass Labs
- Cubie3