Correct BOM for freebird
C1 47uf CPOL-EUE2,5-6E E2,5-6E rcl 1
C2 47uf CPOL-EUE2,5-6E E2,5-6E rcl 1
C3 100nf C-EU050-030X075 C050-030X075 rcl 1
C4 100nf C-EU050-030X075 C050-030X075 rcl 1
C5 20pf C-EU025-030X050 C025-030X050 rcl 1
C6 10pf C-EU025-030X050 C025-030X050 rcl 1
C7 47uf CPOL-EUE2,5-6E E2,5-6E rcl 1
C8 100nf C-EU050-030X075 C050-030X075 rcl 1
C9 47uf CPOL-EUE2,5-6E E2,5-6E rcl 1
C10 100nf C-EU050-030X075 C050-030X075 rcl 1
C11 20pf C-EU025-030X050 C025-030X050 rcl 1
C12 10pf C-EU025-030X050 C025-030X050 rcl 1
IC1 OPA627P OPA627P DIL08 burr-brown 1
IC2 OPA627P OPA627P DIL08 burr-brown 1
J1 J7MM J7MM 07 jumper 1
J2 J7MM J7MM 07 jumper 1
JP1 PINHD-1X3 1X03 pinhead 1
JP2 PINHD-1X2 1X02 pinhead 1
JP3 PINHD-1X2 1X02 pinhead 1
JP4 PINHD-1X2 1X02 pinhead 1
JP5 PINHD-1X2 1X02 pinhead 1
R1 4.7K R-EU_0207/10 0207/10 rcl 1
R2 1K R-EU_0207/10 0207/10 rcl 1
R3 100K R-EU_0207/10 0207/10 rcl 1
R4 1K R-EU_0207/10 0207/10 rcl 1
R5 10R R-EU_0207/10 0207/10 rcl 1
R6 1R R-EU_0207/10 0207/10 rcl 1
R7 1K R-EU_0207/10 0207/10 rcl 1
R8 1K R-EU_0207/10 0207/10 rcl 1
R9 100K R-EU_0207/10 0207/10 rcl 1
R10 10R R-EU_0207/10 0207/10 rcl 1
R11 4.7K R-EU_0207/10 0207/10 rcl 1
R12 1R R-EU_0207/10 0207/10 rcl 1
Russ, are you referring to the beer "Lambik"? Didn't knew you had this in the States!?
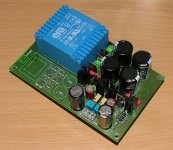
As you can see I'm not very far with the boards. The 100nf cap's I have are all with a pitch of 7,5mm. I ordered them together with some resistors that I also was missing. I hope I will have them before the weekend.
Regards
As you can see I'm not very far with the boards. The 100nf cap's I have are all with a pitch of 7,5mm. I ordered them together with some resistors that I also was missing. I hope I will have them before the weekend.
Regards
Attachments

Yes, the very thing! One of my very favorite styles. 🙂 Always a new adventure with Lambik. 🙂 You can indeed get it here, but not as wide a variety as I would like. 🙁GeWa said:Russ, are you referring to the beer "Lambik"? Didn't knew you had this in the States!?
Cheers!
Russ
You can indeed get it here, but not as wide a variety as I would like.
Well, maybe you should consider moving to Belgium than because we got lot's of it!🙂
Back to topic: just two more resistors and the power supply is finished.
Regards
Attachments
quick question for russ..
Excuse me for butting in like this - russ - how do you print the silkscreen side of your homemade boards? is it just the 'press and peel' stuff used after etching?
cheers
jim
Excuse me for butting in like this - russ - how do you print the silkscreen side of your homemade boards? is it just the 'press and peel' stuff used after etching?
cheers
jim
Re: quick question for russ..
Hi, glad to answer, its really pretty easy, you print the component side mirrored on inkjet photo paper(JetPrint premium glossy Photo from wal-mart works best) with a laser printer and then iron it onto the component side of the board.
You need a piece of plain paper between the photopaper and the board because the back of the photo paper will get sticky with heat as well as the front.
When you are done ironing on high for about 2 minutes run the board paper side up under cool/warm water until it is a little warmer than room temp, then pull the paper off.
That method works pretty good for me. Even better than the boards you see here as I rushed those a bit, and I have perfected my technique a little more since then. As with anything practice makes perfect er well better anyway. 🙂
Cheers!
Russ
blurk99 said:Excuse me for butting in like this - russ - how do you print the silkscreen side of your homemade boards? is it just the 'press and peel' stuff used after etching?
cheers
jim
Hi, glad to answer, its really pretty easy, you print the component side mirrored on inkjet photo paper(JetPrint premium glossy Photo from wal-mart works best) with a laser printer and then iron it onto the component side of the board.
You need a piece of plain paper between the photopaper and the board because the back of the photo paper will get sticky with heat as well as the front.
When you are done ironing on high for about 2 minutes run the board paper side up under cool/warm water until it is a little warmer than room temp, then pull the paper off.
That method works pretty good for me. Even better than the boards you see here as I rushed those a bit, and I have perfected my technique a little more since then. As with anything practice makes perfect er well better anyway. 🙂
Cheers!
Russ
Russ,
Would there be any reason not to stack the yardbirds on top of each other?
I've got access to one of these cases (1434-16)
http://www.hammondmfg.com/dwg21.htm
Everything looks like it will fit nicely in there...
How much clearance should I have between the toroid and the boards?
Regards,
Michael
Would there be any reason not to stack the yardbirds on top of each other?
I've got access to one of these cases (1434-16)
http://www.hammondmfg.com/dwg21.htm
Everything looks like it will fit nicely in there...
How much clearance should I have between the toroid and the boards?
Regards,
Michael
maf_au said:Russ,
Would there be any reason not to stack the yardbirds on top of each other?
Michael
There is no reason it would not work. 🙂 1/4" clearance or more should be plenty. Just be sure you don't bias the buf634 too much so it does not generate much heat. A 500R to 1K resistor for bias should work fine.
Not all torroids are created equal, but I usally try to keep the PS between the preamp boards and the torroid. Or, something like 30-50mm at least. But if it is a nice quiet one you may be able to put it closer, you often have to experiment to get a good feel for whether a given trafo will cause any nasty noise or not.
Cheers!
Russ
Which Pre ?
Hi Russ,
I'm looking to build 2 pre-amps one for my Mauro REV A and one for a pair of monoblocs built on Peter Daniel's 3875 boards I've been watching this thread with keen interest also your earlier thread on opamp pre using OPA627s and Buf364
I now have 2 questions as follows
1) In your opinion which of the 2 preamp designs(627/buf or freebird) would work best with each of my power amps?
2) Do you plan to offer boards or even kits for either / both the preamps? (etching my own boards is just a step too far for me right now since finding components / chemicals etc is difficult here in Abu Dhabi)
I'd be very interested in hearing your opinion and that of others.
Thanks and best regards,
Dave.
p.s. I'm interested in REV C monobloc kits but really must finish my current projects first!
Hi David,
As a pre-amp the freebird design is what I would choose for each of the designs you mentioned. In fact, it is what I use for the REV A amp I have in my living room. 🙂
If you had a naked IGC(no buffer) the yardbird would be better, the designs you mention are not that topology.
Really the yardbird is a great headphone amp, but a little overkill for a preamp because most amps don't really need 150ma current on input, but for those that do (bare IGC for one) it works great.
I do plan on offering both PCBs and kits(freebird and yardbird), but only after I get some feedback from the group of beta testers I sent PCBs to. 😀
I have already cleaned up a few things on the board (mostly just silkscreen stuff).
I would anticipate a GB in the next month, maybe less.
Cheers!
Russ
Hi Russ,
thanks for the very quick response and for your advice, count me in for the Freebird GB when you set it up.
mmm a month - might just get my chassis for Mauro rev A completed by then!
cheers
Dave.
thanks for the very quick response and for your advice, count me in for the Freebird GB when you set it up.
mmm a month - might just get my chassis for Mauro rev A completed by then!
cheers
Dave.
Russ
Do you have an estimate on the future kit for both boards and parts?
I could ofcourse etch them myself but I always seem to get the copperrails unevenlly etched, holes and such.
Do you have an estimate on the future kit for both boards and parts?
I could ofcourse etch them myself but I always seem to get the copperrails unevenlly etched, holes and such.
Soldering...
My soldering is not as good on these boards as it is on a production board, and I'm wondering if there is any special technique I should be using. I found I had a lot of problem getting any solder adhesion to the pcb at all. In the end, I gave the solder pads a light rub with 400 grade sandpaper and things improved. Are they coated with something, or could they have corroded in transit or something?
I'll have a look in my dremel kit, maybe there is something finer than sandpaper to hit those pads with...
I'm using a temp controlled, fine-tip (about 1mm) 48 watt iron, set at 300c, and flux-cored 60/40 0.7mm solder. It's usually a breeze.
Michael
The PCBs will be fairly cheap, I am aiming for $7-$8.00US each(freebird) and probably around $5.00 each ($10.00 a set) for the yardbirds.
I will get a more firm price after I send the gerbers to the manufacturer.
As far as kit prices, I will have to get back to you on that as I have not yet worked up the spreadsheet.
I will likely offer two versions of the kits, one with the opa627s(and buf634s in the case of the yardbird) and one without chips, since the chips are a significant part of the cost, and some folks already have some.
Cheers!
Russ
The boards were sprayed with laquer to protect the copper from oxydizing.maf_au said:Soldering...
My soldering is not as good on these boards as it is on a production board, and I'm wondering if there is any special technique I should be using. I found I had a lot of problem getting any solder adhesion to the pcb at all.
I'm using a temp controlled, fine-tip (about 1mm) 48 watt iron, set at 300c, and flux-cored 60/40 0.7mm solder. It's usually a breeze.
Michael
The laquer actually also forms a sort of a universal solder mask. The trick is to let the iron tip heat the copper pretty well before you apply the solder, because otherwise the solder will flow before the copper is really ready to stick to it. It takes a little practice. Once you get used to it it works really well, and keeps the solder from flowing out of control
Sanding it off won't hurt, but you may want to re-laquer it when you are done to protect the thing from the oxygen.
Cheers!
Russ
Sounds like a very reasonable price 🙂
Count me in, even if I haven't built that much yet I can forsee a bunch of large and small projects that could use a good pre.
Count me in, even if I haven't built that much yet I can forsee a bunch of large and small projects that could use a good pre.
Russ White said:I will fix the component side silk screen too...
Yes please 🙂
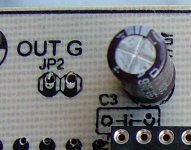
It's a bit hard to guess which resistor goes where, the resistor numbers and values are printed on top of each other.
Reading left to right, I think I make it:
1K
100K
10 ohm
1 ohm
4.7K
OPA627
20pf
---
20pf
OPA627
4.7K
1K
10 ohm
100K
1 ohm
Is that right?
R3 and R4 are to be transposed on the board, but which are they?
Thanks,
Michael
maf_au said:
Yes please 🙂
It's a bit hard to guess which resistor goes where, the resistor numbers and values are printed on top of each other.
Michael
Hi michael, I screwed up when I first laid out the component side, that is why it turned outlike that. I apologize for the confusion.. The production boards will not have that issue. 😀
Use the following values:
R1 4.7K R-EU_0207/10 0207/10 rcl 1
R2 1K R-EU_0207/10 0207/10 rcl 1
R3 100K R-EU_0207/10 0207/10 rcl 1
R4 1K R-EU_0207/10 0207/10 rcl 1
R5 10R R-EU_0207/10 0207/10 rcl 1
R6 1R R-EU_0207/10 0207/10 rcl 1
R7 1K R-EU_0207/10 0207/10 rcl 1
R8 1K R-EU_0207/10 0207/10 rcl 1
R9 100K R-EU_0207/10 0207/10 rcl 1
R10 10R R-EU_0207/10 0207/10 rcl 1
R11 4.7K R-EU_0207/10 0207/10 rcl 1
R12 1R R-EU_0207/10 0207/10 rcl 1
And use the image from post #3 to guide you. 😀
R3 and R4 are correct on the board(and on the image I refer to) they were just not correct in my initial old BOM.
The BOM on post #101 is correct if you need the cap values.
Cheers!
- Status
- Not open for further replies.
- Home
- Amplifiers
- Chip Amps
- completed chipamp pre