Riser Panel Material
Are the riser panels (Riser Panels – diyAudio Store) made from aluminum or steel?
Thanks!
JM
Are the riser panels (Riser Panels – diyAudio Store) made from aluminum or steel?
Thanks!
JM
Hi!
Unfortunately, I am away from my workshop right now and I have time to work on another amplifier design on my CAD program.
I have a 3U Dissipante Chassis with 10mm thick aluminum front panel, 300 mm deep. I would like to know the exact dimensions of the aluminum rear/back panel. I know it is 3mm thick, but I need to know the dimensions in mm of the width and height.
3U version of this:
Rear panel for Dissipante / Deluxe Blank 3mm Aluminum – diyAudio Store
Thanks again!
Anand.
Another nice case and CNC job by Modushop
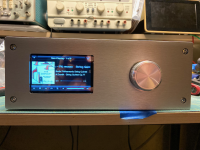
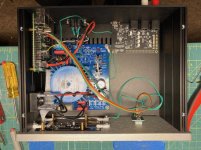
Recently finished a piCorePlayer in a Galaxy 2U chassis. Very fast turnaround on the CNC job on the front panel. Perfectly done. Thanks, guys!
Recently finished a piCorePlayer in a Galaxy 2U chassis. Very fast turnaround on the CNC job on the front panel. Perfectly done. Thanks, guys!
Attachments

Last edited:
Hello,
Could someonekindly give me the hole diameter in the perforated 10 x 10mm bottom grid of the dissipante chassis ?
TIA,
Max
Could someonekindly give me the hole diameter in the perforated 10 x 10mm bottom grid of the dissipante chassis ?
TIA,
Max
Recently finished a piCorePlayer in a Galaxy 2U chassis. Very fast turnaround on the CNC job on the front panel. Perfectly done. Thanks, guys!
Awesome finish, can you point to the display and is it compatible with Pi and all distros like Volumio/Moode or only picoreplayer.
Thanks
The Dissipante 4U is available in 400mm depth. Don't know about the Deluxe. Check their sales page.
Is there not a way to get a Deluxe 4U chassis that's 400mm deep?
The limiting factor is the depth of the heatsinks. It is a standard size in order to standardize the manufacturing process. Though you may check the OEMs actual website (www.modushop.biz)as there are more options available on there.
We do not produce a Deluxe 4U with a 400mm depth. If you are interested in the UMS layout for the 4U 400 chassis feel free to send us a CAD drawing and we can customize the heatsinks in any way you want
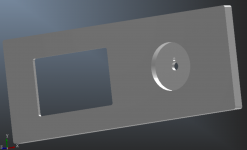
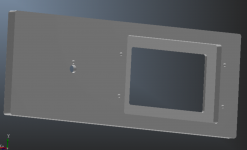
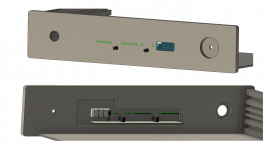
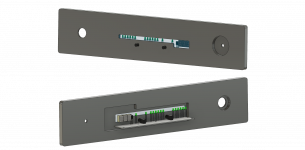
I'm about to finish up the layout of the case and before moving on I would like to ask you what front panel design is more simple, easy to make and cost less between this two (there is a plexiglass in both), forgot to mention is a Slim Line 02/280 10mm front panel:
Attachments
Last edited:
I'm about to finish up the layout of the case and before moving on I would like to ask you what front panel design is more simple, easy to make and cost less between this two (there is a plexiglass in both), forgot to mention is a Slim Line 02/280 10mm front panel:
I made a soekris dac and made something very similar (almost identical) to the first pic. I don’t know what costs more, more holes or plexiglass. I will say, however, you need to check, double check, triple check, and maybe even quadruple check to make sure your drawing layout will work with your soekrs display board and the way it is mounted. There is very little margin of error.
They cost exactly the same as they are both customized on both sides of the panel
Thanks Gianluca, when doing both side of a panel do you suggest to redo anodization after works?
I made a soekris dac and made something very similar (almost identical) to the first pic. I don’t know what costs more, more holes or plexiglass. I will say, however, you need to check, double check, triple check, and maybe even quadruple check to make sure your drawing layout will work with your soekrs display board and the way it is mounted. There is very little margin of error.
Thats's exactly what I'm trying to achieve, a case for the dam1941 with the own display board. As you suggest the margin a tight and that's why I thought about a single hole for the leds and display shaped like that.
What case size did you choose for your build?
Thanks Gianluca, when doing both side of a panel do you suggest to redo anodization after works?
Thats's exactly what I'm trying to achieve, a case for the dam1941 with the own display board. As you suggest the margin a tight and that's why I thought about a single hole for the leds and display shaped like that.
What case size did you choose for your build?
I believe it was the pessante 2U. It turned out pretty good. If you use a cable to connect the dam1941 to the display board it will be a little easier as you wont have to ensure the display and 1941 line up properly when mounted.
Attachments

Thanks Gianluca, when doing both side of a panel do you suggest to redo anodization after works?
In my opinion in your case anodizing the panel after the milling is not really needed because the only part which is going to be drilled from on the front face is going to be covered anyway (recess for the knob).
- Home
- The diyAudio Store
- Chassis Discussion