What are you using to solder this smd board?I don't have solder paste
So you soldered parts by hand?
Valery what are you using for smd soldering?
Last edited:
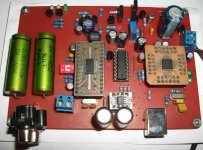
Yes, by hand. This is only the second SMD board I've built. The parts aren't difficult but I didn't like trying to solder the electolytics. Those would be much better as through hole.
Hi Thimios,
I use the flux paste - the picture is >HERE< - and a sharp iron. I also soldered everything by hand so far, electrolytics went pretty much ok - just applied some paste, aligned the pins and touched the edges of the pins - solder goes further, covering the whole pin, as a liquid.
Cheers,
Valery
I use the flux paste - the picture is >HERE< - and a sharp iron. I also soldered everything by hand so far, electrolytics went pretty much ok - just applied some paste, aligned the pins and touched the edges of the pins - solder goes further, covering the whole pin, as a liquid.
Cheers,
Valery
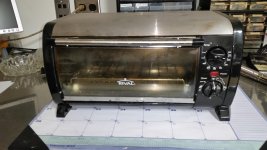
Any cheap toaster oven works. An easy to use temperature dial is a plus as you need to adjust the temperature as it cooks. Digital push button controls are a pain for this. I'll post a picture of my oven when I get to the office.
Yes you cook smd electrolytics. If you look at their data sheet you will see a chart similar to what I posted.
The whole concept of SMT was to speed board production because of little through hole stuffing and one shot wave soldering. The only real learning curve is how much paste to use. You usually use too much and get blobs and bridging on small parts but thats quickly fixed with a solder sucker or some wick. The most time consuming part of assembly I find is digging through all the boxes of parts. I haven't found a way to organize pieces so I leave them in their tape it their shipping bags for labling. It's slow sorting through 100 bags of resistors.
Last edited:
Yes, by hand. This is only the second SMD board I've built. The parts aren't difficult but I didn't like trying to solder the electolytics. Those would be much better as through hole.
I prefer through hole electrolytics too. They are cheaper and take less board space.
This is an expensive solution🙁Hi Thimios,
I use the flux paste - the picture is >HERE< - and a sharp iron. I also soldered everything by hand so far, electrolytics went pretty much ok - just applied some paste, aligned the pins and touched the edges of the pins - solder goes further, covering the whole pin, as a liquid.
Cheers,
Valery
Is the content enough for 2 boards?
This is an expensive solution🙁
Is the content enough for 2 boards?
SMD291AX10 Chip Quik Inc | SMD291AX10-ND | DigiKey
This is paste with solder mixed in. A tube goes forever. It usually dries up and gets thrown out. I don't think I've ever finished one.
High Tech SMD Oven
This is my oven complete with old Sesame seeds and bagel drippings. As my SMD ovens die I reallocate me food duty ovens to SMD and buy a new one for food. Cheap controls are best. It seems the more expensive ones are prone to hard failures in the element drivers and they don't shut off. They grow a layer of goo from the solder smoke that's impossible to clean so they get pretty nasty looking.
This is my oven complete with old Sesame seeds and bagel drippings. As my SMD ovens die I reallocate me food duty ovens to SMD and buy a new one for food. Cheap controls are best. It seems the more expensive ones are prone to hard failures in the element drivers and they don't shut off. They grow a layer of goo from the solder smoke that's impossible to clean so they get pretty nasty looking.
Attachments
Some years ago Elektor published an oven.A modified home use oven, microcontroller controlled .The temperature rises accord to smd heating profile and then the temperature goes down under control.
There isn't an expiration date printed?SMD291AX10 Chip Quik Inc | SMD291AX10-ND | DigiKey
This is paste with solder mixed in. A tube goes forever. It usually dries up and gets thrown out. I don't think I've ever finished one.
I did use the Flux paste from Mouser for the electronics. It is just flux though so I really have no idea how well the solder flowed under the pins. There is only the tiniest tab sticking out past the edge of the part. Not much to get the tip of the iron onto. They feel solid so I'm probably OK. The resistors and small caps were easy. I simply tinned one pad then heated it as I placed the part with tweezers and then soldered the other pad. I have one of those large lighted magnifying glasses to look through. It's a huge help for these tiny parts. I do want to try the toaster oven trick. I will hit some garage sales. Those things show up all the time for cheap.
Thanks
Thanks
Last edited:
This is an expensive solution🙁
Is the content enough for 2 boards?
I think it's enough for a thousand boards or something of that scale 🙂
That is good but i think has a short time life..I think it's enough for a thousand boards or something of that scale 🙂
There isn't an expiration date printed?
All I've ever seen is a fill date on the tube. I run it until it become too thick to pump out without getting huge blobs of it. That's usually a year or two. The little needle needs to be flushed out every time you use it. I've got a gun coming today to put the syringe into. That might make it a little easier to control.
iirc you are to refrigerate solder paste, to extend its shelf life.
iaef, read the specs.
jeff, since you like your manual control, having a thermo-couple is really nice to have. Another reason to build a good temp meter.
In the past. we used to use tape a number of thermo-couples on a populated board and run it through the oven a few times to get the dwells,temp,soaks correct.
a real IR oven is a bunch of heating panels in a row, with each panel run on a sep controller, and a track belt with a speed control. one of my jobs at motorola was to service the smt lines, it was a real cool work environment for a young buck out of school. absolutely everything possible, you had access to, with permission of course 🙂
Another caution, pop-corning, that is when the plastic package takes on too much moisture. this is why you get parts in a sealed bag with desiccant and a humidity indicator. if you leave parts out for extended periods of time in a humid environment and then process them, you take the risk of damage or failure. you are supposed to store in temp/humidity env or pre-bake to drive out moisture. one of the first thing you check at a mfg location for qc. no risk if you hand solder. so there you go, some smt 101 for you today.
Last edited:
That is good but i think has a short time life..
It's a transparent "oily" jelly sort of paste with very narrow dispenser (pin hole) - I keep it without any covers and I'm sure it will work fine for some years. Very good as a flux by the way - clean, efficient, easy to apply...
- Status
- Not open for further replies.
- Home
- Amplifiers
- Solid State
- CF-FET V2.0 front-end - going high-tech (SMD)