Looks great! Amazing what you can do with simple aluminum. The front doesn't look anodized. What did you use to brush it? belt sander? I am wondering how to perfect the brushed aluminum look.
--
Brian
--
Brian
Peter, how much longer until it's running and you can get some sonic impressions? Will you be publishing a little reference guide for others to follow in your footsteps? Looks awsome, how about a polycarbonate lid to prtotect the transport mechanisim?
Anthony
Anthony
The front is brushed, but since I wasn't doing it in a while it didn't come out too well. The paper wasn't abrassive enough and lower grid would be better (less than 80). It should have been done deeper. I was using 3" belt sander and oil. It was also anodised, but for some reason they did very thin layer (probably not hard anodizing).
But for best results, to much the other panels I probably have to sand blast it.
I was having a listening session today at some analog enthusiast house. His analog rig is probably worth $10,000 and he was interested in my CD. After an hour of tweaking we finally achieved proper sound (we finally settled on 2.5" acrylic board, 3 dampers on top and then 2 plates of granite with blown rubber sandwitched in between, then additional 3 dampers). The sound in his opinion was not exactly as his TT, but in a same league.😉
I think that's not too bad. I was using my outboard oversampling DAC.
The CD transport as it is now is too complicated for a kit. I will be making new version with separate PS and 1 pc acrylic platform. No soft suspension. I just realised today that there is a big potential in this mechanism. But half of the success is proper placement.
Attachments
Previously I had some complaints about my CD PRO not reading all the disks properly. It was my fault. I placed series 10ohm resistors in CRCRC raw PS filter. Since the current draw on motors and actuators is changing all the time, I guess those resistors were limiting factor and shouldn't be placed there. I removed them and now I don't have any problem. I can even use my Marigo mat. Iattached the clamp to Marigo with double sided tape and they form now one piece clamp-damper unit.
You Guess: Marigo improves the sound even further.😉
You Guess: Marigo improves the sound even further.😉
Attachments

Excellent, congrat!
Very very nice work Peter,
BTW, have you ever try the Bedini CD Clarifier. It certainly work for me, big improvements on the sound and the "veil has lifted" can truly apply with it.
I have the old version that costed me around $200, and I say it's worth for me. There is a newer model now with double the strength I think.
Chris
I am happy you got the cd to work better.
It happens sometimes, you try to improve something and something else goes wrong.
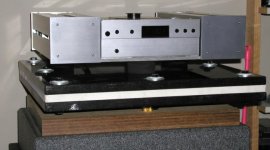
What kind of base do you got there for the cd player?
The layer in the middle looks like aluminium. What are the two black layers?
It happens sometimes, you try to improve something and something else goes wrong.
What kind of base do you got there for the cd player?
The layer in the middle looks like aluminium. What are the two black layers?
Nice work🙂
Just curious, I would have never thought to consider power supply resistors for the fault you had, track skipping from memory? how did you figure that out?
Just curious, I would have never thought to consider power supply resistors for the fault you had, track skipping from memory? how did you figure that out?
promitheus:
It looks like the 2.5" of acrylic.
FANTASTIC work. I wish I had the expertise and tools. I'm having to travel to my parents house to use my Dad's tools...And I'm still having to conjour up novel ways of banding sheet aluminium!
More to the point - I wish I had the budget!!! I set out with a budget of about £120 for my amps - £400 later...
Outstanding Shopping list:
Wood / more aluminium to finish off sides
Fixings
Long threaded rod
A few components
Thankfully the expensive stuff is out of the way!!!
Keep up the great work!
Gaz
promitheus said:I am happy you got the cd to work better.
It happens sometimes, you try to improve something and something else goes wrong.
What kind of base do you got there for the cd player?
The layer in the middle looks like aluminium. What are the two black layers?
The 2 black plates are granite, the white stuff between is material called "blown rubber". It has characteristics of rubber, but half the weight. I found that base made of that sandwich has very little signature of its own and sounds the best so far. Got it from an audiophile friend.
Luke said:Nice work🙂
Just curious, I would have never thought to consider power supply resistors for the fault you had, track skipping from memory? how did you figure that out?
I just measure raw supply voltage while player was running. Since it was changing a lot I thought about series resistors.😉
Initially I didn't use any delay circuit, because all my raw PS were identical. But later I had to remove series resistors from motors and actuators PS and I had to do something about it (9V supply supposed to come on later).
Right after rectifiers I placed a series resistor (I forgot the value but you can experiment😉 ). It makes the caps to charge slowly. When the voltage reaches around 12V a relay is activated and shorts the resistor. The realay is rated at 24V and the final volatge on caps is around 18V. It kinda works like an inrush protection circuit.
Right after rectifiers I placed a series resistor (I forgot the value but you can experiment😉 ). It makes the caps to charge slowly. When the voltage reaches around 12V a relay is activated and shorts the resistor. The realay is rated at 24V and the final volatge on caps is around 18V. It kinda works like an inrush protection circuit.

Hi every one.
I finished my CD-PRO2 in last weekend.
It's using EBU dig data to conncet to my DAC,
and That has CS8412 + SM5842 + PCM1702K.
I think it more mobile than using I2S mode.
It's has a base to hold shock absorber.
How much weigh the Disc clamp when switching the power on to spin up
I finished my CD-PRO2 in last weekend.
It's using EBU dig data to conncet to my DAC,
and That has CS8412 + SM5842 + PCM1702K.
I think it more mobile than using I2S mode.
An externally hosted image should be here but it was not working when we last tested it.
An externally hosted image should be here but it was not working when we last tested it.
An externally hosted image should be here but it was not working when we last tested it.
An externally hosted image should be here but it was not working when we last tested it.
An externally hosted image should be here but it was not working when we last tested it.
It's has a base to hold shock absorber.
An externally hosted image should be here but it was not working when we last tested it.
An externally hosted image should be here but it was not working when we last tested it.
How much weigh the Disc clamp when switching the power on to spin up
It's very easy to build that player if you don't want to get fancy about certain aspects. All that is required are power supplies and connecting the display board. The site run by Mr. Thevissen is very informative and you can't go wrong . 😉
There is a link on his site to a German site which can provide the enclosure and even PS.
There is a link on his site to a German site which can provide the enclosure and even PS.
- Status
- Not open for further replies.
- Home
- Source & Line
- Digital Source
- CD PRO 2 - The making of a high end CD Transport